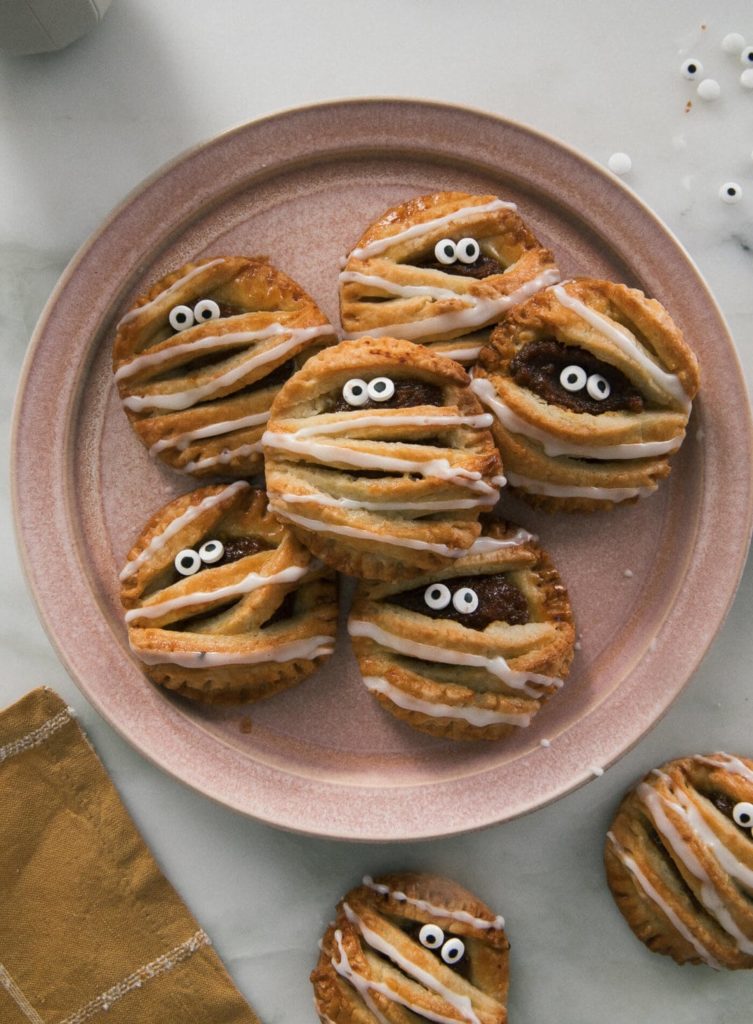
Mexican Corn

Mexican Corn

1/4 C. butter or margarine
1/4 C. finely chopped onion
1/4 C. chopped green pepper
1 pkg. (10 oz.) frozen corn or 1 can whole kernel corn
1/4 C. diced pimiento
1/2 tsp. salt
1/4 tsp. pepper
sweet pepper slices, to garnish

Heat butter or margarine over low heat. Add and cook until onion is transparent. Add green pepper. Add corn. Cook corn covered, over low heat, about 10 minutes, or until tender. During the last few minutes of cooking, mix in diced pimento. Season to taste with salt and pepper. Mix gently. Garnish with sweet red pepper slices. Serves 4.

Lemon Cod with Sorrel Salsa Verde & Minted New Potatoes

Lemon Cod with Sorrel Salsa Verde & Minted New Potatoes

4 x Fillets Cod
Sea salt & black pepper
Zest of 1 lemon
Juice of 1 lemon
Good glug of olive oil

Sorrel Salsa Verde

1/2 Clove of garlic – Crushed and finely chopped
2 Anchovy fillets – Finely chopped
Small handful of sorrel – Finely chopped
Small handful of parsley leaves – Finely chopped
Large handful of basil leaves – Finely chopped
Generous sprinkle of sea salt
Generous sprinkle of black and white pepper
1 Tsp Dijon mustard
1 Small glug of red wine vinegar
Generous glug of good quality extra virgin olive oil

Start by marinating the cod fillets by evenly covering them with lemon juice, zest, seasoning and oil, cover and place in the fridge for as long as you have. Next combine all salsa verde ingredients together, ensuring you’ve chopped it all as finely as possible (you can use a blender but I prefer it to be hand cut). Make sure you try it and adjust seasoning accordingly. Cover and place in the fridge for the flavours to combine and intensify. Bring to the boil a large pan of water and add in a handful (roughly a third) of the mint leaves plus a sprinkle of salt before adding the potatoes and cooking for 7-10 minutes or until the potatoes become soft. Once the potatoes are cooked drain the water and add in the remaining mint leaves plus the seasoning, a large knob of butter and a glug of oil. Slightly mash with the back of the spoon or fork. Cover to keep warm or let cool and reheat when you’re ready to serve. Once you’ve thoroughly washed the spinach add to a pan over a medium heat along with a small amount of seasoning and cover until the leaves wilt. Drain or squeeze out the excess liquid prior to serving. For the cod fillets, place a large frying pan over a medium to high heat and allow to heat up for a minute or so then place the fillets in the pan skin side down (your marinade should be oily enough to ensure the skin doesn’t stick but if not add a small glug of oil to the skin of the fish along with an extra sprinkle of salt then place face down in the pan). Allow to cook here for around 2-3 minutes until the skin crisps. If the fillets are quite thick transfer to a baking dish and allow to cook on 190 degrees Celsius for a further 3-4 minutes until the fish is cooked through. Once cooked allow to rest under foil for 2-5 minutes before serving.
Plate up by starting with the spinach in the centre of the plate followed by the crushed minted new potatoes on top. Place the fillet of cod on the potatoes and finish by adding a generous dollop (or two) of salsa verde.

Shrimp & Pepper Noodle Bowl

Shrimp & Pepper Noodle Bowl

2 pkg shrimp flavored ramen noodles
8 oz. pkg. cooked medium shrimp
1 C. bell pepper strips
1/4 C. chopped green onions
1 tsp. soy sauce
2 tsp. chopped fresh cilantro
1/2 tsp. tabasco sauce

Bring 4 C. of water to a boil in large saucepan over high heat. Reserve seasoning packets from noodles. Set aside. Break up noodles. Add to water. Add shrimp and bell pepper; cook for 3 minutes. Add seasoning packets, green onions, soy sauce and tabasco sauce; cook 1 minute. Garnish with cilantro. Makes 4 servings.

Sheet Pan Suppers: Honey-Orange Shrimp with Baby Bok Choy

Sheet Pan Suppers: Honey-Orange Shrimp with Baby Bok Choy

Honey-Orange Shrimp With Baby Bok Choy1 ½ pounds 26/30 count raw shrimp, peeled and deveined, tails removed
1 tsp. grated orange zest
¼ cup plus 3 T. freshly squeezed orange juice
¼ cup extra-virgin olive oil
2 T. hot sauce
1 T. Dijon mustard
2 cloves garlic, minced
Cooking spray
2 T. unsalted butter, melted
2 T. honey
1 T. soy sauce
Pinch of crushed red pepper flakes
1 pound baby bok choy, sliced lengthwise into quarters

Place the shrimp, orange zest, ¼ cup orange juice, olive oil, hot sauce, Dijon mustard and garlic in a medium-size bowl or gallon-size zip-top bag, and toss to combine. (Seal the bag and shake gently.) Cover the bowl and marinate the shrimp in the fridge for 20 to 30 minutes. Meanwhile, preheat the oven to 400 degrees with a rack in the center position. Mist a sheet pan with a lip with cooking spray. Whisk together the butter, honey, soy sauce, red pepper flakes and remaining 3 T. orange juice in a small bowl. Place the bok choy on the sheet pan, drizzle with the dressing, and toss to coat. Spread out the bok choy in a single layer. Roast the bok choy, rotating the pan halfway through, until it starts to brown and the sauce has thickened, about 25 minutes. Add the shrimp and its marinade to the pan in a single layer over the bok choy, and roast until the shrimp are bright pink and just cooked through, an additional 8 to 10 minutes. Serve hot.

Jicama Sticks

Jicama Sticks

1 red or sweet onion, finely chopped
1 C. cold water
¾ tsp. salt
¼ C. extra-virgin olive oil
2½ tsp. fresh lime juice
1 tsp. sugar
¼ tsp. freshly ground pepper
1½ lbs. jicama, peeled, cut into matchsticks
1/3 C. finely chopped cilantro or parsley

Steps: Soak onion in water with ½ tsp. of the salt, 15 minutes. Drain. Rinse under cold water. Pat dry. Whisk together oil, lime juice, sugar, remaining ¼ tsp. of the salt and pepper in a large bowl until sugar dissolves. Add onion, jicama and cilantro. Toss well. Nutrition information per serving: 97 calories, 62 percent of calories from fat, 7g fat, 1 g saturated fat, 0 mg cholesterol, 9 g carbohydrates, 1 g protein, 222 mg sodium, 4 g fiber

Chicken & Egg Breakfast

Chicken & Egg Breakfast

Chicken Pancakes

Pancake Mix (or favorite homemade recipe)
1 Strawberry
1 Hard Boiled Egg
1 Piece of Turkey Bacon
1 Orange Slice
Granola
1 Chocolate Chip

Start out by pouring your pancake mix in a pan on low heat making a large pancake. Cut around the edges in the shape of a chicken. Cut out the tail & wing from the scraps using kitchen scissors. We cut slices from 1 strawberry for the top. We used an orange slice from the beak. We cut a piece of turkey bacon for the feet and waddle & a chocolate chip for the eye. We place granola at the bottom & then placed the hard boiled egg on top.

Ultimate Party Crab Bites

Ultimate Party Crab Bites

2 C. breadcrumbs (plus another cup for coating finished balls)
16oz crabmeat
8oz Monterey jack cheese, shredded
8oz cream cheese, at room temperature
3 large eggs
½ C. mayonnaise
1 medium onion, finely diced
1 red bell pepper, finely diced
¼ C. parsley, chopped
2 jalapeno peppers, finely diced
1 T. Old Bay seasoning
1½ tsp. salt
A few cranks of fresh ground black pepper
Vegetable oil for frying

In a large mixing bowl, combine all ingredients (except 1 C. of reserved breadcrumbs). Scoop and form into bite sized balls. Roll balls in breadcrumbs. Place on a large platter and chill for a half of an hour. Heat 1″ of oil in a large frying pan until a deep fry thermometer registers at 350º. Fry the crab bites until golden brown. Drain on paper towels and place on a cookie sheet in a 200º oven to keep them warm while you fry the rest of them up. Serve with cocktail sauce, tartar sauce and lemon wedges. (Remoulade?)

Roast Chicken with Prosecco Herb Sauce

Roast Chicken with Prosecco Herb Sauce

2 lb. chicken thighs and drumsticks
3 T. butter
2 T. olive oil
salt and pepper to taste
½ C. flour
â…“ C. shallots, diced
1.5 C. Prosecco (or any champagne)
1.5 C. chicken stock
1 T. fresh oregano, chopped (see notes)
1 tsp Herbs de Provence
½ C. heavy cream
salt and pepper to taste

Preheat oven to 350º. In a Dutch oven, heat butter and oil over medium heat. Season chicken with salt and pepper. Lightly dredge in flour. Place in skillet and let the chicken cook for ten minutes undisturbed. This is what creates that wonderful crispy skin. After ten minutes, turn the pieces and cook an additional ten minutes. Remove chicken and place on a plate. Set aside. Add shallots to the pan. Sauté until translucent, 4-5 minutes. Add Prosecco, stock and herbs. Using a wooden spoon, loosen the crusty browned chicken bits from the bottom of the pan. This is the good stuff and it will add so much flavor to the final dish. Simmer for ten minutes. Add chicken pieces back to pan, cover and place in the oven for thirty minutes. At that point, remove chicken from pan and pour in the cream. Season with salt and pepper to taste. Give it a good stir and add chicken pieces back in. Serve immediately. Notes: Herbs de Provence already has oregano in the mix, but the addition of fresh adds a different flavor. You could skip fresh oregano and replace with fresh parsley, but I do like the way the fresh oregano plays with the Prosecco in this dish.

Old Fashioned Raspberry Preserves

Old Fashioned Raspberry Preserves

4 C. smashed, fresh raspberries , use a potato masher to smash the raspberries
4 C. sugar
¼ C. fresh lemon juice

Place berries in a large stainless steel or enamel saucepan. Bring to a full boil over high heat, stirring continuously. Boil hard for 1 minute, continuing to stir. Add sugar, return to a boil, and boil until mixture reaches 220ËšF on a candy or instant thermometer. Ladle into clean jars for storage in the freezer or into sterilized jars if processing with a water bath. If water-bath processed, this jam can be stored at room temperature.

Limoncello Soaked Pound Cake

Limoncello Soaked Pound Cake

3 C. flour
1 tsp. baking soda
1 tsp. salt
2 sticks butter, softened
¾ C. granulated sugar
½ C. brown sugar
3 eggs
½ C. milk plus 2 T.
the zest and juice of 1 lemon
Limoncello for soaking (anywhere from ½ C. to 1 C. depending on how strong you like it)

Preheat oven to 350º. Grease loaf pan. (see notes). In a large mixing bowl, combine flour, baking soda and salt. Set aside. In a stand mixer (or hand mixer) beat butter and sugars until light and fluffy. Add eggs one at a time, mixing just until incorporated. Add milk and mix for another two minutes over medium speed. Add flour mixture by the heaping spoonful just until incorporated. Add lemon juice and zest and mix on medium speed for two more minutes. Pour batter into greased loaf pan and bake in a 350º oven until a toothpick inserted comes out clean. (about an hour) Let cake cool for ten minutes. Poke holes all over the top of the cake. (I used a fork) Using a spoon, ladle the Limoncello over the top of the cake slowly. Allow each spoonful to be absorbed before adding another. Wrap cake with cellophane and chill for at least two to three hours. It’s even better if you wait until the next day to serve. Notes: I used an odd sized 12″x5″ pan, but you can use a standard loaf pan for this recipe.

Dandelion Greens Salad with Roasted Nectarines and Warm Red Onion Vinaigrette

Dandelion Greens Salad with Roasted Nectarines and Warm Red Onion Vinaigrette

Dandelions arrive in my yard during the summer months, a little later than they appear in areas with milder climates. Their fringed yellow heads speak of warmth and sunshine and remind me that soon other wildflowers will appear, and the bees will surely follow. Though dandelions attract pollinators like bees, we dig them up to make more room for native wildflowers. I reserve the tender greens for salads while saving the soft yellow blossoms for sweet fritters.

When foraging for wild dandelion greens, take care to source them from areas you know’ to be free from pesticides, such as your own yard, and avoid dandelions growing near waterways, in public parks, or near the roadside, as they may contain chemical residue.

4 medium nectarines, pitted and quartered
1 tsp. extra-virgin olive oil
8 oz. bacon, chopped
1 small red onion, minced
1 tsp. brown mustard seeds
1/4 C. red wine vinegar
6 C. loosely packed dandelion greens, rinsed well and trimmed of tough stems

Preheat the oven to 400°F. Arrange the nectarines in an 8-inch square baking dish and roast them for 15 to 20 minutes, turning once, until they release their juice and begin to caramelize around the edges. Remove them from the oven and let them cool while you prepare the rest of the salad. Line a plate with a paper towel or clean kitchen towel. Warm the olive oil in a skillet over medium heat, drop in the bacon, and fry until it crisps and renders its fat, 6 to 8 minutes. Remove the bacon from the pan with a slotted spoon and let it drain on the lined plate. Stir the onion into the bacon fat and fry it over medium heat for 3 minutes, or until soft and translucent. Stir in the mustard seeds and sauté for 1 minute. Remove the skillet from the heat and whisk in the vinegar to make the vinaigrette. Arrange the dandelion greens on a serving plate and place the nectarines on top. Top with the crisped bacon and dress with the warm vinaigrette. Serve immediately.

Pickled Garlic Scapes

Pickled Garlic Scapes

Are you familiar with garlic scapes? They’re the curly, wonky shoots that pop up from garlic plants in late spring and early summer. They range in thickness from hefty-chive to green-onion size and they smell and taste like mild garlic. If you’re a fan of garlic (and I assume you are if you spend much time here on Foodie with Family), then you are quite likely to be a fan of garlic scapes.

Garlic scapes are versatile; they taste amazing chopped up fresh and added to salads, in pesto, sautéed with bacon, on top of pizzas, and more. PICKLED garlic scapes take that fabulousness to an even higher plane. They add a little tang of vinegar and a hint of spice to the party. I’ve been known to fish a cold, pickled garlic scape out of the jar and munch it plain. Granted, this is a pretty bad idea if you’re going to go out to a party where you’re going to be cheek-to-jowl with a lot of people, but if you’re staying home and your sweetheart eats one, too, you’re golden. This may or may not be one of the reasons I’m a homebody.

Leaving all that aside, garlic scapes are really only available at one time of year. NOW. If you want to preserve the deliciousness that is the garlic scape in all it’s glory, there’s only one way to do it. You have to pickle it. Just imagine cracking open a jar of pickled garlic scapes in January and putting it on a pizza or chopping it up and adding it to potato salad or a pasta dish. Shoot, you can even make pickled garlic scape pesto. Can you picture anything more heart-lifting than a bowl of garlic scape pesto while the snow swirls ouside your window? Or a hearty breakfast of frittata or scrambled eggs studded with pickled garlic scapes on a cool fall morning?

To Make about 2 Pints of Pickled Garlic Scapes:
2 bunches garlic scapes (washed and trimmed of any withered or brown areas)
1 ½ C. apple cider vinegar
1 ½ C. water
2 T. kosher salt
2 T. raw sugar (can substitute granulated white sugar if necessary)

Additional ingredients PER PINT:
½ tsp. black peppercorns
½ tsp. mustard seed (not ground mustard)
¼ tsp. crushed red pepper flakes (can omit if you’re sensitive to heat)
¼ tsp. coriander seeds (not ground coriander)
Coil each garlic scape and insert into a sterilized mason or ball jar. When you have filled the jar to within ¼ –inch of the top of the jar, coil or break any extra scapes and stuff them down into the center of the jar. When the jars are full of scapes, add the spices to each pint jar. Set aside.
Bring the apple cider vinegar, water, salt, and sugar to a boil, stirring until the salt and sugar are dissolved. Carefully pour the boiling brine over the garlic scapes. The garlic scapes will probably pop up and look like they are trying to get out of the jar. Use a sterile chopstick or butterknife to push it back into the jar. Wipe the rims of the jars, then fix the lid tightly into place. Let the jars come to room temperature before storing in the refrigerator for 6 weeks before opening and tasting. Be patient. It’s worth it! The pickled garlic scapes will store well for up to 8 months when stored tightly covered in the refrigerator. If at any point the scapes stick above the brine and develop mold, remove the entire scape that has mold. The rest should still be alright.

Chewy Chocolate Chip Granola Bars

Chewy Chocolate Chip Granola Bars

6 T. unsalted butter
1/3 C. dark brown sugar
1/4 C. plus 2 T. honey
1-1/2 tsp. vanilla extract
Heaping 1/8 tsp. salt
2 C. quick-cooking/instant oats, such as Quaker Quick 1-Minute Oats (do not use regular old-fashioned oats)
1-3/4 C. crispy rice cereal, such as Rice Krispies
1/2 C. sliced almonds
1/4 C. flax meal or wheat germ
1/3 C. mini chocolate chips (or to taste)

Line a 9 x 13-inch baking pan with aluminum foil. Spray the foil lightly with nonstick cooking spray. In a large pot, combine the butter, brown sugar and honey. Bring the mixture to a boil over medium-high heat, stirring constantly. Lower the heat and simmer until the sugar dissolves and the mixture is slightly thickened, about 2 minutes. Remove the pan from the heat and stir in the vanilla and salt. Add the oats, rice cereal, almonds and flax meal (or wheat germ) to the pan and fold with a rubber spatula until well combined. Transfer the mixture to the prepared pan and press down lightly with a rubber spatula to even out. Sprinkle the miniature chocolate chips over top, adding more or less to suit your taste, and press down firmly with the spatula so the chips stick. The mixture should be tightly compacted in the pan. Place the pan in the refrigerator for 1-1/2 – 2 hours to cool. Use the foil overhang to transfer the uncut bars to a cutting board. Using a sharp knife, cut into rectangles. Store the bars in an airtight container in the refrigerator. If you have to stack them, be sure to use parchment paper or foil in between the layers, otherwise they’ll stick together and fall apart. Note: If you are substituting dried fruit for the chocolate chips, mix it in along with the other ingredients as opposed to sprinkling over top.

Butternut Squash Chips with Cranberry Toppings

Butternut Squash Chips with Cranberry Toppings

1 ½ lb (1 medium) butternut squash
2/3 T. oil – walnut oil would be nice
2 tsp. finely chopped fresh sage leaves (6–7 leaves)
½ tsp. ground black pepper
½ tsp. finely chopped fresh rosemary
½ tsp. kosher salt
¼ tsp. ground white pepper
2 T. finely chopped dried cranberries
1 T. honey
½ tsp. freshly squeezed lemon juice
Coarse salt, such as Celtic or Maldon sea salt
Fresh rosemary for garnish

Preheat your oven to 350°F, with the racks positioned in the upper and lower thirds. Line two baking sheets with parchment paper or silicone baking mats and spray or lightly brush them with some of the oil. To prepare the squash, remove about ½ inch from the top and bottom. Divide it into two sections where the neck meets the seed bulb, then remove the skin with a sturdy vegetable peeler or a paring knife. If you plan to use the seed bulb, scoop out the seeds. Cut each section into even, â…› inch slices, about as thick as two stacked quarters. A Mandoline or food processer would be helpful here. If the flesh around the seed bulb is less than ½ inch thick, save it for another use. In a wide pot or deep skillet, bring about 2 quarts of water to a boil. Place a bowl of ice water near your cooktop. Cook the squash in 2 batches, boiling each for 1½ to 2 minutes. Don’t overcook them or they’ll break apart. Carefully scoop the slices into the ice water. Lay the slices on a kitchen towel and pat them completely dry.
In a mixing bowl combine the sage, black pepper, rosemary, salt, and white pepper. Pour the oil into another bowl for brushing. Combine the cranberries, honey, and lemon juice and set the mixture aside. Arrange the slices in a single layer on the prepared baking sheets so that they’re close but not touching. Brush them generously with the oil, flip and brush the other side, and then sprinkle them with some of the herb mixture. Bake the slices for 15 minutes, flip them and sprinkle them with more of the seasoning, then rotate the baking pans and return them to the oven on opposite racks. Continue cooking the chips until they’re a deep amber-brown and crisp—10 to 15 minutes longer, depending on thickness. Check the chips frequentl – they can burn quickly – and remove the ones that finish early. Note: The chips will get crisper as they cool. To serve, spread the chips on a platter and drizzle them with the cranberry topping, coarse salt, and fresh rosemary.

You can use other winter squash for this recipe – kabocha, delicata, acorn – but I think the butternut squash was custom-designed for chip-making. Its neck section yields perfect rounds, and its sturdy, dense flesh makes it easy to handle. Look for a squash that has a long, straight neck and a small seed bulb on its end.

Fry. Butternut squash chips fry up nicely in a couple of minutes in hot oil! Par-boil and dry the slices as described above, then follow a basic frying technique

Graham Cracker Swirls

Graham Cracker Swirls

1 C. whole wheat flour
1 1/2 C. all purpose flour
1/2 C. dark brown sugar, packed
1/2 tsp. salt
1 tsp. cinnamon
1 tsp. baking soda
1/2 C. butter, chilled & cubed
1/4 C. honey
1/4 C. water
1/2 C. Nutella, peanut butter or preserves

Preheat oven to 350 F. Place the flours, sugar, salt, cinnamon and baking soda in the bowl of your KitchenAid® Stand Mixer fitted with the paddle attachment and mix to combine. Add the cubed and chilled butter and mix until it resembles coarse meal, about 2 minutes. Add the honey and water and continue to mix until it combines and forms a dough. Divide the dough into 2 equal pieces and roll each piece into a 9 x 13 inch rectangle until 1/4 inch thick. If the dough is soft it can be refrigerated 30-60 minutes. Spread 1/4 C. of the Nutella or other filling in a thin layer over each sheet of dough. Starting at the 13 inch side, use your fingertips to roll the dough tightly into a spiral like a cinnamon roll, and pinch the seams to seal. Slice the dough into 1/2 inch pieces, place on a silpat or parchment lined cookie sheet, and bake for 12-15 minutes, or until golden brown and set. Tip: Cookies can be frozen before or after baking. Place cookies on a baking sheet in the freezer for about 30 minutes, until frozen solid, then transfer to a zip top bag or other freezer-safe container and freeze for up to 4 months.

Classic Peach Jam with Apple Pectin

Classic Peach Jam with Apple Pectin

12 oz. Granny Smith apples (about 2 large)
4 pounds peaches, peeled, pitted and diced (about 6 C.)
2 C. granulated sugar
3 T. strained fresh lemon juice

Sterilize jars by boiling for 10 minutes in a large canning pot; leave them in the pot to stay hot. Put a small plate in the freezer. Put the flat lids in a heat-proof bowl. Quarter and core the apples, reserving the cores and seeds. Tie cores and seeds in a cheesecloth bag and set aside. Put the peaches and sugar in a wide, 6- to 8-quart preserving pan or other wide shallow pan. Bring to a simmer over medium-high heat, stirring frequently, and continue to cook until the juices just cover the peaches, about five minutes. Pour into a colander set over a large bowl. Stir peaches gently to drain off juice. Return juice to pan, along with the apples and the cheesecloth bag. Bring to a boil over high heat and cook, stirring occasionally, until syrup is thick and reduced, about 15 minutes.

Return peaches and any accumulated juices to pan, along with the lemon juice. Bring back to a simmer and cook, stirring frequently, about 15 minutes, until peaches are very tender and a small dab of jam spooned onto the chilled plate and returned to the freezer for a minute becomes somewhat firm. (It will not gel.) Remove from heat. Remove apples and trimmings, and stir gently to distribute fruit in the liquid. Ladle hot water from the canning pot into the bowl with lids, and remove jars from hot water bath.

Ladle hot jam into the jars, leaving 1/4 inch head space at the top. Wipe jar rims with wet paper towel, if necessary. Put a flat lid and ring on each jar, and tighten until snug. Return the jars to the canning pot, making sure water covers jars by at least 1 inch. Bring to a rolling boil and boil for five minutes. Remove jars from the pot and let sit untouched for 12 hours. (After one hour, check to see if the jars have sealed. If the center of the lid can be pushed down, it hasn’t sealed. Immediately move any unsealed jars to the refrigerator. They should keep for a couple of weeks.) When you’re all done, label your pretty little jars and store them in a cool, dark place.

Stir-Fried Shrimp with Rice Noodles

Stir-Fried Shrimp with Rice Noodles

1/2 package brown rice noodle (about 7 oz)
2 T. low sodium soy sauce or braggs amino acids
1 T. honey
1 T. cornstarch
1 T. cold water
1 T. canola or vegetable oil
1 garlic clove, minced
1 tsp. ginger, minced
1 C. fresh snow peas, chopped
1 pound large raw shrimp, peeled and deveined (i used frozen shrimp that I defrosted)
1 C. carrots, grated
1 14-15 oz. can baby corn, cut into 1-inch pieces
1 T. toasted sesame seeds, optional

Take 1/2 package of rice noodles, break in half, and cook according to package directions. In a small bowl stir together the soy sauce, honey, cornstarch, cold water and set aside. Heat a wok or a large sauté pan over medium/high heat with oil and add the garlic, ginger, snow peas and shrimp, and sauté for 2 minutes stirring continuously. Add the carrots and baby corn and cook for another minute stirring continuously or until the shrimp are cooked through and pink. Create a well in the center of the wok or pan and pour in the soy sauce mixture and heat for 20 seconds or until sauce starts to thicken. Add the drained rice noodles to the pan, stir-fry for another minute or until noodles, shrimp and vegetables are coated with the sauce and heated through. Serve.

Baked Butternut Squash Chips

Baked Butternut Squash Chips

1 small and skinny butternut squash
2 sprigs fresh rosemary, chopped (or another herb if you prefer)
kosher salt
pepper
extra virgin olive oil

Preheat oven to 375 degrees and line two baking sheets with parchment paper. Bring a large pot of water to a boil. Peel squash and slice in half lengthwise. Scoop out any seeds in the base of the squash.Using a very sharp knife (or a mandolin if you have it) thinly slice the squash. The thinner, the better. Mine were probably about 1/8 of an inch thick. Once sliced, boil (in batches) for 1-2 minutes. Remove from water and lay flat in a single layer on a paper towel to dry. Pat completely dry and then transfer to baking sheet, making sure the slices don’t overlap at all. Brush with olive oil to coat and sprinkle generously with salt and pepper. Sprinkle chopped rosemary on top and bake for 20 minutes, checking frequently after 10 minutes to make sure they don’t burn. If your slices are thinner than 1/8 of an inch, they won’t need to bake as long. Remove from oven once they start to brown and crisp up and immediately sprinkle with more salt.

Roast Chicken with Caramelized Lemons, Cherry Tomatoes and Olives

Roast Chicken with Caramelized Lemons, Cherry Tomatoes and Olives

1 T. vegetable or canola oil
4 chicken breasts, bone in and skin on
1 tsp. kosher salt
1 lemon cut in half
1/2 C. pitted black olives
1/2 C. cherry tomatoes
handful of thyme (about 8-10 stems)

Preheat oven to 450°F. Heat the oil in an oven-proof skillet over medium-high heat. Pat the chicken breasts dry, make sure they are very dry, and sprinkle the top with the salt. Place the chicken breasts, skin side down, in the heated oil and sear for 5 minutes, or until skin is crisp and golden brown. Flip the chicken over. Add the lemon, olives, tomatoes and thyme to the skillet and transfer to the oven. Roast for 25 minutes, or until chicken is cooked through. The chicken breasts I used were 3/4 pound each.

Blueberry Preserves (No Pectin)

Blueberry Preserves (No Pectin)

10 C. fresh blueberries
6 C. granulated sugar
¼ tsp. salt
2 T. lemon zest
â…“ C. fresh lemon juice

This is a canned preserve, so it’s important to make sure your jars and lids are sterilized. If you plan to freeze yours, then you can skip over this first part. To begin, fill a large stockpot half full of water [you are going to want the water to be over the tops of your jars by a couple inches, so make sure you have enough water in there for that] and set over a medium burner. Make sure the rack is in the bottom. Carefully put in the jars and lids. Once this comes up to a boil, cover and turn off heat. You are going to turn it back on high for about the last 10 minutes of the preserve cooking time, to sterilize the jars and have the water hot enough to can the final product. Wash blueberries and pick over, removing any debris and spoiled berries. Place about half of the berries in a 5 to 8 quart heavy pot. Crush well with a potato masher. Stir in the other half of the berries, the sugar, salt and lemon zest. Place the pot over a medium flame, and cover with a lid. Stir every few minutes. Once the mixture comes up to a simmer or low boil, remove the lid, and continue to stir every 5 minutes, or more often if they start to stick at all. Place a small plate in the freezer – this will be to test the doneness of the preserves. Cook about 25 minutes, and test a small amount on the cold plate you put in the freezer. After sitting on the plate for a minute or so, the preserves should look pretty thick, and should not run very freely if you tip the plate. If the mixture is still too thin, keep cooking, and check again about every 5 minutes, returning the plate to the freezer after each check. How long it takes is going to depend largely on the moisture content of the berries you are using. This batch took about 40 minutes total. At the 30 minute mark, return your large pot of water and jars to a boil. When the preserves are thick enough, stir in the lemon juice and cook an additional 5 minutes. Carefully remove the jars from the boiling water in the large pot, and set upright on a towel on your work surface. Keep the heat on under the pot. Ladle the preserves into the jars – the big funnel in the canning tools set helps keep the edges of the jars clean. Jams don’t need very much headspace above the surface of the jam itself – about ¼ inch between the top of the jam and the rim of the jar is enough room. Any more than that leaves too much chance for bacteria to grow, so fill them right up to that level. Wipe the edges of the jars clean with a damp cloth, and put on the lids and rings. Don’t screw the rings down super tight – just until they resist a bit is fine. If you have less than enough to fill the final jar, just put that one in the fridge to eat up first. Carefully place the covered jars back in the large pot of water – there are jar tongs in the set of tools, or use regular tongs to gently set the jars upright on the bottom. Once the water is back up to a full boil, set the timer for 10 minutes. When the time is up, carefully remove the jars to a wooden cutting board, or a dry towel on the counter – don’t use same towel as before since it might be damp and cooler and could break the hot jars. You will probably start to hear the centers of the lids popping down pretty quickly. Cool completely and check to make sure all of the centers of the lids have popped down. Refrigerate any jars with a dome still on the lid, and eat up first. When the jars are fully cool, you can remove the rings if you like, though I leave them on. Store in a fairly cool spot, and when opening the jars, inspect the contents, discarding any jars with mold or questionable appearance. Preserves will keep very well for up a year, or even longer, though the quality may suffer somewhat after a year.

Carrot Snack Sticks

Carrot Snack Sticks

1 C. all purpose flour
2 T. parmesan cheese, grated
1/2 tsp. baking powder
1/2 tsp. salt
1/2 C. carrot, finely shredded and thin
2 T. canola or vegetable oil

Preheat oven to 400 degrees. Combine the first four ingredients and stir to combine. Using your hands, add the carrots to the flour mixture coating the carrot pieces with flour. Add the oil and work with your hands to bring the dough together. (You really have to be patient with working this dough together so that the flour absorbs the oil. If you are concerned that it is not coming together, just add 1 extra tsp of oil to the dough and work it with your hands forming a ball until it comes together.) Form the carrot parmesan dough into a flat rectangular disk and allow to rest for 1-2 minutes then roll out 1/2 inch thick on parchment paper or a dry clean surface. Using a knife, cut the dough into sticks, 2 inches long by 1/4 inch wide. Bake on a Silpat or parchment lined cookie sheet for 15-17 minutes. Cool and serve.

Edit:  I have to say that mine appeared to come out exactly like the picture and such, but although the original recipe had rave reviews from kids.  We didn’t like them much.  VERY bland, and quite dry.  I had no trouble with them holding together, I microplaned the carrot.

Dilly Beans with Garlic and Hot Chiles

Dilly Beans with Garlic and Hot Chiles

4 C. apple cider vinegar
4 C. water
3T.kosher salt
5 fresh dill sprigs
5 cloves garlic, left whole
5 dried hot red chiles
2 1/2 tsp. crushed red pepper flakes
2 pounds fresh green beans, trimmed to fit in pint jars

Prepare a water bath canner along with five pint jars, lids, and rings. In a medium nonreactive saucepan, combine the vinegar, water, and salt and bring to a boil. Place one dill sprig, one garlic clove, one chile, and 1/2 tsp. pepper flakes into each pint jar. Pack the beans into each jar. Ladle the vinegar mixture into the jars leaving 1/2 inch headspace. Remove the air bubbles from the jars and adjust the headspace accordingly. Wipe the rims of the jars and top with sterilized lids and rings. Process the jars in a boiling water bath for 10 minutes. Remove to a towel to rest for 24 hours before checking seals, labeling, and storing. Allow the pickles to cure at least one week before opening.

Breakfast Chex Mix

Breakfast Chex Mix

2 C. wheat chex
2 C. rice chex
2 C. bran chex
2 C. o’s cereal
1 C. slivered almonds
5 T. butter
1/3 C. honey
2 C. dried bananas, blueberries, cherries, raisins

Preheat oven to 300 degrees. Place all the cereals and nuts in a large bowl. Toss to combine. Place the butter in a 13 x 9 inch pan and melt in the oven. Once the butter has melted, add the honey to the butter and whisk together. Pour the cereals into the butter/honey mixture and stir to combine. Bake uncovered for 30 minutes. Remove from the oven and let cool. Add the dried fruit to the cereal mixture and toss to combine. Serve

Raspberry Preserves (No Pectin)

Raspberry Preserves (No Pectin)

2 & ½ lbs of fresh raspberries
3 & ¾ C. granulated sugar
¼ tsp. kosher salt
juice of 1 lemon

You can freeze these preserves, and they will keep in the fridge for quite awhile, but if you plan to can them, get your canner ready, as well as your jars and lids. This will make around 5 or 6 half pint jars of preserves, so submerge the washed, empty jars in the canner, and boil them for at least 10 minutes. It’s a good idea to have the lids and rings in another smaller pan of boiling water, so that they don’t get knocked around by the jars. [I will put some links after the recipe, so you can find canning supplies. Pick over the berries, and pick out any squishy, overripe berries. Wash the berries and allow to drain for a few minutes. Place all the berries, the sugar and salt in a large, heavy bottomed pot. I have an old Revere Ware stockpot that holds 5 quarts that is perfect for a batch this size. You want to allow enough room for the mixture to boil – it will foam up a bit. Mash the berries somewhat with a potato masher or large spoon, and turn on the heat. Stir as the mixture begins to come up to a boil, to help the sugar get all mixed in and dissolved. Once it is at a hard boil – which means the boil can’t be “stirred down”, back off the heat just a very little bit. You can, if you like, remove some of the seeds at this point. I put about 4 C. the mixture into a wire strainer, over a bowl, and use a ladle or big spoon to push the preserves through, while keeping the seeds in the strainer. Keep at it until you have as much of the preserves through the strainer as is possible. Discard the seeds. Put a small plate in the freezer, for testing the preserves. You need to stir the boiling mixture often, to keep it from sticking and scorching which can ruin the whole batch. [if it does stick and burn, don’t stir or scrape the burned part from the bottom – pour the preserve mixture into another pan, and just leave the burned part in the first pan – you can then cook it down the rest of the way, and then taste it to if it’s okay.] The closer it is to being done, the more you need to stir, because you are boiling away the moisture in the mixture, and it will get thicker and more liable to stick as that process goes on. After about 20 minutes, you can check with an instant read thermometer – you are looking for a temperature of around 210º to 215º . It usually takes around 25 to 30 minutes at a full boil. If your thermometer reads 210º, try the plate test: take the plate out of the freezer and test a dab of the jam – if it sets up, and seems like a good consistency then it’s done. Stir in the lemon juice, and cook another 2 minutes. One at a time, fill the jars by removing each one from the pot of boiling water, fill carefully, leaving ½ inch of headspace. Wipe the jar rim clean with a clean towel that has been dipped in the boiling water in the canner – be careful not to burn your fingers. Place the jar lid and ring on the jar, turning the ring to snug the lid down. Don’t over tighten. Place the filled jars back into the canner, and cover it. The jars should be covered by an inch of water. Bring back up to a full rolling boils, and process for 10 minutes. Turn off the heat, and leave the jars in the covered canner for 5 minutes – no more or water may suction into the jars as they cool. Remove jars and allow to sit undisturbed for 24 hours. Store at normal room temperature for up to one year – refrigerate after opening.

Early Tastes, Baby Food

Early Tastes, Baby Food

Avocado & Cherimoya Mousse (Baby Food)

1 avocado
1 cherimoya

Wash both fruits. Halve the avocado, remove the pit and scoop the light green flesh into a food processor. Halve the cherimoya and remove the big black seeds. Scoop white flesh into a food processor. Puree until smooth and serve.


Celery Root & Potato Puree (Baby Food)

1 potato, peeled and cubed
1 medium celery root, peeled and cubed
1/4 C. whole milk (if over 10-12 months), breast milk or water

Place ingredients in a steamer pot over boiling water. Steam for 8-10 minutes or until fork tender, reserving water in pot. Place celery root and potato in a food processor. Puree for 30 seconds. Add the milk and continue to puree. If it’s still too thick, add water from the pot. Puree until smooth. Cool and serve.

Japanese Sticky Chicken

Japanese Sticky Chicken

1 T. minced fresh ginger
1/4 C. mirin
1/4 C. honey
1/4 C. low sodium soy sauce
1 T. rice vinegar
1 T. sesame oil
1 tsp. togarashi spice blend, optional
2 bone-in, skin-on chicken breasts
4 bone-in, skin-on chicken legs
3 scallions, chopped

In a large zipper bag or in 13 x 9 baking dish, whisk the first 7 ingredients. Add the chicken to the sauce, turning the pieces so they are completely coated. Marinate 1 hour in the refrigerator or up to overnight. Preheat the oven to 450F. Bake Chicken, skin side up, for 30 minutes or until golden brown. Serve sprinkled with scallions.

Peach and Lemon Thyme Freezer Jam

Peach and Lemon Thyme Freezer Jam

4 C. peeled, chopped, and/or mashed peaches
1/4 C. lemon juice
1/2 C. honey
1 T. lemon thyme leaves, minced
4 1/2 T. pectin powder plus 3 T. calcium water (from a Pomona low-sugar pectin box)

To easily peel peaches: Bring a large pot of water to a boil. Slice an “X” just through the skin on the bottom of each peach. Using a slotted spoon, lower the peaches into the water. Boil for 1-2 minutes, remove with the slotted spoon, and immediately plunge into a bowl of ice water. The peels should slip off easily. Add the calcium water to a medium saucepan. Pour honey into a separate bowl. Mix the pectin powder into the honey. Add the peaches, lemon juice, and thyme to the calcium water. Bring to a boil, stirring occasionally. Add pectin-honey mixture and stir vigorously for 1-2 minutes. Return to a boil and remove from heat. Fill jars or containers to 1/4 inch from top. Allow to cool to room temperature. Place jars in freezer without lids and freeze overnight or until firm. Place lids on jars. To use, thaw jam in refrigerator overnight. Should be used within 2 weeks once opened.

Glazed All-Beef Meat Loaf

Glazed All-Beef Meat Loaf

3 oz. Monterey Jack cheese , grated on small holes of box grater (about 1 C.)
1 T. butter
1 medium onion (about 1 C.)
1 medium rib celery mined (About 1/2 C.)
1 medium clove garlic, minced or pressed
2 tsp. fresh thyme
1 tsp. paprika
1/4 C. tomato juice
1/2 C. chicken broth
2 large eggs
1/2 tsp. unflavored gelatin
1 T. soy sauce
1 tsp. Dijon mustard
2 T. minced parsley leaves
3/4 tsp. table salt
1/2 tsp. black pepper
1 Lb. ground sirloin
1 Lb. ground beef chuck (Or use 85% Ground beef.)
21 saltines, crushed
Glaze

1/2 C. ketchup
1 tsp. Tabasco
1/2 tsp. ground coriander
1/4 C. cider vinegar
3 T. packed light brown sugar

Adjust oven rack to middle position; heat oven to 375 degrees. Spread cheese on plate and place in freezer until ready to use. Prepare baking pan by folding a piece of aluminum foil into a 10″ X 6″ rectangle. Place it on a cooling rack placed inside a baking pan with sides. Using a skewer, poke holes in the aluminum foil every 1/2 inch. Spray the foil with non-stick vegetable spray before putting the meat loaf on it. Heat butter in 10-inch skillet over medium-high heat until foaming; add onion and celery and cook, stirring occasionally, until beginning to brown, 6 to 8 minutes. Add garlic, thyme, and paprika and cook, stirring, until fragrant, about 1 minute. Reduce heat to low and add tomato juice. Cook, stirring to scrape up browned bits from pan, until thickened, about 1 minute. Transfer mixture to small bowl and set aside to cool. Whisk broth and eggs in large bowl until combined. Sprinkle gelatin over liquid and let stand 5 minutes. Stir in soy sauce, mustard, saltines, parsley, salt, pepper, and onion mixture. Crumble frozen cheese into coarse powder and sprinkle over mixture. Add ground beef; mix gently with hands until thoroughly combined, about 1 minute. Transfer meat to foil rectangle and shape into 10 by 6-inch oval about 2 inches high. Smooth top and edges of meat loaf with moistened spatula. Bake until an instant-read thermometer inserted into center of loaf reads 135 to 140 degrees, 55 to 65 minutes. Remove meat loaf from oven and turn on broiler. While meat loaf cooks, combine ingredients for glaze in small saucepan; bring to simmer over medium heat and cook, stirring, until thick and syrupy, about 5 minutes. Spread half of glaze evenly over cooked meat loaf with rubber spatula; place under broiler and cook until glaze bubbles and begins to brown at edges, about 5 minutes. Remove meat loaf from oven and spread evenly with remaining glaze; place back under broiler and cook until glaze is again bubbling and beginning to brown, about 5 minutes more. Let meat loaf cool about 20 minutes before slicing.

Spiced Vanilla Peaches

Spiced Vanilla Peaches

10 C. peaches, peeled and sliced into ¼th (about 20 large peaches)
13 C. water
1½ C. sugar
8-12 vanilla beans
6 medium cinnamon sticks
4-6 fresh lemons

Prepare jars and lids per USDA canning standards. In a large pot put the water and sugar. On low allow the sugar to dissolve while slicing the peaches. Squeeze the juice from ½ a lemon into the bottom of a large bowl. Peel and slice the peaches into ¼ths putting the peach slices into the bowl with the lemon juice to prevent browning. Remove about half of the water & sugar from the pot and reserve. Bring the remaining sugar water to a boil. Add as many of the peach slices as possible into the pot of boiling sugar water. Stir the peach slices for a couple of minutes until the peaches are heated through. Remove a pint jar from the hot water. Into each jar place 1 T. lemon juice, ½ a cinnamon stick, 1 vanilla bean cut in half and split. Carefully ladle peaches into each jar. Fill each jar with the light syrup leaving ½ inch headspace. Remove all air bubbles by running a chop stick or similar non metal item around the edges of each jar. Wipe rim of jar with a damp paper towel. Place a flat lid and band on each jar. Set filled jars aside. Repeat as needed filling all of your jars until you run out of peaches. When the light syrup gets low in the large pot replenish with reserved syrup and bring to a boil. Process filled jars in a hot water bath for 20-30 minutes.

Kindred’s Milk Bread

Kindred’s Milk Bread

Makes 6 rolls, two 9- by 5-inch loaves, or 12 split-top buns

5 1/3 C. bread flour, divided, plus more for surface (Kindred uses King Arthur)
1 C. heavy cream
1/3 C. mild honey (such as wildflower or alfalfa)
3 T. nonfat dry milk powder (such as Alba)
2 T. active dry yeast (from about 3 envelopes)
2 T. kosher salt
3 large eggs, divided
4 T. (1/2 stick) unsalted butter, cut into pieces, at room temperature
Nonstick vegetable oil spray
Flaky sea salt (optional, but shouldn’t be)

Cook 1/3 C. flour and 1 C. water in a small saucepan over medium heat, whisking constantly, until a thick paste forms (almost like a roux but looser), about 5 minutes. Add cream and honey and cook, whisking to blend, until honey dissolves. Transfer mixture to the bowl of a stand mixer fitted with a dough hook and add milk powder, yeast, kosher salt, 2 eggs, and 5 remaining C. flour. Knead on medium speed until dough is smooth, about 5 minutes. Add butter, a piece at a time, fully incorporating into dough before adding the next piece, until dough is smooth, shiny, and elastic, about 4 minutes. Coat a large bowl with nonstick spray and transfer dough to bowl, turning to coat. Cover with plastic wrap and let rise in a warm, draft-free place until doubled in size, about 1 hour. If making rolls, lightly coat a 6-C. jumbo muffin pan with nonstick spray. Turn out dough onto a floured surface and divide into 6 pieces. Divide each piece into 4 smaller pieces (you should have 24 total). They don’t need to be exact; just eyeball it. Place 4 pieces of dough side-by-side in each muffin C..
 If making loaves, lightly coat two 9- by 5-inch loaf pans with nonstick spray. Turn out dough onto a floured surface and divide into 12 pieces. Nestle pieces side-by-side to create 2 rows down length of each pan.
 If making split-top buns, lightly coat two 9- by 13-inch baking dishes with nonstick spray. Divide dough into 12 pieces and shape each into a 4-inch long log. Place 6 logs in a row down length of each dish. Let shaped dough rise in a warm, draft-free place until doubled in size (dough should be just puffing over top of pan), about 1 hour. Preheat oven to 375° F. Beat remaining egg with 1 tsp.. water in a small bowl to blend. Brush top of dough with egg wash and sprinkle with sea salt, if desired. Bake, rotating pan halfway through, until bread is deep golden brown, starting to pull away from the sides of the pan, and is baked through, 25 to 35 minutes for rolls, 50 to 60 minutes for loaf, or 30 to 40 minutes for buns. If making buns, slice each bun down the middle deep enough to create a split-top. Let milk bread cool slightly in pan on a wire rack before turning out; let cool completely.

Vanilla Syrup

Vanilla Syrup

A couple of years ago, I uncovered a secret that completely changed the way I cooked and baked. I discovered that it was possible to order bulk lots of vanilla beans on eBay for cheap. I went from treating the vanilla bean as a precious item to using them freely. And this time of year, they can become an easy path to a sweet, homemade holiday gift. Homemade vanilla syrup can sweeten coffee, is delicious in plain yogurt and is wonderful drizzled as a quick glaze over top of any number of simple baked goods.

To make, combine one C. water with two C. sugar and add three to four vanilla beans, split lengthwise and scraped. Bring to a simmer and cook until the sugar is dissolved. Remove from the heat and pour into half pint jars (when I made this tonight, I filled two half pints and one quarter pint). Include a piece or two of vanilla bean in the jar to keep infusing.

Because this is an unacidified product, it can’t be processed for shelf stability. However, it will keep indefinitely in the refrigerator. Gift this with some pancake mix, freshly baked scones or a pound of coffee.

Citrus Salt

Citrus Salt

1 T. minced lemon zest
1 T. minced lime zest
1 T. minced orange zest
1/2 C. sea salt, kosher salt or grey salt

Preheat oven to 200F. In a small bowl, stir together all the ingredients, then spread the mixture on a small rimmed baking sheet. Place in the oven to dry for 2 hours. Remove from the oven and let cool completely. Pour the mixture in a mini processor and process until finely and evenly ground. Store in a tightly covered jar for up to 2 months.

Heavenly Jam – Peach, Pear, Apple & Ginger

Heavenly Jam – Peach, Pear, Apple & Ginger

12 peaches, peeled and pitted (8 C. macerated)
12 apples, peeled and cored (8 C. macerated)
12 pears, peeled and cored (8 C. macerated)
24 C. sugar (1 C. sugar for each C. fruit)
Fresh ginger- a knob the size of your thumb, grated
.
First, you will want to clean out your mason jars. There are several methods for doing this (I have added some helpful links above) but I like to take a short cut and run them through the dishwasher on the ultra-hot ‘sanitation’ setting, which also heat dries the jars. Do ensure your jars are dry before canning with them. To peel the peaches, bring a large pot of water to a boil. Slice a small ‘X’ into the skin on the bottom of each peach. Place the scored peaches into boiling water for 30-40 seconds then shock them in a bath of very cold or ice water. The skins should peel off quickly and easily. Quarter the fruits, remove the pits and whiz them through the food processor. You should have roughly 8 C. macerated fruit. Pour chopped peaches into your large jam pot. Peel apples and pears with a vegetable peeler. Quarter and core fruits and blitz through a food processor in batches, similar to how you cut the peaches- small chunks are okay but try and get any larger pieces broken up. You should have roughly 8 C. chopped pear and 8 C. chopped apple. Add both to the jam pot. Add 24 C. sugar (1 C. for each C. fruit) and grated ginger and stir well. On the stovetop, turn the heat on the jam pot up to high, stirring frequently to ensure the bottom doesn’t burn. Once the fruit has come to a boil, turn the heat down to med-low and simmer for 40 minutes or so. Using a spoon and a little bowl, skim the ‘foam’ that forms on the top of the jam as it is simmering. This ‘jam waste’ is cloudy but still delicious and is a great way to test for flavor and adjust the ginger to your palette! When the jam is ready, the color will have darkened slightly to a beautiful gold and the bubbles coming to the surface with ‘burp’ slowly, indicating a good thickness. Fill a small saucepan with water and bring the water to a boil. Place the center lids of your mason jars (with the rubber seal) in the boiling water to sanitize them. Using a ladle and a wide funnel, pour your jam into one of the sanitized mason jars. Using a moist cloth, wipe down the edge of the jar to ensure a tight seal. Using tongs, lift one of the mason jar lids out of the boiling water and place on top of the filled jar. Screw on the outer lid tightly and set aside. Repeat with the rest of the jars until all the jam has been canned. As you go through this process you will begin to hear a satisfying ‘popping’ noise as the hot jars seal themselves- that’s a good thing! A ‘pop’ means the jar is well sealed and the jam will keep well in a cool dark place for up to a year or two!

Darkest Chocolate Crepe Cake

Darkest Chocolate Crepe Cake

3/4 C. (1 1/2 sticks) cold unsalted butter, cut into pieces, plus melted for pan
8 Oz. semisweet chocolate, finely chopped
1 1/2 C. all-purpose flour
1/3 C. sugar
1/2 Tsp. salt
2 1/2 C. whole milk, room temperature
6 large eggs, room temperature
1 T. pure vanilla extract

Bring 1/4 C. water to a rolling boil in a small saucepan over medium-high heat. Add butter, 1 piece at a time, whisking to combine after each addition. Remove from heat; stir in chocolate until completely melted. Set aside. Whisk together flour, sugar, and salt in a medium bowl. Whisk together milk, eggs, and vanilla in another medium bowl. Gradually add milk mixture to flour mixture, whisking until smooth. Add chocolate-butter mixture, whisking until smooth. Pour through a fine sieve into an airtight container; discard lumps. Refrigerate at least 2 hours or up to overnight. Lightly coat an 8-inch crepe pan or nonstick skillet with melted butter. Heat over medium heat until just starting to smoke. Remove pan from heat; pour about 2 T. batter into pan, swirling to cover bottom. Reduce heat to medium-low; return pan to heat. Cook, flipping once, until edges are golden and center is dry, about 30 seconds per side. Slide crepe onto a plate. Repeat process with remaining batter, coating pan with butter as needed. Crepes can be refrigerated, covered, up to 1 day. Place a crepe on a wire rack set over a rimmed baking sheet. Spread with about 3 T. hazelnut filling. Top with another crepe. Continue layering with hazelnut filling and crepes, using about 32 crepes and ending with a crepe on top. Insert a plastic straw down the center of the cake to provide stability. Cut off any of the straw that sticks up above the top of the cake. Refrigerate until firm, about 15 minutes. Spoon 1/2 C. glaze on top of the cake, spreading to edges. Spread remaining glaze around sides of cake, coating completely. Refrigerate until glaze is firm and set, about 20 minutes. Cake can be refrigerated up to 3 days. Garnish with toasted and candied hazelnuts.

Hazelnut Filling

2/3 C. heavy cream
6 large egg whites
1 2/3 C. sugar
1 3/4 C. (3 1/2 sticks) unsalted butter, cut into pieces, softened
1 Tsp. pure vanilla extract
1/3 C. hazelnut cream, (available from Whole Foods Market, www.wholefoods.com)
1 salt

Put cream into the bowl of an electric mixer fitted with the whisk attachment; beat on medium-high speed until soft peaks form, about 4 minutes. Transfer to a medium bowl. Refrigerate 1 hour. Whisk egg whites and sugar in the clean bowl of mixer set over a pan of simmering water until sugar has dissolved and mixture registers 160 degrees, 2 to 3 minutes. Attach bowl to mixer fitted with the clean whisk attachment; beat on high speed until slightly cooled and stiff (but not dry) peaks form, about 5 minutes. Fit mixer with paddle attachment. With mixer on medium-low speed, add butter, several pieces at a time, mixing well after each addition (meringue will deflate slightly as butter is added). Add vanilla, hazelnut cream, and salt; mix until mixture comes together, 3 to 5 minutes. Fold in whipped cream with a rubber spatula. Use immediately.

Chocolate Glaze

1 1/4 C. heavy cream
1 T. light corn syrup
1 salt
10 Oz. semisweet chocolate, finely chopped

Bring cream, corn syrup, and salt to a boil in a medium, heavy saucepan over medium- medium-high heat. Remove from heat. Add chocolate; swirl pan to cover completely with cream. Let stand about 5 minutes. Stir until smooth. Let cool completely.

Candied Hazelnuts

9 hazelnuts, toasted and peeled
1 C. sugar

Thread each hazelnut onto tip of a long wooden skewer; set aside. Place a cutting board along the edge of a countertop; set a baking sheet on floor next to edge. Cook sugar and 1/4 C. water in a medium, heavy saucepan over medium heat, stirring occasionally, until sugar has dissolved. Continue to cook, without stirring, until syrup comes to a boil, washing down sides with a wet brush to prevent crystals from forming. Let boil until syrup turns light amber, about 5 minutes; remove from heat. Let stand until slightly cooled, 8 to 10 minutes. Dip 1 skewered hazelnut into syrup, coating completely and letting excess syrup drip back into pan. When dripping syrup becomes a thin string, secure end of skewer under cutting board, letting caramel string drip over edge onto sheet. Repeat with remaining hazelnuts. Let stand until caramel has hardened, about 5 minutes. Break strings to about 4 inches. Carefully remove skewers.

Pickled Radishes (makes about 2 pints)

Pickled Radishes (makes about 2 pints)

2 lb. radishes (about 2 bunches), tops and roots removed, scrubbed and cut into 1/8 in rounds
1/4 C. plus 1/4 tsp. pure kosher salt
1 1/2 C. 5% white vinegar
1 T. salt
1 tsp. black peppercorns
1 tsp. fennel seeds
1 tsp. mustard seeds

Combine 1/4 C. salt with 2 1/2 C. water. Stir to dissolve (warm water helps). Put radish rounds into a bowl and pour salt water over. Refrigerate for 8 hours or overnight. Drain and rinse. In a large 6-8 quart pot, combine vinegar, sugar, 1/4 tsp. salt and spices. Bring to a boil, stirring to dissolve salt and sugar. Add radishes and return to a boil. Remove from heat. Pack hot canning jars loosely with radishes and brine. Leave 1/2 in headspace. Process jars in water bath for 10 minutes. Remove from water bath and leave jars undisturbed for at least 12 hours. Check if jars are sealed. Label sealed jars and store.

Garlic Sauteed Mushrooms

Garlic Sauteed Mushrooms

Choose mushrooms that you like. I used 1 pound plain white mushrooms, but others are fine too. Wipe them with a damp paper towel and slice or quarter them. Put about 2-3 T. olive oil in a skillet and heat until hot, add a lot of minced garlic. I used 9 big cloves of a very peppery garlic, and added a pinch of crushed red pepper and freshly ground black pepper. Cook the garlic for about 1 minute and then add the mushrooms and stir them around with the garlic until the mushrooms have cooked the way you like them (5 to 10 minutes usually). Part of the fun is to pull out a mushroom occasionally and eat it. When it’s ready, toss in some chopped herbs (I used parsley) and serve as a side dish or add it to couscous or pasta. Kiss a lot of people, to share the wonderful garlic aroma.

Balsamic Tomato Jam with Fresh Basil

Balsamic Tomato Jam with Fresh Basil

3 1/2 lbs tomatoes, coarsely chopped
3/4 C. brown sugar
1/2 C. balsamic vinegar
1/4 C. bottled lemon juice
1 tsp. salt
1/2 tsp. coriander
1/4 tsp. cumin
1 T. red pepper flakes
1/2 C. chopped fresh basil
1 tsp. sugar
2 tsp. pectin

Mix tomatoes, brown sugar, balsamic vinegar, lemon juice, salt, coriander, cumin and red pepper flakes in a 3 1/2 quart dutch oven. Bring to a boil then reduce to a simmer and cook until reduced by half, about 30 minutes. Stir in basil. Continue to cook until reduces slightly, about 30 minutes longer. Puree with immersion blender until smooth. In a small bowl mix sugar and pectin. Bring jam to a rapid boil, add pectin and stir until dissolved. Continue boiling jam for 2-3 minutes until reaches jelly point. Ladle jam into hot, sterile half-pint or 4oz. jars leaving 1/4-inch headspace. Process jars in a boiling water bath for 25 min.

Clam Pan Roast with Fennel & Sausage

Clam Pan Roast with Fennel & Sausage

Many of the seafood stews of the world— bouillabaisse, cioppino, and caldeirada de peixe (from Portugal), among others— share a common ingredient: fennel, which lends an anise- like taste. Essentially a creamy stew, the shellfish pan roast is most famously made with oysters, but clams are also traditional and often appear in combination with sausage; we include two types, sweet Italian and kielbasa. Pernod and tarragon add more anise flavor.

1 clove garlic, minced
1 pound sweet Italian sausage, casings removed
1/4 pound kielbasa, cut into 1/2 -inch cubes
12 small red potatoes, halved
3 small fennel bulbs, trimmed and cut into 1/4 -inch slices
1 small leek, cut into 1/4 -inch rounds and rinsed well
1/4 C. Pernod or other anise-flavored liqueur
1 1/2 C. bottled unsalted clam juice
Kosher salt and freshly ground pepper
2 1/2 pounds littleneck clams, scrubbed
2 large tomatoes, each cut into 8 wedges
1/4 C. fresh tarragon leaves

Cook garlic and Italian sausage in a deep straight- sided skillet or Dutch oven over medium, stirring and breaking up meat with a spoon, until sausage is no longer pink, about 5 minutes; transfer to a bowl with a slotted spoon. Drain all but 1 T. fat from skillet. Cook kielbasa, stirring occasionally, until crisp, 8 to 10 minutes. Add to bowl. Arrange potatoes in skillet, cut-side down; cook until golden brown, 5 to 7 minutes. Flip potatoes; cook until just
tender, about 5 minutes more. Scatter fennel over potatoes. Cook, stirring frequently, until
fennel is tender, about 10 minutes. Add leek, Pernod, and clam juice. Season with salt and pepper. Cook, stirring occasionally, until leek is tender, about 5 minutes. Return sausage mixture to pan; stir to combine. Add clams, cover, and cook 5 minutes. Add tomatoes; cook,
covered, until clams open, about 8 minutes. Discard any unopened clams and remove pan from heat. Stir in tarragon and serve.

Confetti Couscous with Dried Cherries and Pistachios

Confetti Couscous with Dried Cherries and Pistachios

1 tsp. olive oil
1/4 C. minced yellow onion
1 1/2 C. fat free low sodium chicken broth (or vegetable broth)
5 oz. whole-wheat couscous (about 1 C.)

1 T. cherry juice (or use another type of juice, if you wish)
1 ½ tsp. lemon juice
1 ½ tsp. Dijon mustard
2 T. canola oil

1/2 C. chopped dried tart or sweet cherries
3 T. coarsely chopped pistachios
2 T. chopped fresh basil
2 T. chopped fresh mint
1 T. fresh lemon zest
¼ tsp. salt
¼ tsp. ground black pepper

Prepare couscous: In a saucepan, heat olive oil over medium high heat. Add onion and sauté for about 3 minutes or until softened. Add the broth and bring to a boil. Add couscous, stir, cover and remove from heat. Let stand, covered, for 5 minutes. Transfer to a mixing bowl to cool. Prepare dressing: In a small bowl, whisk together cherry juice, lemon juice and mustard. Whisk in oil until emulsified. Set aside. Assemble: Add dressing and remaining ingredients to the couscous and mix well. Serve immediately.