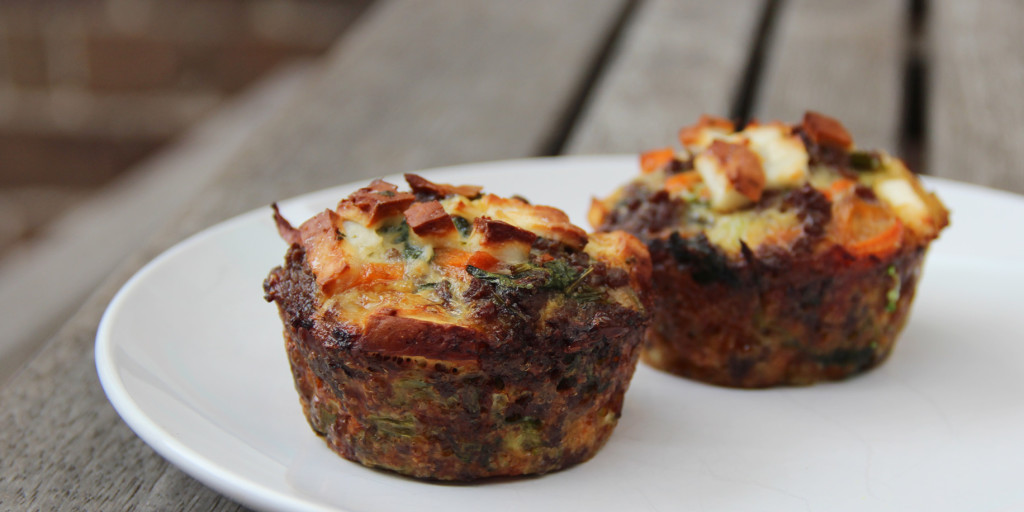
Quick and Easy Gravy from Scratch

Quick and Easy Gravy from Scratch

Quick and Easy Gravy from Scratch

Homemade gravy is quick and easy. If you’ve roasted chicken, turkey or beef, use the drippings left in the roasting pan. They make the gravy extra flavorful and seasoned. You can make gravy without drippings and use stock or broth in its place. Store-bought stock is usually under seasoned. Take care when seasoning with salt and pepper towards the end of the recipe. Finally, for more flavor, whisk in mushroom powder. This is optional but adds a deep savory flavor.


1/4 cup unsalted butter

1/4 cup all-purpose flour

3 cups warm stock (poultry, beef or vegetable stock) or use pan drippings, see note below

1/2 teaspoon mushroom powder, optional

1/2 tablespoon chopped fresh herbs or 1/2 teaspoon dried herbs (try sage, thyme or rosemary)

2 to 3 tablespoons half and half or cream, optional

Sea salt and fresh ground black pepper to taste


In a wide skillet with sides, melt butter over medium heat. When melted and sizzling, whisk in the flour. Whisk until the flour and butter turn into a smooth paste and look medium blonde in color; about 1 minute. It smells toasty, like browned butter.  Pour in stock and whisk until smooth. Bring the gravy to a low simmer. As it simmers, it thickens and becomes glossy.  Whisk in the herbs and mushroom powder then cook at a low simmer for a minute or two. Remove from the heat then stir in half and half or cream (optional).  Taste for seasoning and adjust with salt and black pepper (we like a generous amount of pepper).  TIPS FOR USING PAN DRIPPINGS:  Substitute some or all the butter with fat left in the pan from roasting. If there are juices left in the pan, strain them then swap all or some of the stock for the pan juices. Pan drippings and juices will be well seasoned compared to the stock. When seasoning, taste the gravy first then adjust with more salt and/or pepper. If you used a stove-top safe pan such as a Dutch oven or stainless steel pan for roasting, there is no need for the skillet. Make the gravy directly in the roasting pan.

LTS Scalloped Chicken and Corn

LTS Scalloped Chicken and Corn

LTS Scalloped Chicken and Corn


6 oz. Macaroni

1 can Chicken Broth

¼ C. dried Onion

½ C. dried Celery

1 can Chicken

1 can Creamed Corn

1/3 C. Cream of Anything Mix + ½ C. Water (or a can of cream of chicken soup)

8oz. Velveeta (or similar processed shelf stable “cheese”), cubed

1 tsp. Parsley Flakes

1/8 tsp. Pepper

Dash Worcestershire Sauce


Simmer noodles in broth until almost done.  Drain off most broth, leaving enough to rehydrate the onion and celery. Add in the dried vegetables and let them sit a minute or two to absorb the warm liquid.  Strain in chicken juice, add water and cream of chicken soup mix and stir until combined.  Add all other ingredients, including strained chicken.  Spread in greased 8 x 12 casserole dish and bake at 375 for 25 minutes.

Baked Ricotta

Baked Ricotta

Baked Ricotta

1 pound (about 2 cups) whole-milk ricotta cheese

1 tablespoon chopped fresh oregano or 1 teaspoon dried

1 tablespoon fresh thyme or 1 1/2 teaspoons dried

2 teaspoons chopped fresh rosemary or 1 teaspoon dried

1-2 tablespoons chopped garlic (2-4 cloves)

Zest of 1 lemon, finely grated

1/4 cup thinly sliced sun-dried tomatoes (optional)

Salt and freshly ground black pepper

1 egg, lightly beaten

Ground paprika, for garnish


Preheat the oven to 375°F (19O C). Use a drizzle of oil to grease a 2-cup baking dish. Combine the ricotta with the oregano, thyme, rosemary, garlic, lemon zest, sun-dried tomatoes (if using), and a few grinds of pepper. Mix well and season generously7 with salt (I usually start with 1/4 teaspoon). Add the egg and mix thoroughly. Transfer the mixture to the prepared baking dish. Sprinkle the top with paprika and a drizzle of oil. Bake for 20 to 30 minutes, or until the top puffs up slightly and the mixture is hot and bubbling. Let cool for 10 minutes before serving. The ricotta has to be well drained; if it is too liquid, the finished product will be soupy. Most ricotta comes strained, but if the ricotta you have has any’ liquid on top, pour it off rather than mixing it in.

Instant Pot Pineapple Skirt Steak

Instant Pot Pineapple Skirt Steak

Instant Pot Pineapple Skirt Steak


3/4 cup pineapple juice or pineapple juice blend

1/4 cup soy sauce

1/2 teaspoon freshly ground black pepper

1 1/2 pounds skirt steak, sliced about 1/4 inch thick against the grain

2 scallions, green parts only, thinly sliced, for garnish


Place the pineapple juice, soy sauce, and pepper in the inner pot and stir to combine. Add the steak and stir to coat it with the sauce. Close and lock the lid. Set the valve to Sealing. Press Manual or Pressure Cook and use the Pressure or Pressure Level button to select High Pressure. Use the – or + button to set the time to 12 minutes. When the cooking cycle ends, carefully use a wooden spoon to release the pressure by turning the pressure-release valve to Venting. (The pressure is released when the small metal float valve next to the pressure-release valve sinks back into the lid and the lid is no longer locked.)  Press Cancel and remove the lid. Remove the steak from the inner pot.   Serve warm, drizzled with a spoonful of the sauce and garnished with scallions. Pineapple Skirt Steak and cooking liquid will keep, in an airtight container in the refrigerator, for up to 4 days. To reheat, place the steak in a pot, add cooking liquid to cover the bottom, and warm on the stovetop over medium-low heat, stirring occasionally, for about 5 minutes. Note: To cut against the grain, slice perpendicular to the muscle fibers running through the steak.

Lavender Fizz

Lavender Fizz

Lavender Fizz

7 1/2 cups water

1/2 cup raw honey

1 tablespoon white wine vinegar

4 tablespoons fresh or dried lavender flowers

1 lemon, sliced into ¼-inch rounds

Combine the water, honey, vinegar, lavender, and lemon in a clean half-gallon mason jar, cover with a lid, and shake well until all the honey has dissolved. Set the mixture aside to ferment, covered, at room temperature for 2 days. After 2 days, strain out the lavender and lemon. Transfer the liquid into glass or plastic bottles with tight-fitting lids, leaving about 1/2 inch of headroom in each bottle. (The lids need to be tight fitting to contain the carbonation that is going to develop. If the lids do not fit tightly, the carbonation will escape from the bottles, leaving you with a still delicious yet noncarbonated beverage.) Set the bottles aside in a cool, dark place to ferment for 3 days. Then open one of the bottles to taste it. If the soda is still not carbonated, put the lid back on and let the bottles continue fermenting. Taste regularly. The length of time needed to produce carbonation will vary depending on the temperature and the activity of the yeasts in your fizz.   Once the soda reaches the desired carbonation, transfer the bottles to the refrigerator. The cold temperature will slow the fermentation process and keep the carbonation level as it is. Sometimes a bit of mold can form on the surface of the soda during the fermentation process. This is just surface mold, and the soda is still good; simply remove the mold and proceed

Wilted Dandelion Greens with Garlic Confit

Wilted Dandelion Greens with Garlic Confit

Wilted Dandelion Greens with Garlic Confit


Americans love their lawns and hate weeds. In fact, Americans use upwards of 90 million pounds of pesticides on lawns yearly. Yet despite all the efforts made against them, weeds still prevail, resorting to popping up through the cracks in sidewalks if they must, along roadsides, and in garden paths. Their resiliency is part of what makes them so special — they are up for a challenge and continue to thrive despite adverse conditions. Dandelion is one such hardy weed, tenacious and determined to overcome all obstacles. And while many hate it as a pestilent lawn invasive, dandelion is beloved by children, herbalists, and bees and has been revered as a food and medicine throughout history’. In fact, European settlers purposefully introduced dandelions to the United States so that they could eat the leaves as a spring green.

12 garlic cloves (about 3 heads)

Olive oil

1/2 pound dandelion greens

Salt and freshly ground black pepper

1 teaspoon fresh lemon juice


Peel the garlic cloves and trim off the ends. Place the cloves in a small saucepan or cast-iron pan; the pan should be just big enough that the garlic cloves can sit flat on the bottom without overcrowding. Add enough oil to cover them by half. Turn the heat on as low as possible. As the oil heats, the garlic will begin to smell delicious and turn a warm yellow color. After 5 minutes, flip the cloves. Continue cooking, flipping the cloves every 5 minutes, until they are soft and mushy. The total cooking time is usually 20 to 30 minutes, but it depends on how low you’re able to set the heat on your stove, and the slower you cook them the better. If your stove will not go low enough and the oil gets so hot you think the garlic may bum, take it off the heat for a moment, let it cool, then return it. While the garlic is cooking, chop the dandelion greens into 2-inch pieces. When the garlic is done, transfer the cloves and the oil into a large skillet and mash them with a fork until they are broken down but still a little chunky. Turn the heat to medium-low. Once the oil is warm, add the dandelion greens, sprinkle with salt and pepper, and cook, stirring continuously, until the greens have wilted, 5 to 8 minutes. Add the lemon juice and cook for another minute or two. Season to taste with salt and serve hot.

One Pot Spaghetti Alla Puttanesca with Chickpeas & Artichoke Hearts

One Pot Spaghetti Alla Puttanesca with Chickpeas & Artichoke Hearts

One Pot Spaghetti Alla Puttanesca with Chickpeas & Artichoke Hearts


1 tsp. olive oil

1/2 large white or yellow onion diced

2 cloves garlic minced

12 oz spaghetti

2 oz sliced black olives (up to 4 oz. for olive lovers)

14 oz artichoke hearts rinsed and drained, and chopped

3/4 cup cooked chickpeas rinsed and drained

2 T. capers

14 oz. canned diced tomatoes

1 T. dried oregano

1 tsp. dried basil

1/2 tsp. dried thyme

1/2 tsp. red pepper flakes (reduce to 1/4 tsp. if sensitive to heat)

1/2 tsp. ground black pepper (reduce to 1/4 tsp. if freshly ground)

salt to taste (see notes)

4 cups low-sodium vegetable broth


Warm the olive oil in a large, deep, skillet and then add the onions and garlic, stirring occasionally until just starting to turn golden. Add the pasta to the skillet, breaking in half if needed (a saucepan may also work). Add the rest of the ingredients, minus the broth, to the pan on top of the pasta. Then pour the vegetable broth over everything. Cover the pan and bring to a boil. Reduce to a steady simmer (medium to medium-low heat) and, keeping covered & stirring occasionally, cook for 8-10 more minutes, or until pasta is done through to your liking.

Herbal Balsamic Vinaigrette

Herbal Balsamic Vinaigrette

Herbal Balsamic Vinaigrette

1 cup olive oil

3 tablespoons balsamic vinegar

1 teaspoon Dijon mustard

1 teaspoon raw honey

2 tablespoons chopped chives or chive blossoms

2 tablespoons fresh oregano

2 tablespoons fresh tarragon

2 tablespoons fresh thyme

1-2 garlic cloves, roughly chopped

Salt and freshly ground black pepper


Combine the oil, vinegar, mustard, and honey with the chives, oregano, tarragon, thyme, garlic, and a pinch of salt and pepper in a blender and blend until smooth. Add more vinegar or mustard if you like dressing with a more pungent flavor. Store in the refrigerator, where the dressing will keep for 2 to 3 weeks.

Pantry Friendly Pasta con Ceci

Pantry Friendly Pasta con Ceci

Pantry Friendly Pasta con Ceci

4 tablespoons extra-virgin olive oil, plus more for drizzling

3 cloves garlic, peeled and smashed

3 tablespoons good tomato paste

1 teaspoon kosher salt, or more to taste

1 1/2 cups cooked chickpeas (or one 15-ounce can, drained and rinsed)

1/2 cup uncooked ditalini pasta (or another small shape, like macaroni)

2 cups boiling water

Crushed red pepper flakes, for serving


In a large heavy-bottomed pot, heat the olive oil until it shimmers. Add the garlic and cook, stirring until it becomes lightly browned and fragrant. Stir in the tomato paste and salt and fry for 30 seconds or so. Add the chickpeas, pasta, and boiling water. Stir to scrape up any browned bits on the bottom of the pot, lower the heat, and simmer until the pasta is cooked and most of the liquid has been absorbed, about 15 to 20 minutes. Taste and adjust seasoning. To serve, ladle the pasta into shallow bowls, sprinkle with crushed red pepper flakes, and drizzle a bit of extra-virgin olive oil on top.

Caprese Chicken with Bacon

Caprese Chicken with Bacon

It’s still too early for herbs and tomatoes from my garden, but I don’t think Covid-19 is going anywhere fast, so hanging onto this recipe for later this season

Caprese Chicken with Bacon

8 bacon strips

4 boneless skinless chicken breast halves (6 ounces each)

1 tablespoon olive oil

1/2 teaspoon salt

1/4 teaspoon pepper

2 plum tomatoes, sliced

6 fresh basil leaves, thinly sliced

4 slices part-skim mozzarella cheese


Place bacon in an ungreased 15x10x1-in. baking pan. Bake at 400° for 8-10 minutes or until partially cooked but not crisp. Remove to paper towels to drain. Place chicken in an ungreased 13×9-in. baking pan; brush with oil and sprinkle with salt and pepper. Top with tomatoes and basil. Wrap each in two bacon strips, arranging bacon in a crisscross. Bake, uncovered, at 400° for 20-25 minutes or until a thermometer reads 170°. Top with cheese; bake 1 minute longer or until melted.

Sheltering In Pumpkin Chili

Sheltering In Pumpkin Chili

Pumpkin Chili


1 can Chicken

2 cans Black Beans, rinsed and drained

1 15oz. can Pumpkin Puree

1 can diced Tomatoes

1 can Chicken Broth

½ C. dried Bell Pepper

½ C. dried Onion

1 ½ tsp. Oregano

2 tsp. Cumin

2 tsp. Chili Powder


Combine all ingredients and heat through.  (100-Day Pantry)

Pumpkin Breakfast Muffins

Pumpkin Breakfast Muffins

Pumpkin Breakfast Muffins

Makes 12 muffins (1 per serving)


Prep time: 15 minutes

Cooking time: 25 minutes

1/2 cup coconut flour

1/2 teaspoon baking soda

1 1/2 teaspoons ground cinnamon

1/2 teaspoon ground nutmeg

1/4 teaspoon sea salt

6 large eggs, lightly beaten

1/3 cup raw honey

1/4 cup coconut oil or ghee, melted

1 teaspoon pure vanilla extract

1 teaspoon apple cider vinegar

2/3 cup canned pure pumpkin puree

Unsweetened coconut flakes, for garnish


Preheat the oven to 35O°F. Line a 12-cup muffin tin with silicone or parchment paper baking cups. In a medium bowl, combine the coconut flour, baking soda, cinnamon, nutmeg, and salt. In a large bowl, lightly whisk the eggs, honey, coconut oil, vanilla, and vinegar. Slowly add the dry ingredients to the wet ingredients and mix until there are no lumps. Fold in the canned pumpkin. Scoop the batter evenly into the prepared muffin tin, filling each liner about three-quarters full. Sprinkle the coconut flakes on top, pressing them down gently into the batter to make them stick. Bake for 25 to 30 minutes, until the edges are lightly golden brown. Let the muffins cool in the pan for 10 minutes, then transfer to a wire rack to cool completely. Store in an airtight container in the refrigerator for up to 1 week or in the freezer for up to 3 months.   Noelle’s tip: To make blending the batter easier, pulse the dry ingredients in a food processor until relatively smooth, then add the wet ingredients and pulse until blended, scraping down the sides of the bowl as needed to make sure everything’s incorporated.  Change it up: Top the muffins with raw pumpkin seeds, pecans, or walnuts.

Canning  Chicken (Raw Pack Method)

Canning  Chicken (Raw Pack Method)

Canning  Chicken (Raw Pack Method)

4 whole roasting chickens or 35 assorted chicken pieces

8 whole bay leaves

8 teaspoons lemon juice

8 teaspoons salt (optional)

8 teaspoons dried parsley or 8 teaspoons dried cilantro


Remove fat and skin from chicken pieces. Have sterilized hot quart canning jars ready. Have damp hot cloth ready to wipe rim of jars. Seals should be hot in water. Lay out the chicken pieces in groups for each jar. Pack each jar half full. Add to each jar, 1 bay leaf, 1 tsp lemon juice, 1 tsp salt and 1 tsp parsley or cilantro. Fill the jar with hot water. Leave at least 1 1/2 inch head room. Wipe jar rim with damp clean cloth. Place seal and ring and tighten. Have the pressure cooker ready, fill the jars in the rack, lower the rack. Please the lid on the pressure cooker. Pressure cook 15 lb. pressure for 90 minutes.


DO NOT LEAVE THE KITCHEN. You must adjust the heat to stabilize the pressure and maintain the 15 lb pressure. This is not hard to do. When 90 minutes have passed. Turn off the heat, take off the burner or leave on, let it cool naturally. Do not remove the pettcock, the pressure gauge. Let the steam go out naturally. Take the jars out, place on a towel, out of drafts. Let seal.

LTS Chicken Basil

LTS Chicken Basil

LTS Chicken Basil


6 oz. Pasta

1 can Chicken Broth

1 can Chicken, undrained

1 can Carrots, drained

1 can mushrooms, undrained, optional

1 jar alfredo sauce (or follow make it from scratch LTS)

½ C. dried Broccoli

1 T. Basil

Simmer pasta in broth until softened, stirring occasionally.  Add remaining ingredients and heat through.  If fresh broccoli is available, steam one cup separately and add at the end after the soup is heated, stir gently.


Alfredo Sauce from Scratch:


1 T. all-purpose flour

1 C. water

3 T. Milk Powder (not instant non-fat)

1/2 C. evaporated milk

1/2 tsp. salt, plus more to taste

3/4 C. grated Parmesan cheese


Combine 3 T. milk powder with 1 C. water until dissolved.  Stir the flour into the milk until it is completely dissolved. Put a T. of olive oil in the skillet and heat over a medium-high heat. Add the minced clove of garlic and cook for 30 seconds. Add the flour-milk mixture and cook until the mixture begins to boil, stirring constantly. Reduce heat to low and cook, stirring, for 2 minutes more. Add the evaporated milk, salt, and cheese and cook, stirring, until the cheese is melted, about 1 minute. Season with additional salt to taste. 

Canning Spaghetti Sauce

Canning Spaghetti Sauce

Canning Spaghetti Sauce

10 lbs fresh tomatoes

3 tablespoons oil

4 1⁄2 cups onions, chopped

3 cloves garlic, minced

1 1⁄2 teaspoons oregano, crushed

2 bay leaves, crushed

1 tablespoon plain non-iodized salt

1 tablespoon granulated sugar

1 teaspoon black pepper

1⁄2 teaspoon red pepper, crushed

1 tablespoon dried parsley

1 tablespoon celery leaves, minced


Peel, core and chop tomatoes. Combine with remaining ingredients in heavy saucepan. Simmer 2 hours stirring often until desired consistency. Pour into hot jars to 1/2 inch from top. Wipe jar top and threads carefully with damp cloth making sure they are thoroughly clean. Put on lids and bands. Place in water canner with at least 2 inches of hot water over tops of jars. Bring canner to gentle boil and process 30 minutes. At end of processing time, remove jars to draft free area to cool at least 12 hours. Inspect each jar to make sure it is sealed, remove bands and wipe with damp cloth. Label with date and store.

Pantry Friendly Caramelized Canned Potatoes

Pantry Friendly Caramelized Canned Potatoes

Pantry Friendly Caramelized Canned Potatoes

1 (16 ounce) can small potatoes

2 tsp. butter

1⁄2 C. brown sugar


Drain your potatoes well. Melt butter in a skillet. Stir in the brown sugar and heat, stirring until it bubbles. Wait until it turns brown and starts to caramelize. Add potatoes and cook 3-5 minutes (until heated through), stirring constantly.

BLTA Chicken Salad Lettuce Wraps

BLTA Chicken Salad Lettuce Wraps

BLTA Chicken Salad Lettuce Wraps

1/2 C. plain fat free Greek yogurt

1/4 C. mayonnaise (I used full fat for richer flavor)

2 tsp. fresh lemon juice

2 T. thinly sliced green onions

1 T. minced parsley

Salt and freshly ground black pepper

3 C. diced cooked and chilled chicken breast

6 slices bacon, cooked and chopped

1 1/2 C. grape tomatoes, halved

1/2 C. diced celery

1 medium avocado (fairly firm but ripe), diced

Romaine lettuce leaves, for serving


In a medium mixing bowl stir together Greek yogurt, mayonnaise, lemon juice, green onions, parsley while seasoning with salt and pepper to taste. Add chicken, bacon, tomatoes and celery to a large mixing bowl (if you want some of the ingredients to show through set some aside to sprinkle over the top of the salad before serving). Add in the dressing mixture and toss to coat. Gently toss in avocado. Serve over lettuce leaves (or in bread slices).

Canning Raspberries

Canning Raspberries

Canning Raspberries

4 C. water

1 -4 3⁄4 C. sugar

1 1⁄2-3 lb. berries


Use 1 C. sugar for VERY LIGHT SYRUP; 2 C. sugar for LIGHT SYRUP; 3 C. sugar for MEDIUM SYRUP; 4 3/4 C. sugar for HEAVY SYRUP. Boil sugar& water together for 5 minutes& skim, if necessary; keep hot but not boiling. Wash fruit, drain& fill hot sterile jars, leaving 1/2-inch headspace. Bring syrup to a full boil& cover berries with syrup, leaving 1/2-inch headspace. Remove any trapped air bubbles (I use a chopstick to do this) & adjust lids. Process in a boiling water bath, 10 minutes for pints or 15 minutes for quarts.

LTS Brunswick Stew

LTS Brunswick Stew

LTS Brunswick Stew

2 (16 ounce) cans stewed tomatoes

1 can whole kernel corn

1 can creamed corn

1 can white meat chicken

1 can castleberry barbecue pork

1 can castleberry barbecue beef


Open all the cans. Empty them, including the juice, into a large stock pot. Cook over medium heat for at least one hour.  If you have an onion that you can sauté first, do that.

Grilled Maitake Mushrooms

Grilled Maitake Mushrooms

Grilled Maitake Mushrooms

Start this recipe the night before serving so that the mushrooms can marinate overnight. Widely known as “hens of the woods” because of their richness and dense texture, maitakes can look intimidating, like a strange piece of brown coral. But they’re delicious, meaty, and easy to work with. If you’ve never tried maitakes, I encourage you to experiment with them. Portobellos, shiitakes, or any mushroom big enough to grill may also be used.


1 C. olive oil

1/2 C. soy sauce

2 scallions, green and white parts separated, and green parts thinly sliced

2 cloves garlic, peeled and crushed

2 T. honey

5 T. white wine

Salt and freshly ground black pepper

1 1/2 lb. maitake mushrooms

1/2 bunch watercress, roots trimmed


Put the olive oil, soy sauce, scallion whites, garlic, honey, and 2 T. of the wine in a blender and blend until smooth. Season with salt. Cut the maitake into slices 1 inch thick. It’s important that each slice be attached to the large stem at the bottom; otherwise the slice will fall apart and be hard to handle on the grill. To avoid this problem, simply pick up the mushroom and look at where the stem is. Turn the mushroom on its side while gently slicing, making sure the connection between the frilly part of the mushroom and the stem stays intact. Place the slices in a shallow rimmed dish and coat them with the marinade. Cover and refrigerate overnight. Heat a grill until it’s very hot and arrange the maitakes on the grill, reserving the marinade. Press the slices with a metal spatula to form grill marks and brush them with some of the reserved marinade. Grill for 3 minutes, then turn and press down with the spatula again. Brush with some of the remaining marinade and grill for 2 minutes more. Set the maitakes aside. Heat a sauté pan over high heat and add the reserved marinade and the remaining 3 T. white wine. Bring to a boil and reduce for a few minutes, until the sauce coats the back of a spoon. To serve, arrange a bed of watercress on four individual plates. Slice the maitakes into a few pieces and divide among the plates, arranging them on top of the watercress. Season with salt and pepper. Spoon the sauce over the mushrooms and garnish with the scallion greens.

Canning Pizza Sauce

Canning Pizza Sauce

Canning Pizza Sauce

4 pints

25 -28 tomatoes

2 large onions, minced

4 garlic cloves, minced

3 tsp. olive oil

2 tsp. lemon juice

1 tsp. cracked pepper

1 tsp. sugar

2 tsp. parsley, chopped

1 tsp. oregano

1 tsp. basil

1 tsp. rosemary

1 tsp. celery seed

2 tsp. salt

1⁄2 tsp. summer savory


Peel and puree the tomatoes. Mince the onion and garlic. Put olive oil in deep pan and sauté the onions and garlic until transparent. Add the tomato puree and the rest of the ingredients; stir well to blend. Cook on low until mixture is reduced by ½, stirring occasionally. This will take 1-1/2 to 2 hours. When sauce is done and nicely thickened, ladle into hot pint size jars, clean the rims of the jars, and seal. Process for 25 minutes in water bath.

Dutch Oven Chili-Cornbread Pie

Dutch Oven Chili-Cornbread Pie

Dutch Oven Chili-Cornbread Pie


2 lb ground beef

1 medium onion

2 (15 oz.) cans chili beans

2 pkg. chili seasoning

2 (6 oz.) pkg. of “water only” combread mix


Before leaving home, brown meat and sauté onions. Stow in large heavy duty food storage bag in ice chest. Line Dutch oven carefully with heavy duty aluminum foil. Add pre-cooked meat and onions, chili beans and seasonings mix. Stir well but be careful not to rip foil liner. Mix combread per box instructions in plastic bag. Spread out combread mix over the top of chili. Place lid on Dutch oven. Fill lid with 18 pieces of charcoal. Place 6 pieces charcoal on aluminum foil under the Dutch oven. Cook for 30 minutes.

Dutch Oven Brown Bears in the Orchard (Applesauce and Gingerbread)

Dutch Oven Brown Bears in the Orchard (Applesauce and Gingerbread)

Dutch Oven Brown Bears in the Orchard (Applesauce and Gingerbread)


2 lb. jar of (chunky) applesauce OR 2 cans apple pie filling OR 1 (16 oz.) can apple sauce and 3 apples cut into chunks

1(14 oz.) box gingerbread mix (complete kind)


Line Dutch oven with foil, shiny side up. Put applesauce in bottom of greased Dutch oven. Mix gingerbread according to package directions. Pour gently over applesauce. Cover tightly. Bake in coals about 30-40 minutes. Serve warm with Cool Whip or ice cream or plain.

Dutch Oven Pot Roast

Dutch Oven Pot Roast

Dutch Oven Pot Roast


1- 3 lb. beef roast, rolled, round bone or rump cut

2 T. oil

1 c. water

6 medium potatoes

garlic to taste

6 carrots


Line the Dutch oven carefully with heavy duty aluminum foil. Brown roast in oil, on each side. Add water to oven, sprinkle garlic on top of roast. Add potatoes and carrots. Place lid on Dutch oven. Place 10-12 well started pieces of charcoal in a checkerboard pattern and put oven on top. Fill lid with 18 pieces of charcoal. Cook for about 2 hours in covered oven, adding small amounts of water if needed.

Dutch Oven Quiche

Dutch Oven Quiche

Dutch Oven Quiche


1 1/2 c. shredded cheese

2 c. milk

1/2 c. biscuit mix

1 onion, chopped

1 lb. diced ham

4 eggs

Oil

seasonings to taste


Season Dutch oven with oil or line with foil. Sprinkle ham, cheese, and onion on the bottom. Mix other ingredients together and pour over meat and cheese mixture. Bake for 35 minutes with 14 coals on top and 8 on the bottom. Serves 8. May be adapted for a box oven.

Dutch Oven Dump Cake

Dutch Oven Dump Cake

Dutch Oven Dump Cake


2 large cans of any kind of fruit with juice OR 2 cans of any kind of fruit pie filling OR 6 c. cut up fresh or frozen fruit

1 box of white or yellow cake mix and needed ingredients

1 stick of butter or margarine

whipped cream or Cool Whip (optional)


Line Dutch oven with foil. Pour fruit (and juices) into oven. Top with dry cake mix and spread evenly. Stir enough to moisten cake mix. Dot with butter or margarine. Bake 25 minutes with 12 coals on top and 8 on the bottom. Serve with whipped topping. Serves 12. Suitable for box oven.

LTS Bread Sticks

LTS Bread Sticks

LTS Bread Sticks


3 ½ C. Flour, Divided

2 T. Sugar

1 tsp. Salt

1 T. Yeast

1 1.2 C. Hot Water

Shortening for greasing pan

Toppings, optional – seeds, parmesan cheese, garlic salt, etc.


Add sugar, salt, and yeast to 2 cups flour and toss.  Stir in 1 ½ C. hot water.  Slowly add 1 ½ C. more flour.  Knead 10 minutes.  Allow to rise until double.  Roll into rectangle, cut in 1 inch strips.  Twist and place on greased baking sheet.

LTS African Chicken

LTS African Chicken

LTS African Chicken


2 cans Chicken Broth

½ C. Crunchy Peanut Butter

1 can Chicken, undrained

¼ C. dried Celery

1 C. dried Onion

½ C. dried Bell Pepper

1 C. quick-cooking Rice

Dash Hot Pepper Sauce, optional


Start with one can broth in a large pot and mix with peanut butter until dissolved.  Add remaining ingredients, except for rice, and bring to a boil.  Stir in rice, turn heat to low, and let sit 10 minutes, or until rice is done, stirring once.  Serve with Black-Eyed Peas. 100-Day Pantry

Canning BBQ Sandwich Meat

Canning BBQ Sandwich Meat

Canning BBQ Sandwich Meat

5 Pints


58 ounces tomato sauce

2 cups chopped onions

1⁄2 cup green pepper

1⁄4 cup packed brown sugar

1⁄4 cup Worcestershire sauce

2 tablespoons dry mustard

2 teaspoons salt

1⁄4 teaspoon bottled hot pepper sauce

1⁄4 cup mixed pickling spices

6 cups cooked beef or 6 cups pork


Combine first 8 ingredients. Tie pickling spices in a cheesecloth bag. add to sauce. cover and simmer 15 minutes. remove the spice bag. and add the meat to the sauce. Cover, heat. Pack into hot jars, leaving 1 inch head space. Adjust the lids. Process in pressure canner at 10 pounds, 75 minutes for pints. BEFORE SERVING: Boil uncovered 10 minutes before tasting or using. Serve on your favorite bun.

Layered Finger Jell-O

Layered Finger Jell-O

Layered Finger Jell-O

For each colored layer:

1 3 oz package jell-o

1 pack or 1 T. unflavored gelatin

1 C. boiling water


For the white layer:

1 14 oz can sweetened condensed milk

4 packs or 4 T. unflavored gelatin

2 C. boiling water


Mix each jell-o color separately in containers. Let stand till room temperature, stirring occasionally. Mix up white layer and also let stand till room temperature, stirring occasionally.  Pour first color into 9×13 dish. Refrigerate till firm. Put 1/3 of white layer in next. Refrigerate till firm. Repeat till done. If all mixtures are at room temperature, it takes only about 7 minutes to firm up each layer so you can add the next one. Do not make the Jell-o as directed on the package. Make each package as directed above – for each package of Jell-o, add 1 package or 1 T. of gelatin and 1 C. boiling water. I was skeptical about the taste but when I carefully sliced into it this morning, I popped an end bit into my mouth and was pleasantly surprised.

LTS BBQ Chicken with Fruit

LTS BBQ Chicken with Fruit

LTS BBQ Chicken with Fruit


1 ¼ C. Rice

1 Can Chicken Broth

1 Can Chicken

1 can Pineapple Tidbits

1 can Mandarin Oranges

1 16oz. Bottle BBQ Sauce

¼ C. dried Bell Pepper

¼ C. dried Onion


Cook rice in broth in separate pan.  Combine remaining ingredients, without draining first, and heat through.  Serve over rice.  Serve with cornbread.  (100-Day Pantry)

Chive Blossom Vinegar and Vinaigrette

Chive Blossom Vinegar and Vinaigrette

Chive Blossom Vinegar and Vinaigrette

1 1/2 cups white wine vinegar (or champagne vinegar)

Fresh chives with blossoms

For the Vinaigrette:

3/4 cup extra-virgin olive oil

1/4 cup chive blossom vinegar

1/2 teaspoon grainy Dijon or a honey Dijon

1/2 teaspoon sugar, optional

salt and freshly ground black pepper, to taste

Optional: fresh snipped chives

Steps to Make It

Gather the ingredients.


Cut the blossoms off of the chive stems just below the flower head. Rinse gently and let them dry. Pack the chive blossoms loosely in a 1-pint jar, filling it about 3/4 full.  Pour the vinegar over the blossoms until the jar is very full. Put a cover on (not metal) the jar, label it with the date, and set in a cool, dark place for ten days to 2 weeks. If you don’t have plastic covers for your jars or a jar with a glass lid, use a metal screw band and screw it over a small square of wax paper or parchment paper. Strain the vinegar, discard the chive blossoms and transfer the vinegar to a clean bottle or jar.  Store the strained vinegar for up to 6 months in a dark, cool place or in the refrigerator.


Chive Blossom Vinaigrette

In a jar or bottle, combine 3/4 cup extra virgin olive oil with 1/4 cup chive blossom vinegar. Add 1/2 teaspoon of a grainy or honey Dijon mustard, 1/2 teaspoon of sugar, if desired, and a dash of salt and freshly ground black pepper, to taste. Shake well. Store chive blossom vinaigrette for up to 1 week in the refrigerator. The vinaigrette makes about 8 servings of 2 tablespoons each.

Canning Navy Beans (Easy Method)

Canning Navy Beans (Easy Method)

Canning Navy Beans (Easy Method)

1 1⁄2 cups dried navy beans

1⁄2 teaspoon salt (optional)


Put 1 1/2 Cups Dry Navy Beans in each quart jar. Add salt as desired. Fill Jar with boiling water to 1 inch from the top. Put on lids and rings. Place in canner with hot water. Pressure can at 10 lb. pressure for 20 minutes. Beans will continue to soften when you use them in either your soup or for baked beans.

Strawberry Balsamic Sweet Onion Jam

Strawberry Balsamic Sweet Onion Jam

Strawberry Balsamic Sweet Onion Jam

1/4 cup balsamic vinegar

4 cups fresh strawberries, stems removed, crushed

1 1/2 cups diced sweet onion (I used Vidalia Onions)

1 tsp butter to reduce foaming

1 box Sure Jell or powdered fruit pectin

7 cups granulated sugar


In a large pot, over high heat, add the strawberries, onions, butter, balsamic vinegar, and pectin. Bring to a full rolling boil (one that doesn’t stop while stirring). Add the sugar and return to a full rolling boil. Boil hard for one (1) minute. Remove the pot from the heat. Ladle the jam into your hot jars, you want them filled to within ¼” of the top rim. Be sure to wipe the top rim of the jars with a damp paper towel to get off any drips or spills. Cover each jar with a lid and a ring. Process jars 10 minutes in a boiling water bath or steam canner. Remove jars and allow them to cool 24 hours undisturbed on your kitchen counter-top. Jars are sealed when the button on the top of the lid is fully depressed and won’t move up and down. Yield: 10 – half-pint (8 oz) jars

LTS Brunswick Stew

LTS Brunswick Stew

LTS Brunswick Stew


Originally Brunswick Stew was made with rabbit or squirrel, but now is most often made with chicken.  If available, this stew benefits by first sautéing an onion from the root cellar.


1 can Chicken

1 can Potatoes

1 can Tomato Soup

1 can Stewed Tomatoes (fire roasted for extra flavor)

1 can Corn

1 can Lima Beans

3 T. Onion Flakes

1 Bay Leaf

½ tsp. Garlic Powder

½ tsp. Worcestershire

Shake or two of BBQ Sauce or a little Brown Sugar

Salt & Pepper


Do not drain cans.  Combine all and heat through.  Remove bay leaf before serving.  (100-Day Pantry)


One Pan Dump and Bake Summer Pasta with Corn, Zucchini, Tomato & Chicken

One Pan Dump and Bake Summer Pasta with Corn, Zucchini, Tomato & Chicken

One Pan Dump and Bake Summer Pasta with Corn, Zucchini, Tomato & Chicken

2 cups diced, cooked chicken

1 cup halved grape tomatoes (can substitute with a can of undrained diced tomatoes)

1 small zucchini (about 1 cup), diced

½ cup corn kernels (fresh, canned, or frozen is fine)

12 ounces (about 3 cups) uncooked uncooked penne pasta

3 ½ cups low-sodium chicken broth

8 ounces about 2 cups shredded mozzarella cheese, divided

½ cup chopped or torn fresh basil leaves, divided

2 teaspoons minced garlic

½ teaspoon salt


Preheat oven to 425°F (220°C). Spray a 9 x 13-inch baking dish with cooking spray.  In the prepared dish (or in a separate bowl), stir together cooked chicken, tomatoes, zucchini, corn, uncooked pasta, chicken broth, 1 ½ cups of mozzarella cheese, about half of the basil leaves, minced garlic, and salt. Cover the dish tightly with foil and bake for 40 minutes. Uncover; stir. At this point you should check the pasta to make sure that it is al dente (firm but just about finished cooking). If it’s still too hard, cover the dish and return to the oven until pasta is al dente. Then move on to the next step.  Sprinkle remaining ½ cup of mozzarella over the top. Bake uncovered for 5-10 more minutes (or until cheese is melted and pasta is tender). Garnish with remaining basil leaves just before serving.

Canning Baked Beans

Canning Baked Beans

Canning Baked Beans

8 pints


2 lb. dried navy beans

1⁄2 lb bacon

1 -3 large onion

2⁄3 cup brown sugar, packed

4 teaspoons salt

2 teaspoons mustard powder

1 cup orange juice (optional)

2⁄3 cup molasses (I use Grandma’s molasses which has a higher concentration of sugar)


Soak beans in 3 quarts of water, (make sure they are covered!) for 12-18 hours. Drain but do not rinse. Return beans to pot and cover with 3 quarts of fresh water. Bring to a boil over high heat. Reduce the heat; cover and simmer until the bean skins begin to split. Drain the beans, reserve the liquid. Transfer the beans to a 4-quart or larger covered baking dish. Chop the bacon and onions. Add them to the beans. Combine the brown sugar, salt, mustard, and molasses in a large mixing bowl. Add 4 cups of the reserved bean liquid (or 1 cup orange juice and 3 cups water). Pour the sauce mixture over the beans. Don’t stir! Cover the beans and bake them in a preheated 350-degree oven for 3 to 3.5 hours. The consistency should be like a thick soup. Adds more liquid if the beans become too dry. While the beans are baking, prepare your canning jars and two-piece caps (lids and screw bands) according to the manufacturer’s instructions. Keep the jars and lids hot. Ladle the hot beans into your prepared jars, leaving a 1-inch headspace. Release any air bubbles with a nonreactive tool, adding more beans as necessary to maintain the proper headspace. Wipe the jar rims; seal the jars with the lids and caps, hand tightening the bands. Process your filled jars in a pressure canner at 10 pounds pressure for 1 hr 20minutes (pints) or 1 hr 35minutes (quarts). After the pressure in the canner has returned to 0, wait an additional 10 minutes, and then carefully open the canner lid. Remove the hot jars with a jar lifter. Place them on a clean kitchen towel away from drafts. After the jars cool completely, test the seals. For added safety, boil the contents for 15 minutes before tasting or eating. (If you follow accurate canning protocol, that should not be necessary!). It takes a big pot to make this so if you want to double it, prepare two separate pots. My canner only holds 5 quarts so it can only hold a single batch anyways.

Foraged Oregon Grape and Lemon Curd

Foraged Oregon Grape and Lemon Curd

Foraged Oregon Grape and Lemon Curd


Foraged Oregon Grapes are transformed from tart and bitter to an unctuous curd suitable for eating from a spoon.

1 cup Oregon Grape puree

1/2 cup lemon juice

2 tablespoons lemon zest

1 1/2 cups raw organic cane sugar

6 eggs

8 tablespoons butter cubed


To create puree, place a heaping cup of clean Oregon Grape berries into a blender or food processor and pulse a couple times until juices start to release. Do NOT over puree. Place berry puree, lemon juice, lemon zest, sugar and eggs into a heavy bottomed saucepan. Over medium heat and whisking constantly, cook the mixture until it thickens (coats back of a spoon and whisk leaves traces in curd).

Remove from heat and pass through a fine-mesh sieve into a bowl; discard solids. Whisk butter into hot curd until well combined. Place a sheet of parchment or plastic wrap directly on top of curd and chill until cold. Serve within one week or freeze.

LTS Canned Corn Chowder

LTS Canned Corn Chowder

LTS Canned Corn Chowder


1 (15 ounce) can corn (whole kernel or creamed style)

1 (12 ounce) can evaporated milk

1 (15 ounce) can canned sliced potatoes

1 (15 ounce) can chicken broth (or water)

3 chicken bouillon cubes

salt and pepper


Combine all ingredients in a pot, including all liquid from cans. Heat until just steaming. Add salt and pepper to taste. If you like, you can also add some frozen corn to make it “cornier”.  As with many LTS recipes, if available, start by sautéing fresh aromatics (garlic, onion, shallot, celery, etc.)  before adding canned ingredients.

Neskowin Blueberry Salmon

Neskowin Blueberry Salmon

Neskowin Blueberry Salmon

1 cup Oregon blueberries

2 Chinook salmon filets, 6-8 oz. Each

½ fresh ruby red grapefruit

½ cup crushed pineapple

2 fresh limes

fresh ground black pepper

½ teaspoon chili powder

1 small Anaheim chile

2 tablespoons butter

¾ cup brown sugar


Generously butter a glass baking dish and spread pineapple in the dish. Sprinkle liberally with fresh ground black pepper. Slice the chile into very thin rings and arrange over the pineapple. Squeeze the juice of two limes over the chile slices, then lay the salmon filets over the sliced chile. Peel and trim the grapefruit, and cut it into bite-size chunks and arrange those over the salmon. Top with Oregon blueberries, sprinkle with brown sugar, and season generously with chili powder. Bake at 425° till top is bubbly and salmon is opaque. Serve with rice and fresh steamed asparagus or artichokes.