Browsed by
Tag: Spring

Ramp Chimichurri Sauce & Ramp Chimichurri Crostinis

Ramp Chimichurri Sauce & Ramp Chimichurri Crostinis

Ramp Chimichurri Sauce

1 T. fresh oregano leaves
2 tsp. fresh thyme leaves
1/4 C. fresh parsley leaves
10 ramps, trimmed and cut into 1 inch pieces, leaves included
1 T. white wine vinegar
1/2 C. extra virgin olive oil, or more as desired
Coarse or kosher salt and freshly ground pepper to taste (be liberal)
Pinch red pepper flakes

Put everything into a food processor and blender and whir the hell out of it. If you want a thinner sauce, add more olive oil, or you could add a little water.
Ramp Chimichurri Crostinis

Goat Cheese or Fresh Ricotta
Baguette
Ramp Chimichurri Sauce
Cilantro, for garnish, optional

Slice baguette into slices for bruschetta or crostini. Toast or Grill if desired; you can add olive oil if desired. Spread with cheese, drizzle with Ramp Chimichurri Sauce, sprinkle with cilantro, if desired, and serve.

Stuffed Snap Pea

Stuffed Snap Pea

Stuffed Snap Pea

20–30 pea pods (snap peas or snow peas work well)

1/4 cup assorted finely chopped herbs (see recipe notes)

1/4 cup ricotta cheese

1/3 cup cream cheese

1/2 tsp. lemon juice

salt and pepper to taste


Use a sharp paring knife to split each pea pod down the middle and form a small pocket. In a small bowl, combine herbs, ricotta, cream cheese, lemon juice, salt and pepper. Mix well. Fill a plastic bag or piping bag fitted with a round or star tip with the cheese mixture. Pipe a bit of the cheese mixture into each pea. Eat immediately or store in the fridge for a few hours before you dig in!


How to Split a Snap Pea:


It can be tough the first few times to get the knife right in the center of the pea so be patient and be prepared to give it a few tries. Insert the knife gently into the seam of each pea and then slowly slice down the center – but be careful not to slice all the way through the pea pod. This can take a bit of practice, but you’ll get the hang of it! Try to keep the knife straight and steady, and slide it through the rest of the pea (it sometimes helps to lay the pea flat on a cutting board and slide the knife through that way!) kind of like you’re opening an envelope.


NOTES


Use any herbs you have on hand here – I like a mix of parsley, chives, basil, and dill.


Buy a few extra pea pods the first time you make these so you have a few backups if you accidentally slice all the way through the peas!


You can make this appetizer a day ahead of you like. If you can, I recommend splitting the peas and mix the filling ahead of time, and then piping the cheese into the pea pods when you’re ready to serve.

Nettle Ravioli Filling

Nettle Ravioli Filling

1 1/2 tsp. extra virgin olive oil
1 C. minced leek whites
1/2 C. minced scallion (“spring” or “green onion”), white and green parts
salt and freshly ground black pepper
1 lb. fresh ricotta cheese
2/3 C. ricotta salata, grated
1/2 C. mascarpone
1/4 C. grated parmesan cheese
4 C. cooked, squeezed, chopped nettles
2 T. chopped fresh basil leaves
2 T. chopped fresh parsley
1 egg, beaten

Heat the olive oil in a skillet. Add the leek and cook, stirring, until softened. Add the scallion and cook for another minute or two, until the scallion has softened. Season with salt and pepper, and set aside to cool. Combine the cheeses. Add the leek and scallion mixture. Incorporate the nettles and herbs, and stir in the beaten egg. Taste and adjust seasonings.

Morel Mojo

Morel Mojo

Chef Scott Dolich extends morel season by pickling them into a loose, relishlike condiment he calls mojo. At the restaurant, he dips into his supply to dress up spring vegetables like asparagus or ramps or to garnish grilled meats and fish.

1 1/4 lb. morel mushrooms
1 C. apple cider vinegar
1 C. beef broth
1 C. vegetable broth
3 garlic cloves, thinly sliced
2 1/4 tsp. salt
1 bay leaf
1/2 tsp. red pepper flakes
3 tsp. EVOO

Submerge the morels in a bowl of cold water and agitate them gently to dislodge any grit. Drain them in a colander and pat dry immediately. Slice off the stems and cut the morels into bite-size pieces. Combine the morels, vinegar, beef broth, vegetable broth, garlic, salt, bay leaf, and red pepper flakes in a large pot. Cover and simmer the mixture over medium heat for 10 minutes. Remove the pan from the heat and let the morel mixture cool slightly. Discard the bay leaf. Drain the morels, reserving the brine. Puree 1 C. the morels with ½ C. the brine in the bowl of a food processor fitted with a steel blade attachment until well combined but not entirely smooth. Add the olive oil in a steady stream with the motor running until well combined. Transfer the puree to a medium bowl and fold in the remaining morels. Discard the remaining brine. Salt to taste. Transfer the relish to an airtight container to cool to room temperature. Stored in an airtight container in the refrigerator, the relish will keep for about l month. NOTE: Morels come into season in early spring and generally stick around through May.

Pickled Ramp Bulbs

Pickled Ramp Bulbs

1 pound ramps
1/2 cup unseasoned rice vinegar
1/4 cup granulated sugar
1 tsp. pickling salt (or any other finely milled salt)
1/2 tsp. coriander seeds
1/2 tsp. black peppercorns
1/8 tsp. red chile flakes
1 bay leaf

Wash the ramps well. Trim away the leafy greens and root ends. Combine the vinegar, sugar, and salt with 1/2 cup/120 ml of water in a small saucepan and bring to a boil. Place all the spices and the bay leaf in the bottom of a clean l-pint/500 ml jar and pack the trimmed ramps into the jar. Pour the brine over the ramps, leaving 1/2 inch/12 mm of headspace. Tap the jar gently to remove any air bubbles. Add more liquid to return the headspace to 1/2 inch/12 mm, if necessary. Wipe the rim and apply a clean lid and ring. Let the jar cool for at least an hour and then place in the refrigerator. Give the ramps at least a week in the pickling liquid before eating. Note: Because nothing about ramps is neat or precisely cultivated, you have to take a bit more care in their preparation. Wash them well in several changes of cold water to ensure you remove all the grit. And don’t toss the green tops! You can either sauté them and serve them as a cooked green or whirl them into an oniony pesto.

Mushroom, Potato, & Nettle Soup

Mushroom, Potato, & Nettle Soup

Nettles, once cooked, they can be handled and used as you would spinach – scramble with eggs or use in quiche or frittatas, add them to Greek spanakopita fillings, ravioli filling, risotto, soups, stir-frys, puree them for nettle pasta dough, top pizzas, make creamed nettles, or simply sauté them with extra virgin olive oil, garlic, and a squeeze of lemon (just like spinach!).

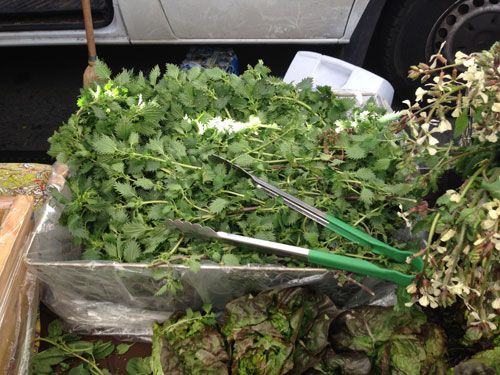
To soften the stingers, and render them harmless, cook them as such:

Bring a pot of water to a boil. Tip the contents of your bag of nettles into the pot, or use tongs to lift them into the pot. Push them down and stir them around a bit with a wooden spoon or tongs. Let them boil, and, after a minute, the stingers will have softened so that the nettles can be handled. Within 2-3 minutes, the nettles will be fully cooked. Lift them out with a spider or strainer and either refresh them under cold water, or spread them out on a baking sheet to cool. Once cool, they can be squeezed of excess water if desired (a good idea if you are adding them to eggs), or chopped to add to soups. If the stem is tender, you can chop the vegetable in its entirety and use the whole thing. If the stem is woody, just pluck the leaves from the stem and discard the stem (much easier than donning gloves and plucking the leaves from the raw stem).

Note that the nettles are lifted from the boiling water rather than pouring out the contents of the pot into a colander. This is so that you remove the floating nettles, and leave the sunken sediment (if any) behind in the pot. In preparing the nettles in this manner, you can avoid having to wash the raw nettles and risk a run-in with the stingers. Also note that I have never had anyone mention that the nettles retain any sediment, nor have I ever encountered it when eating nettles prepared in this manner. Occasionally, though, there will be a thin twig or pine needle that has to be removed.

I am often asked if nettles can be steamed rather than boiled. Yes, they can, but they should be washed first, because the sediment will not be washed away by the steam. Also, if you blanch or boil rather than steam, you have the advantage of getting a “2 for 1” with your vegetable purchase.

After par-boiling, you have a nutrient-dense leafy green (think nutrient content of spinach, times 10, with added trace minerals), plus the nutrient-dense cooking liquid. If you have salted the cooking water, you can use the resulting Nettle Broth as a rich vegetarian soup broth or for cooking rice and risotto. If you have kept your nettle boiling water unsalted, you will have a Spring Tonic of Nettle Tea to drink.

Both the nettles and the nettle cooking liquid freeze beautifully, and will keep the better part of a year. A tip: Don’t squeeze out the water from the cooked nettle leaves before freezing; the extra water will help to preserve their integrity in the freezer, and you can always squeeze them out when they have thawed.

Mushroom, Potato, & Nettle Soup

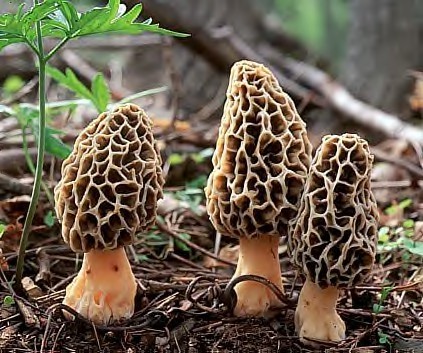
Don’t feel limited to the mushrooms listed – a great number of wild mushrooms will work just as well. This soup freezes quite nicely.

1/2 lb. young nettles
¼ C. good flavored olive oil, plus more for cooking the mushrooms
1 lb. potatoes, peeled, halved, and sliced ¼ inch thick
a pinch of chile flake
2 large garlic cloves, peeled and sliced
½ lb. shiitake mushrooms, sliced
½ lb. maitake mushrooms, chopped or pulled apart into petals
10 C. good quality meat, chicken, mushroom, or vegetable broth (you can include some of the nettle cooking liquid in the soup broth – it is rich and will add another layer of flavor to the soup)
sea salt & black pepper

Bring a pot of water to a boil. Season the water with salt. Carefully add the nettles and cook until the stingers have softened, about a minute. Drain the nettles and refresh them briefly under cold water until cool enough to handle. Pick the leaves from the larger, woodier stems (the tender young stems can be chopped and added to the soup). Set the nettles aside.

Heat the olive oil in a soup pot over a medium flame. Add the sliced potato and cook, stirring every so often, until the potatoes have started to take on some color (10-15 minutes). Add the chile flake and sliced garlic. Add another T. oil if the ingredients in the pot seem dry. Cook for 1 more minute. Break up the potatoes slightly with a potato masher or wooden spoon, then add the stock to the pot. Bring to a boil.

Meanwhile, sauté the mushrooms in additional oil. Add them to the soup. Season with salt and pepper. Simmer the soup for 20 minutes, then add the nettles. Warm through and serve.

SpicySweet Pickled Ramps

SpicySweet Pickled Ramps

12 oz. ramps with greens (about 3 bunches)
3 C. cider vinegar (5% acidity)
2 tsp. pure kosher salt
1/2 C. sugar
2 tsp. fennel seeds
2 tsp. yellow mustard seeds
1 tsp. whole black peppercorns
1 tsp. hot pepper flakes, or more to taste

Prepare for water-bath canning: Wash the jars, keep them hot in the canning pot, and put the flat lids in a bowl. Wash the ramps well and trim off any damaged leaves. Cut the tops off so that the bulb ends will fit upright in your canning jar with 1/2 inch headspace at the top. Arrange the leafy tops into four stacks. In a saucepan, bring the vinegar, 1 C. water, the salt, sugar, and spices to a boil over high heat, stirring to dissolve the salt and sugar. Using a jar lifter, remove the hot jars from the canning pot, carefully pouring the water from each one back into the pot, and place them upright on a folded towel. Working quickly, pack the ramp bulbs into one of the hot jars. Roll up each stack of leaves and stuff two rolls into each of the other two hot jars. Ladle the hot vinegar mixture into all the jars, leaving 1/2 inch headspace. Use a chopstick to remove air bubbles around the inside of each jar. Use a damp paper towel to wipe the rims of the jars, then put a flat lid and ring on each jar, adjusting the ring so that it’s just finger-tight. Return the jars to the water in the canning pot, making sure the water covers the jars by at least 1 inch. Bring to a boil, and boil for 10 minutes to process. Remove the jars to a folded towel and do not disturb for 12 hours. After 1 hour, check that the lids have sealed by pressing down on the center of each; if it can be pushed down, it hasn’t sealed, and the jar should be reprocessed or refrigerated immediately. Label the sealed jars and store.

Sausage & Orecchiette with Ramps and Favas

Sausage & Orecchiette with Ramps and Favas

Orecchiette with Ramps and Favas

Kosher salt

1 pound fresh orecchiette pasta

2 tablespoons extra-virgin olive oil, plus more for drizzling

1 pound spicy Italian sausage, removed from the casings if not bulk

1 cup peeled shelled fava beans

3 cups sliced ramps, bulbs and leaves (or an equal amount of leeks and 1 garlic clove)

Freshly ground black pepper

2 cups freshly grated parmesan cheese


In a very large pot, bring 5 quarts water and 3 tablespoons salt to a boil. Add the pasta and cook until just al dente, about 1 minute less than the package directions. Occasionally give the pasta a stir so it doesn’t stick together. Scoop out and reserve 1 cup of the pasta water before draining the pasta.  Meanwhile, put a large skillet over high heat. Add the olive oil and sausage and cook, breaking up the meat as it cooks, 2 to 4 minutes. Add the fava beans and ramps, season with salt and pepper and cook for 2 minutes.  Add the pasta and reserved pasta water to the pan and cook for 30 seconds, stirring to blend. Remove from the heat and stir in the parmesan. Top with a good drizzle of olive oil and a sprinkling of freshly ground pepper.

Pixie Tangerine Mint Spritzers

Pixie Tangerine Mint Spritzers

Pixie Tangerine Mint Spritzers


Pixie tangerines are pale orange colored, moderately juicy, with lower acidity, and always seedless. Individual Pixie tangerines vary in shape, size and peel texture. In general, Pixies are small (1-3 inches in diameter), have a pebbly skin and are easy to peel with segments that separate easily from one another.  Typically available in April


3 Ojai Pixie Tangerines

8 fresh mint leaves

1 tsp. agave nectar

3 ounces Vodka or Tequila

Club Soda

Ice


Peel the tangerines and split each tangerine in half. Please the tangerines mint and agave in a cocktail shaker or cocktail glass and use a muddler or the long end of a wooden spoon to muddle the ingredients together. Add the Vodka or Tequila and fill the shaker with ice. Shake well. Strain the cocktails over a fresh glass of ice and top with a float of club soda.