Browsed by
Tag: Nutrition Skipped

Kil’t Greens with Bacon Jam

Kil’t Greens with Bacon Jam

Kil’t Greens with Bacon Jam


2 lbs. mixed young greens, such as mustard, chard, kale, and spinach

1/4 cup bacon jam (recipe below)

Kosher salt and freshly ground black pepper, to taste

Optional garnishes: hot pepper vinegar, red onion, sliced boiled egg

Holly Hill Inn’s Bacon Jam

1 lb. good-quality bacon, diced

1 1/2 cups diced onion

1/3 cup bourbon

1 cup apple cider vinegar

1 cup brown sugar

1/4 cup whole-grain mustard


For the greens:  Submerge greens in standing water, remove any large stems, and rip leaves into bite-size pieces if necessary. Heat a large cast-iron skillet over medium-high, add bacon jam, and melt. Add greens, turn heat to high, and toss until wilted. Season with salt and pepper. Garnish as desired and serve immediately.


For Holly Hill Inn’s Bacon Jam:


Cook bacon in a cast-iron skillet over medium-high heat until a good amount of fat has rendered and bacon just starts to turn golden, about 4 to 5 minutes. Add diced onion, turn the heat down to low, and cook together until onion is tender. Add bourbon, vinegar, brown sugar, and mustard, and simmer until thickened, about 10 minutes. Refrigerate until ready to use. (Makes about 2 cups)

Bacon Scallion Hoecakes

Bacon Scallion Hoecakes

Bacon Scallion Hoecakes


1 cup self-rising flour

1 cup fine yellow cornmeal

2 tsp. baking powder

1/2 tsp. salt

1/2 T. sugar

2/3 cup buttermilk

1/3 cup water

Scant 1/4 cup bacon fat

1/3 cup crème fraîche (or sour cream)

2 eggs

1/3 cup scallions, thinly sliced

1/4 cup crisp bacon, finely chopped

Canola oil, combined with some bacon fat if desired


In a medium bowl, whisk together flour, cornmeal, baking powder, salt, and sugar. In another small bowl, combine buttermilk, water, bacon fat, and crème fraîche or sour cream. Blend well. Add eggs, and mix until just combined. Pour liquid into dry ingredients, and mix just until a thick batter has formed. Stir in scallions and bacon. To keep the hoecakes tender, avoid overmixing. Heat oil and bacon fat in a cast-iron or other heavy skillet over medium to medium-high heat. Use about an eighth of a cup of batter for smaller cakes, or a quarter cup for larger ones. Cook them as you would pancakes, allowing them to fry on one side for about three minutes or until crisp and golden brown. Flip and cook for another couple of minutes. Replenish oil as needed, to maintain a generous film in the pan. Batter will keep for a couple of days tightly covered in the refrigerator. If it seems too thick after storing, stir in a bit more buttermilk or water.

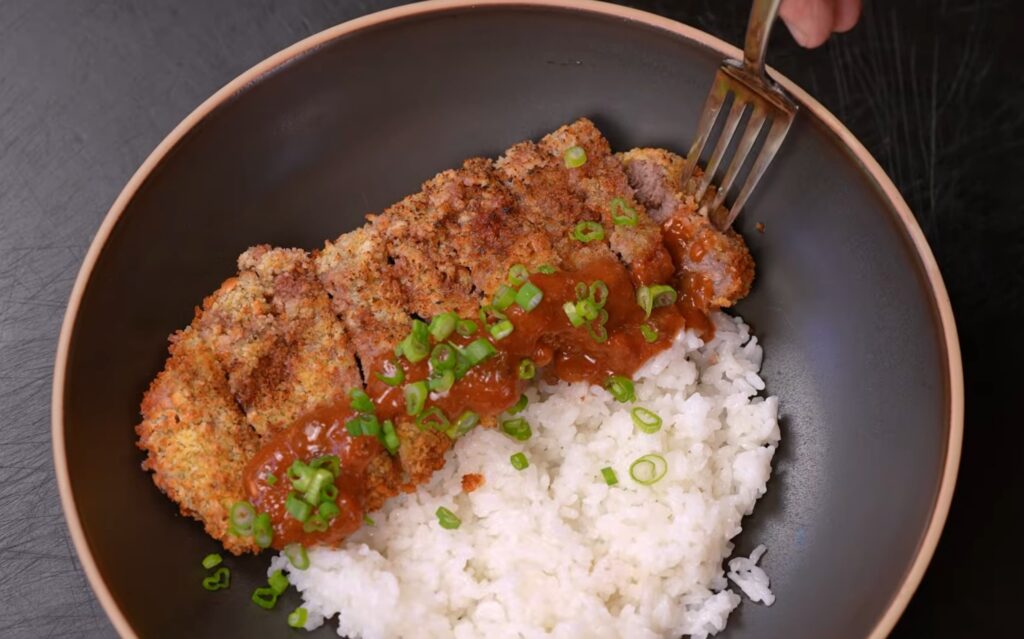
Air Fryer Steak Katsu

Air Fryer Steak Katsu

Air Fryer Steak KatsuAir Fryer Steak Katsu


1 strip steak, about 12 oz. and about 1 inch thick

Kosher salt
freshly ground black pepper

1/2 C. all-purpose flour

2 large eggs, beaten

1 C. panko breadcrumbs

Neutral oil spray

Rice for serving

Sliced green onions for garnish

1/4 C. ketchup

1/4 C. Heinz chili sauce

2 T. Worcestershire sauce

2 tsp. Dijon mustard

2 tsp. apple cider vinegar

1 tsp. soy sauce

1/2 tsp. onion powder

1/2 tsp. garlic powder

1/4 tsp. celery salt

Fresh black pepper

1 to 2 T. water as needed


Place the steak between two pieces of plastic wrap and gently pound to about 1/2 inch thick – season both sides with salt and pepper. Put the flour in one shallow dish, the eggs in a 2nd, and the panko in a third. Dredge the steak in flour and shake off the excess, dip into the egg mixture, then press firmly into the panko so it’s fully coated. Preheat air fryer
at 400 degrees. Spray both sides of the steak lightly with oil, and cook 8 – 10 minutes, flipping halfway, until golden and about medium inside. Stir together the ketchup, Worcestershire, soy sauce, sugar and Dijon – mix well. Rest the steak 3 minutes, then slice into strips and serve over rice with the sauce drizzled over the top – garnish with green onions.

Summer Rubber Chicken

Summer Rubber Chicken

Summer Rubber Chicken


Day one: Marinate as much chicken as you need to make three meals.


We are a family of five and I use 12 chicken breasts total. I marinate 12 breasts in two bags (6 each) with teriyaki sauce, balsamic vinegar, a squeeze of lemon or lime, garlic powder, oregano and a liberal grinding of pepper. Or if I’m in a huge hurry, I’ll split a bottle of Italian salad dressing between the two bags and call it a day. Remember, the longer you marinate, the more time the flavors of your marinade have to infuse themselves in your chicken. In other words, I’d do this first thing in the morning so your chicken is wonderful that night.

On your outdoor grill, barbecue all of the chicken, reserving six breasts for later. I will serve coleslaw, green salad and maybe a potato salad with the meal. The breakdown of the 12 breasts is six used the first night (my husband or teenage son usually eats the extra one), three used the second night and the last night, three more get used.

Day two: Take three of the leftover chicken breasts and cube them for Chicken Taco Salad. Use a bag of prewashed salad (I like the spring mix), shredded cheese, a can of drained and rinsed black beans, chopped green onions, chopped cilantro, chopped tomatoes and anything else you like. Toss altogether with a little Italian dressing and you’ve got a nice dinner. You can make quesadillas to go with this salad, if you like.

Day three: Take the remaining chicken breasts and chop for Summer Chicken Salad Sandwiches. Add chopped hard boiled egg, chopped red onion, pesto (you can buy it in a jar or make it if you have a bounty of basil), mayo (use low fat), salt and pepper to taste. Serve on hearty wheat rolls with sliced tomato and leaves of Romaine lettuce. Add a tossed salad and you’re there!

There you have it — Summer Rubber Chicken. Chicken cooked once and stretched into three tasty and easy meals! Notice we never turned on any appliance in the kitchen — your kitchen will stay cool and so will you!

The Rubber Chicken Recipe!

The Rubber Chicken Recipe!

The Rubber Chicken Recipe!


Rubber Chicken is one of the recipes I’m most famous for—and yet, it’s not really mine. I just named it Rubber Chicken because it allows you to stretch one measly chicken into 3 days worth of meals!

Rubber Chicken was originally published 20 years ago in my newspaper column (The Manic Housewife) that I wrote for the Daily Courier in Rutherfordton, NC. Hard to believe it’s been that long!

My mother made Rubber Chicken, her mother made it (with the second day meal slightly different) and I’m sure, women across this continent and abroad have been passing this well loved frugal recipe down to their kin for generations.

Besides the fact that you can get three real meals out of this recipe, you also get the benefit of some pretty fabulous bone broth as well! Let’s not forget how transformative this stuff is, plus favorwise, you just can’t beat it.

If you buy organic chickens and cringe at the price, this is one way to make your purchase go well beyond just one meal.


Enjoy!

Leanne Ely’s Famous Rubber Chicken

Serves 4 for 3 days

1 chicken — washed and patted dry (get a nice sized one)

1/2 celery rib — cut in pieces

1 onion — quartered

1 carrot — cut in 2″ pieces

salt, pepper, garlic powder to taste


Day One: The adventure begins–Preheat oven to 400 degrees. In the cavity of the chicken, season with salt, pepper and garlic powder and place cut up vegetables inside. Sprinkle the outside with salt and pepper and a little garlic powder, too, if you like. Cook for about an hour or longer (depending on the size of the bird) till the juices run clear. Let sit a minute and then remove the vegetables. In the meantime, if you were smart, you boiled the neck with some celery, onion and carrot and have that broth, too. To further cut down on the grease from the chicken, you could take the cooking juices and put them in a C. and refrigerate while you make the rest of the meal. This will get rid of a significant amount of chicken fat which will all rise to the top. Make a nice gravy by deglazing the pan with a little water and thicken it up with a flour/water mixture (about a T. should do) Serve your wonderful chicken with Just Like Mama’s Mashed Potatoes and lots and lots of veggies. Remember, you want leftover chicken.

Day Two: Let the adventure continue! Take your time and pull every last itty bitty bit of chicken off them bones. You want that chicken skeleton to look like a science project. Toss the chicken in pot with a can of black beans and season with a little cumin, some garlic powder and serve it up with lots of salsa, tortillas, some cheese–whatever turns your key! A great big salad will give you a perfect dinner.

Day Three: The adventure ends–with the skeletal remains finally hitting the stock pot. Throw in the same veggies: onion, carrots and celery, season it with salt, pepper and garlic powder and throw about 3 quarts of water over the top, adding 1 T. of apple cider vinegar to pull the minerals from the bones (don’t worry, you won’t taste it!). Cook the daylights out of it and strain. Now make soup or store appropriately.

Chicken Noodle Soup

Chicken Noodle Soup

Chicken Noodle Soup


Chicken carcass (everything left: bones, skin, bits)

1/2 onion

1–2 carrots, chopped

1–2 celery stalks, chopped

2 cloves garlic (smashed)

3-4 slices fresh ginger

1 bay leaf (if you’ve got it)

6-10 peppercorns

Water (enough to cover everything by about an inch)

Salt (to taste, later)

A splash of soy

1 T. chicken soup base or 1 bouillon cube

1 C. wide egg noodles


Throw everything into a pot. Cover with water. Bring it to a boil, then immediately turn it down to a gentle simmer. Let it go at least 1 hour, ideally 1 1/2 to 2. Skim anything weird off the top if you want, but don’t obsess. Strain it. That liquid is gold – but keep the veggies. Put the strained broth back in the pot. Add the soy & bouillon, and mix in well. Then add the noodles, and simmer until softened, 6 – 7 minutes. Add a handful of whatever chicken you’ve got left and some of the veggies.

Chicken Dumpling Bowl

Chicken Dumpling Bowl

Chicken Dumpling Bowl


1 1/2 C. cooked rotisserie chicken, finely chopped or shredded

2 C. green cabbage, thinly sliced

2 green onions, sliced

2 cloves garlic, minced

2 tsp. grated ginger

2 T. soy sauce

1 tsp. sesame oil

1 tsp. rice vinegar

1/2 tsp. sugar

1 T. neutral oil

Rice

Chili crisp


Heat a large pan over medium-high and add the oil. Add the cabbage and let it cook a couple minutes until it starts to soften and get a little color. Add garlic and ginger, cook about 30 seconds until fragrant. Add the chicken and toss everything together. Let it sit a minute so some bits get a little crispy. Add soy, sesame oil, vinegar, and sugar – toss well and cook another 1–2 minutes until everything is hot and slightly glossy. Turn off heat and stir in most of the green onions

Pink Pine Needle Tea

Pink Pine Needle Tea

Pink Pine Needle Tea


2 cups water

2 T.  (11g) snipped pine needles

¾ cup (90g) wild blueberries, fresh or frozen

2 tsp. freshly squeezed lemon juice

2 tsp. honey, or to taste


Combine the water, pine needles, and wild blueberries in a small saucepan over high heat. Bring to a simmer, cover, then reduce the heat to low to maintain a simmer for 15 minutes. Remove the pan from the heat and stir in the lemon juice and honey. Make sure the honey is completely dissolved. Set a strainer over your serving mugs and pour the tea through the strainer. Enjoy!

Crispy Chicken Melt

Crispy Chicken Melt

Crispy Chicken Melt


1 C. cooked chicken, finely shredded

4 slices bread (sourdough, white, whatever you’vegot)

4 slices cheese (cheddar, provolone, or mozzarella)

2 T. butter or mayonnaise (for the bread)

2 T. mayo

1 tsp. mustard or chili sauce

Pickles or thin sliced onion

Chips


Heat a pan over medium-high with a little oil or butter. Add the shredded chicken and leave it alone for a couple minutes so it can get crispy in spots. Stir, let it go another minute, and season lightly with salt and pepper. Drop the cheese right onto the chicken in the pan and let it melt into it. Meanwhile, spread butter or mayo on one side of each slice of bread. Put two slices, buttered side down, into another pan (or move the chicken aside and use the same one). Pile the cheesy chicken onto the bread, top with the remaining slices (buttered side up), and cook until golden and crisp, about2 to 3 minutes per side. Press lightly so everything melts together. Add pickles. Mix mayo with chili sauce and spread inside before closing

Sheet Pan Breakfast

Sheet Pan Breakfast

Sheet Pan Breakfast


1 package Simply Potatoes Shredded Hash Browns

3 T. olive oil

1 ½ tsp. Italian seasoning blend – OR Southwest seasoning blend

salt and pepper – to taste

1 cup shredded cheddar cheese – or Monterey Jack cheese

6-8 breakfast sausage links

6 large eggs

chopped green onions, parsley, thyme, or cilantro


Preheat oven to 425 degrees. Arrange the hash browns on a greased baking sheet. Drizzle with olive oil, then sprinkle with Italian or Southwest blend seasonings and salt and pepper to taste, toss to combine. Mix the spices around onto the hash browns. Gently push the hash browns onto one half of the sheet pan so that the other half is empty. Bake these alone for 10 minutes. Add sausage links to the pan and bake for 15-20 minutes. Crack the eggs and add them one at a a time to the empty area of the baking sheet. Do not touch them. Sprinkle cheese over the hash browns. Carefully transfer the pan back to the oven and bake for another 10 minutes or until the sausages are done and egg yolks are cooked to your preference. Season eggs with salt and pepper and garnish everything with fresh herbs of choice. Serve immediately.

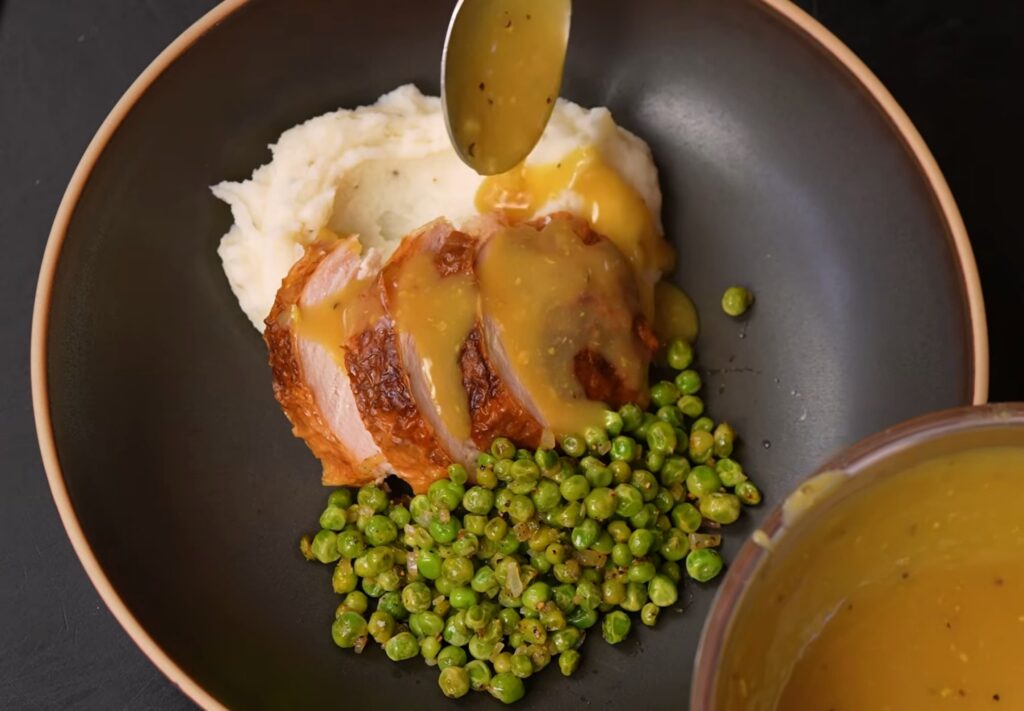
Stretch a Rotisserie Chicken

Stretch a Rotisserie Chicken

Stretch a Rotisserie ChickenStretch a Rotisserie Chicken


Old School Chicken & Mash

1 1/4 lb. Yukon Gold potatoes (about 3 medium), peeled and cut into chunks

3 T. butter

1/3 to 1/2 C. half & half

1/2 tsp. kosher salt (plus more for water)

1/2 tsp. coarse ground black pepper

1 T. butter

1 T. all-purpose flour

3/4 C. chicken broth

1/4 tsp. kosher salt

1/4 tsp. coarse ground black pepper

1/2 tsp. soy

1 1/2 C. frozen peas

1 T. butter

1 small shallot, finely chopped

Pinch kosher salt

Little lemon zest

1–2 tsp. fresh lemon juice

Fresh black pepper


Put the potatoes in a pot, cover with cold water, and salt it so it tastes like the ocean. Bring to a boil, then simmer until fork-tender, about 12–15 minutes. Drain well, then let them sit in the pot for a minute so excess moisture cooks off. Add the butter and start mashing. Once mostly smooth, add the milk a little at a time until you get the texture you like. Season with salt and pepper Melt the butter in a small pan over medium heat. Add the flour and cook, stirring, for about 1–2 minutes until it smells a little nutty but not browned. Slowly pour in the chicken broth while whisking so you don’t get lumps. Let it simmer gently for a few minutes until it thickens to a smooth, pourable gravy. Season with salt and pepper. Add soy Melt the butter in a small pan over medium heat. Add the shallot and a pinch of salt, and cook 2–3 minutes until soft and slightly sweet, not browned. Add the frozen peas (no need to thaw) and cook, tossing, until heated through, about 3–4 minutes. Turn off the heat and add the lemon juice and a little zest. Toss to coat. Finish with black pepper and taste

Sheet Pan Garlic Butter Steak and Potatoes

Sheet Pan Garlic Butter Steak and Potatoes

Sheet Pan Garlic Butter Steak and Potatoes


2 large ribeye or sirloin steaks about 1 1/2 inches thick, room temperature

1 pound baby yellow potatoes halved

1 pound fresh green beans trimmed

2 T.  avocado oil

1 tsp. garlic powder

½ tsp. onion powder

¼ tsp. salt

¼ tsp. black pepper

Garlic butter:

¼ cup salted butter softened to room temperature

1 garlic clove minced

1 ½ tsp. grated Parmesan cheese

1 tsp. fresh chopped chives

¼ tsp. fresh chopped parsley


Preheat oven to 375­°F and grease a large baking sheet. If you haven’t already, move 2 large ribeye or sirloin steaks to the counter to allow them to come to room temperature. Place 1 pound baby yellow potatoes and 1 pound fresh green beans on the baking sheet, and toss with 2 T.  avocado oil. In a small bowl, combine the 1 tsp. garlic powder, ½ tsp. onion powder, ¼ tsp. salt, and ¼ tsp. black pepper. Reserve 1 tsp. of the mixture, then sprinkle the remaining seasoning over the top of the vegetables. Roast the vegetables in the oven for 25 minutes. Remove from the oven and turn and stir the vegetables on the pan. Push the vegetables (carefully) to one side of the baking sheet to make room for the steaks. While the vegetables cook, combine all garlic butter ingredients in a small bowl and set aside.  Place the steaks on the baking sheet and sprinkle them with the 1 tsp. reserved seasoning. Broil for 3-4 minutes, then remove from the oven. Cover the vegetable portion of the sheet pan with aluminum foil, flip the steaks, and broil for another 3-4 minutes. Remove the baking sheet from the oven and spread the garlic butter over the steaks. Carefully cover the baking sheet with aluminum foil and allow to rest for about 10 minutes. Serve!  This yields medium-rare steaks. Add 2 more minutes of broil time for medium steaks. Bringing the steaks to room temperature is essential to making sure they are tender when baked in the oven. Do not put cold steaks into the oven! You can use sirloin steaks or ribeye steaks for this recipe. The ribeyes are much more tender, but the sirloin steaks are a more budget-friendly option and turn out pretty tender and juicy.

Honeymoon Glow Smoothie

Honeymoon Glow Smoothie

Honeymoon Glow Smoothie


1/2 small roasted beet

Heaping 1/2 cup fresh pineapple chunks

1 cup non-dairy milk (I like coconut milk for this smoothie)

small handful macadamia nuts (or 4-5 Brazil nuts)

1-2 dates, depending on your desired sweetness

1/2 tsp maca root

1 tsp organic vanilla extract (optional)


Combine all ingredients in a high powered blender and process until smooth. Serve immediately. Feeling inspired yet? Me too. I can’t wait for the next time I’m called back to magical Hawaii; until then, these Hawaiian beauty secrets infuse my regular routine with a dose of tropical delight.

The Downtowner Sandwich

The Downtowner Sandwich

The Downtowner Sandwich


1 6 inch sub sandwich loaf, I buy the 12-inch loafs from Sam’s Club and cut in half

4 T. softened cream cheese, I use the spreadable tub

¼ tsp. dill

4-5 thin slices Turkey Breast, adapt to your preference

2 slices Swiss or Provolone cheese

2 T. cranberry sauce

½ avocado, sliced thinly

½ cup shredded lettuce


Cut sub sandwich loaf in half length wise to create a top and bottom half of sandwich. Spread about 2 T. of cream cheese on the inside of each sandwich half. Sprinkle the top of the cream cheese lightly with dill. Place turkey slices on bottom half of sandwich and place the two slices of cheese over the top of turkey. Place sandwich halves on microwave safe plate and microwave the sandwich halves for about 30 seconds or until cheese begins to melt. Smear cranberry sauce over the top half of sandwich. Place avocado slices over to top of the cranberry sauce. Next place shredded lettuce evenly over the top of the avocado. Place the two sandwich halves together and enjoy!

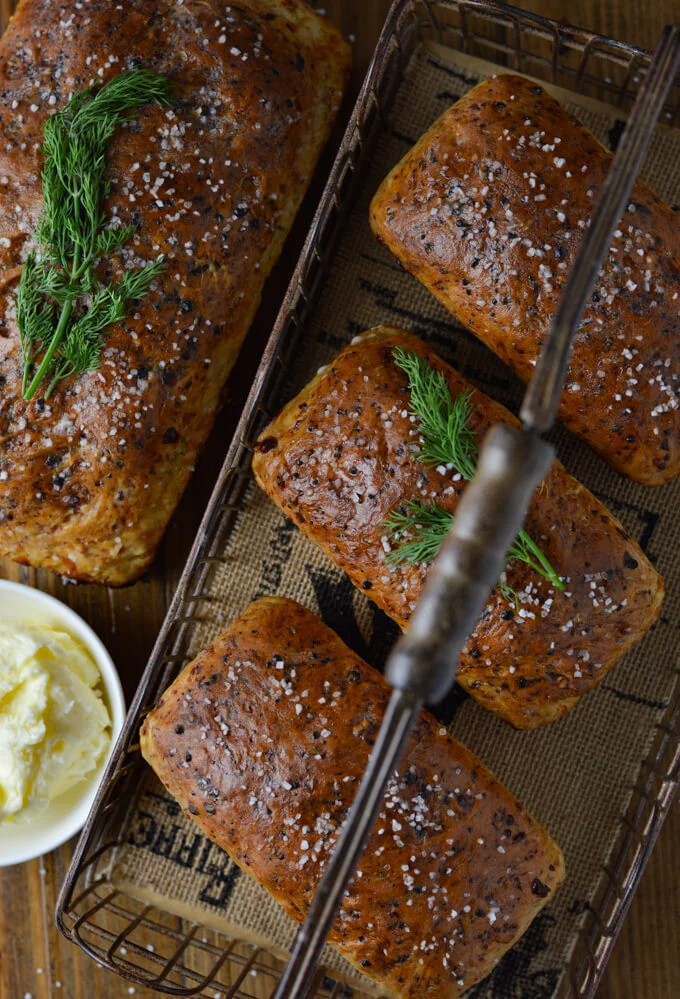
Grandma’s Old Fashioned Dill Bread

Grandma’s Old Fashioned Dill Bread

Grandma's Old Fashioned Dill BreadGrandma’s Old Fashioned Dill Bread


1 package Active Dry Yeast

½ tsp. Sugar

¼ C. warm Water

1 C. small curd Cottage Cheese

2 T. Sugar

1 T. melted Butter

1 T. Minced Dried Onions

2 tsp. dried Dill Seed

1 tsp. Salt

¼ tsp. Baking Soda

1 Egg, beaten

2 ¼ C. All-Purpose Flour

Butter, for brushing on baked loaves

Coarse Sea Salt, for sprinkling


Dissolve yeast and sugar in the warm water. Let it sit for 10 minutes until the foam on top is doubled in size. Heat the cottage cheese in a small pan to lukewarm. Combine the cottage cheese and the yeast mixture together. Add the remaining ingredients until combined. Butter a large bowl and place the dill bread dough. Roll the dough around the bowl to butter it. Place a dish towel over the bowl and set it in a warm place (microwave works great). Let the dough rise for about one hour or until it is doubled in size. Press the dough down and shape it into either one regular loaf size or three mini loaves. Place the shaped dough into the loaf pan(s). And again set them in a warm place, cover them with a dish towel and let them rise for another hour or until doubled in size. While the dough is rising for the second time preheat the oven to 350°F. Bake the regular sized loaf for 40-45 minutes or until golden brown. Bake the mini loaves for 25-30 minutes. Take out of the oven and let sit for no longer than 5 minutes in the pan(s). Remove the bread from the pan(s) and set them on a wire cooling rack. Brush lots of butter on the top and sides of the loaves. Sprinkle with coarse sea salt. ENJOY!

Notes: Place the yeast mixture in a warm place (microwave works great) and let it sit for about 10 minutes or until the foam on top has doubled in size. If the yeast does not rise, it’s because the water was too hot or the yeast is old. If that’s the case, you will need to start over with new yeast. You don’t want the dough to rise beyond double because it stretches the gluten too much and will cause the end product to be tough. How can you tell if your dough has risen to its proper stage? Use the tip of your finger and make an indentation around the outside of the dough. If it bounces back about halfway, you know your dough is ready. Don’t let the baked loaves sit any longer than five minutes in the pan, otherwise, they sweat and produce condensation.

Creamy Garlic Herb Chicken

Creamy Garlic Herb Chicken

Creamy Garlic Herb Chicken


6 pieces of chicken, salt and peppered (I used thighs)

3 T.  olive oil

¼ cup butter

16 ounces sliced mushrooms

2 T.  minced garlic

3 tsp. thyme

1½ tsp. rosemary

1 tsp. salt

¼ tsp. pepper

1 cup chicken broth

2 cups heavy cream


Heat large skillet over medium high heat. Add olive oil and chicken. If using boned chicken cook chicken for 8 minutes per side. Remove chicken from skillet. Wipe skillet clean with a paper towel. Melt butter over medium high heat and add mushrooms. Cook for about 5 minutes. Add garlic, thyme, rosemary, salt and pepper and cook for another minute. Add chicken broth and heavy cream and bring to a boil.

Lower heat to medium low and add chicken back in. Cook for about 20 minutes. Chicken should reach and internal temperature of 165 degrees F. Serve

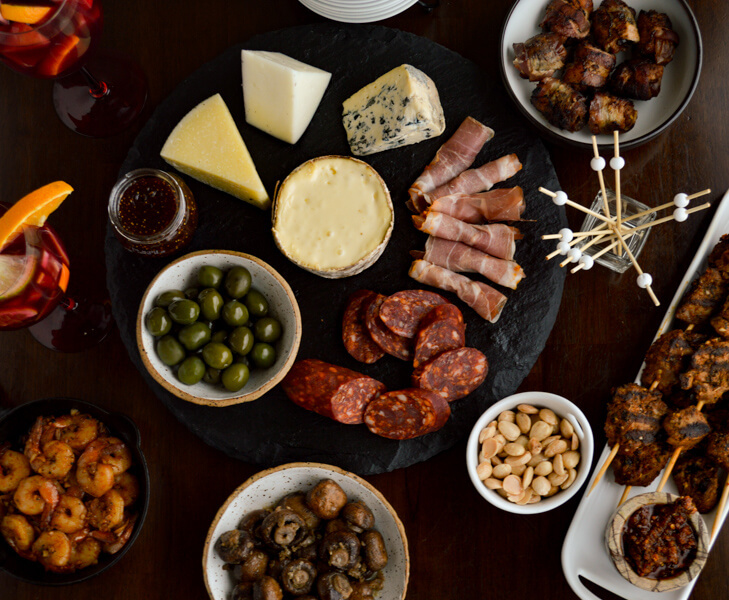
A Tapas Experience

A Tapas Experience

A Tapas ExperienceA Tapas Experience


A Casual and Laid-Back Get-Together: Simplicity is the key. Casual and laid back is the essence of Spanish meals. Nobody is in a hurry. A Tapas Experience should not be a come-and-go party. Otherwise, people will miss out on its true essence. Most of the tapas recipes are not complicated, and they take very little time to prepare. Many of them can be made ahead which will free you to mingle with your guests once they arrive. After all, mingling is an essential element.


Pitcher of Sangria


Manchego – Cheese made in the La Mancha region of Spain from the milk of sheep of the Manchego breed and is one of the most popular cheeses from Spain.

Torta del Casar – Very similar to Brie with a soft and creamy center. Make a thick syrup out of a ¼ C. Spanish Sherry and 1 T. sugar to drizzle over the top. Heat until sugar is dissolved then boil for about 3-4 minutes until thick.

Cabrales – A delicious blue cheese made from primarily cow’s milk blended with goat and sheep milk. Made in Asturias, Spain and found to be very similar to Roquefort. It is considered to be one of the finest blue cheeses in the world.

Jamón Serrano or Jamón Ibérico – These Spanish dry cured hams pair perfectly with the above Spanish cheeses. Sliced paper thin these hams have a rich/buttery and salty/sweet flavor.

Chorizo – A dried and cured sausage in a casing. Found in the ready-to-eat meat section alongside salami. You can purchase either a sweet or spicy version, whichever you prefer.


Spanish Olives

Marcona Almonds

Fig Jam

Crusty Bread

Paella

Crispy Rice Cakes

Crispy Rice Cakes

Crispy Rice Cakes


4 cups old rice

¼ cup gluten free 1:1 flour

¼ cup finely diced green onion

1 T.  sesame oil

4-5 T.  hot water

Kosher salt to taste

1 T.  toasted sesame seeds

Oil for frying

Dipping sauce:

2 tsp. fresh grated ginger

1 garlic clove, minced

1 tsp. sambal

1 tsp. agave

2 tsp. rice vinegar

1 T.  tamari

2 tsp. finely chopped green onion


Add all the rice cake ingredients to the bowl of a standing mixer fitted with a paddle attachment. Beat for a few minutes until the rice mixture coats the sides of the bowl and is very sticky and somewhat uniform as a dough. Scrape the dough from the sides of the bowl and shape with damp hands into discs. I got 10 evenly sized discs. Sprinkle them with kosher salt and the sesame seeds. In a heavy skillet or non-stick pan add the oil over high heat. Fry the rice cakes (I did 5 at a time) for about 4 minutes until golden, and then flip and cook another 4 minutes until golden brown on each side. Repeat with the next batch and serve hot with the dipping sauce. While the cakes are frying, whisk together all of the dipping sauce in a small bowl.

Peruvian Seco de Carne

Peruvian Seco de Carne

Peruvian Seco de Carne


1 1/2 pounds stew meat (such as ground chuck) , cut into 1-inch cubes

kosher salt

Olive oil

1 yellow onion, diced

3 garlic cloves, minced

2 tsp. ground cumin

1 1/2 tsp. ground pepper

1 tsp. ground paprika

1 large bunch cilantro, leaves picked and stems discarded

3 serrano peppers, deseeded and chopped

1 1/2 C. beef or chicken stock, (homemade chicken stock or store-bought), divided

1 C. lager beer , (like Heineken or Beck’s)

4 small potatoes, cubed

4 small winter squash, cubed


Preheat oven to 325F. Sprinkle the cubes of meat liberally with salt. In a large pot, add 2 T. of olive oil and heat over medium heat. When the oil is hot, add the meat in one layer, being sure to not overcrowd the pot (you may have to brown the meat in 2 batches – I did!). Cook meat on both sides for about 30 seconds or so. Remove the meat from the pan and transfer it to a bowl. Set aside. To the jar of a blender, add the cilantro leaves, 3 chopped serrano peppers and 1/4 C. of chicken stock. Blend until smooth – the mixture will resemble a pesto. Set aside. In the same pot, add 2 T. of olive oil and add the onions; cook until translucent, about 5-7 minutes. Add the garlic and cook until fragrant, an additional minute. Stir in the cumin, pepper, paprika and 1 tsp. of salt. (Note: If you’re not using low-sodium chicken broth, I’d recommend adding 1/2 tsp. of salt.) Pour in the beer and deglaze the bottom of the pot, scraping the brown bits as the beer foams up and steams. Add the meat and its juice back to the pot (it will release some juice as it sits), along with the cilantro mixture and remaining 1 1/4 C. of chicken stock. Cover the pot with its lid and transfer it to the oven. Allow to gently simmer for 1 1/2-2 hours, until the meat is tender. Check on it at the 1 hour mark and add any additional chicken stock if liquid is running low (I added about 1/2 C. over 2 hours). At the 1 1/2 hour mark, check the meat – depending on the quality of meat, it might still be tough. If needed, cook for an additional hour, adding any liquid if necessary. Fold in the potatoes and squash. Cook for an additional 30 minutes, until potatoes are tender. Before serving, adjust salt and pepper to taste. Serve over a bed of warm rice, couscous or quinoa. Garnish with a sprinkling of cilantro.

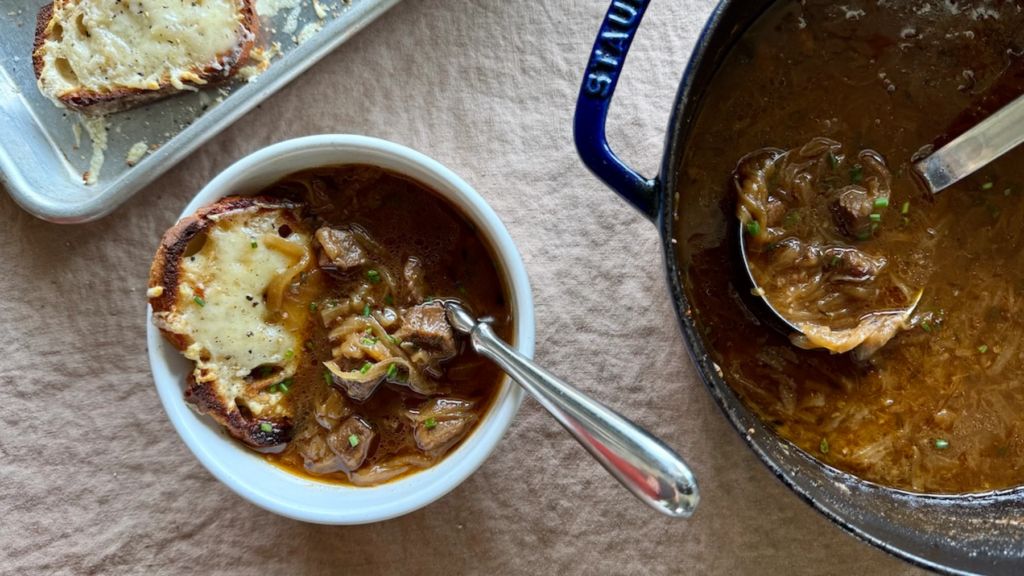
Venison French Onion Soup

Venison French Onion Soup

Venison French Onion SoupVenison French Onion Soup


2 lb. venison stew meat (1-2 inch chunks)

Beef tallow or oil for cooking

Coarse sea salt and fresh cracked pepper

2½ tsp. fresh thyme leaves, divided

3 garlic cloves, minced

2 T. cognac

7 C. unsalted venison or beef stock, plus more as needed

2 – 2½ lb. yellow onions (about 3 medium), thinly sliced

4 T. butter, plus extra for toast

Sliced sourdough or rustic bread

1½ C. grated Gruyère, Swiss, or provolone cheese

Finely chopped fresh chives for garnish


Heat a large Dutch oven or wide pot over high heat. Add enough tallow or oil to lightly coat the bottom and let it melt. Working in batches as needed, add the stew meat and cook, undisturbed for a few minutes, until browned on the bottom. Give the meat a good stir and cook until browned all over. Generously season with salt, pepper, and 2 tsp. of fresh thyme. Add the garlic and cook another few minutes, then carefully pour in the cognac. Allow it to boil for a minute to burn off the alcohol. Pour 6 C. of stock into the pan and stir, scraping up the browned bits from the bottom. Reduce the heat to the lowest setting, partially cover, and gently simmer for roughly 4 hours, or until the meat is tender. Caramelize the onions. Meanwhile, heat a separate, very wide skillet over medium-high heat. Drop in the butter, and after it starts foaming, add the onions. Allow them to cook, stirring sparingly, as they begin to soften and release their moisture. Season with salt and ½ tsp. of thyme. Eventually they will start to turn a golden color, and browned bits will build up on the bottom of the pan. Reduce the heat to a lower setting to avoid burning, stir more frequently, and add a splash of beef stock when it gets dry. Continue this process (stirring, adding a splash of stock when it gets dry) until they become a deep golden brown color and are soft and jammy. This will take about an hour. Deglaze with ½ C. of stock to fully lift the browned bits from the bottom of the pan and dissolve it into the onions. Transfer the mixture into the stew and stir to incorporate. Season to taste. When the stew is very tender and ready to serve, prepare the cheesy toast. Preheat the oven to 425℉. Arrange the bread on a foil-lined sheet pan and swipe a pat of butter across the tops. Toast until lightly crisp, then top generously with cheese. Broil until the cheese is melted and bubbling. Cut the toast in half to fit the bowls, if needed. To serve, ladle the stew into bowls and top with the cheesy bread and fresh chives.

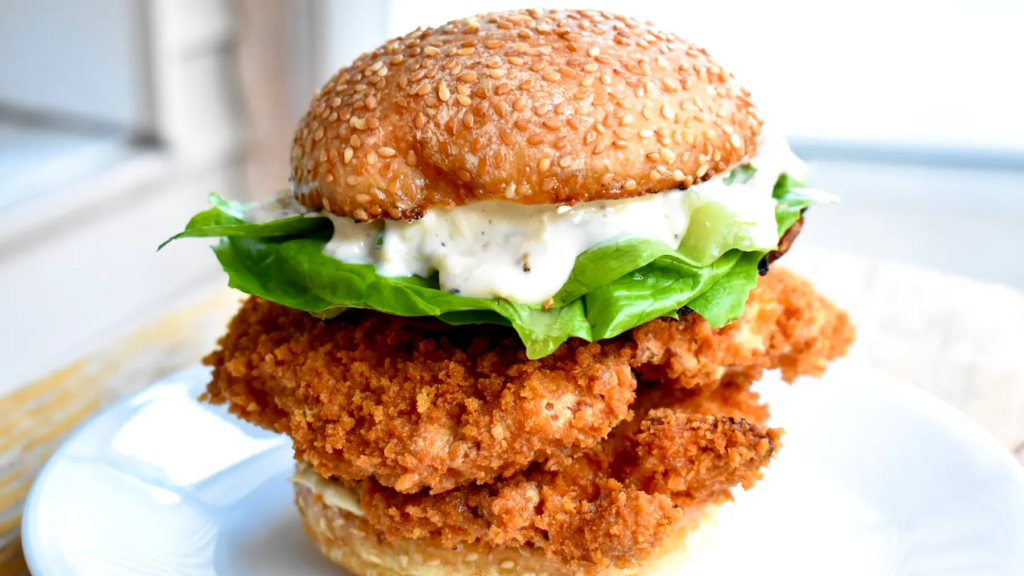
Chicken of the Woods Caesar Burgers

Chicken of the Woods Caesar Burgers

Chicken of the Woods Caesar BurgersChicken of the Woods Caesar Burgers


1-3 cloves garlic, minced

1 C. mayonnaise

1 tsp. anchovy paste (or 3 anchovies, minced)

2 T. lemon juice (juice from ½ a lemon)

1 tsp. Worcestershire sauce

1 tsp. smooth Dijon mustard

¾ C. Parmesan cheese, grated

1 small pinch kosher salt

½ tsp. black pepper

¼ tsp. white sugar

12 pieces bacon

1½ lb. chicken of the woods, torn into bun-sized pieces

Lard or oil for frying

1 C. all-purpose flour

½ tsp. kosher salt

½ tsp. pepper

4 eggs

2 C. panko breadcrumbs

1 head romaine lettuce, torn into large pieces

4 sesame seed buns


Mince garlic and add a small pinch of salt, allow this to sit for 5 minutes. Mince again and scrape into a paste with the side of your knife. Add it to a bowl along with the rest of the sauce ingredients and mix well. Cook the bacon slices until crispy. Drain the bacon skillet of most of its grease, then add the buns to toast them. Bring several inches of oil in a deep skillet to 350°F. Set out three plates or shallow bowls. Add the flour, salt, and pepper to one, the beaten eggs to another, and the panko breadcrumbs to the last. Dip the mushroom pieces in the flour, then shake off. Dip in the eggs on both sides, then into the panko, pressing the crumbs into the mushroom. Transfer to the hot oil and fry for about 3 to 4 minutes per side until golden brown. Do this in several batches so you don’t overcrowd the pan. Keep the fried mushrooms in a 200°F oven while you finish the rest. Tear the lettuce into large, bun-sized pieces. Slather the toasted buns with the Caesar dressing/sauce on both sides. Stack a few pieces of the fried mushroom (depending on its size) onto the bottom bun. Add bacon slices and top with lettuce, then with the top bun. Serve immediately.

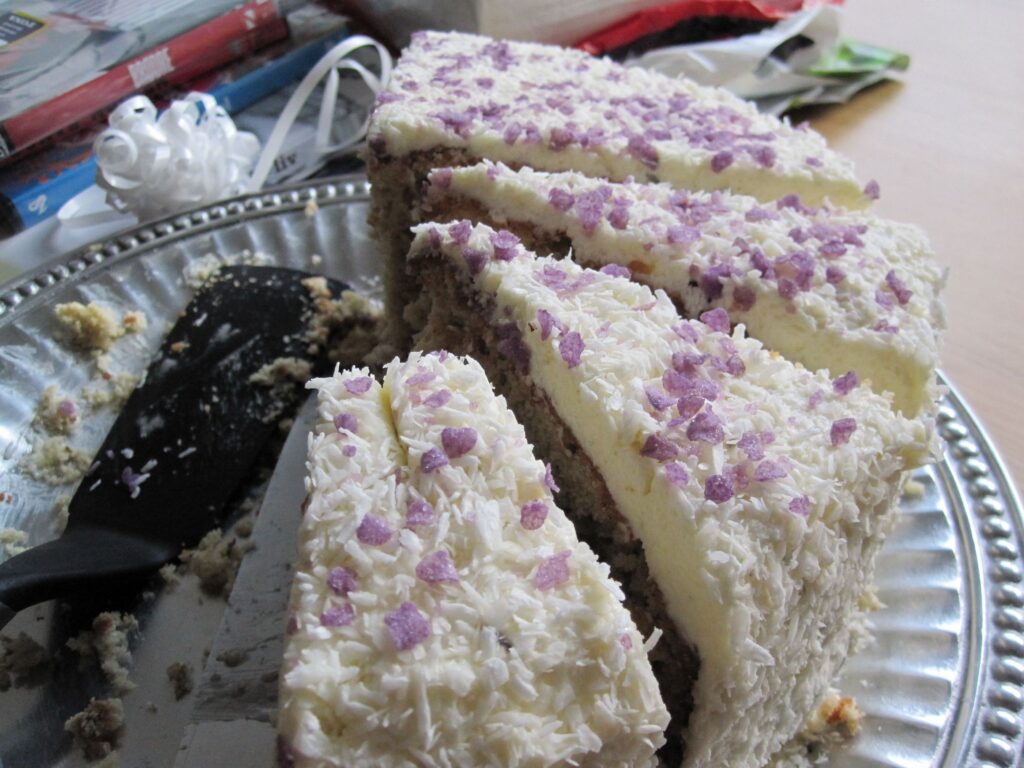
Lavender and Coconut Layer Cake with Lavender Italian Meringue Frosting

Lavender and Coconut Layer Cake with Lavender Italian Meringue Frosting

Lavender and Coconut Layer Cake with Lavender Italian Meringue FrostingLavender and Coconut Layer Cake with Lavender Italian Meringue Frosting


170 grams / 3/4 C. unsalted butter, at room temperature, plus more for greasing the cake pans

2 C. sugar

2 tsp. dried culinary lavender

5large eggs, at room temperature

1 T. vanilla sugar, or 1 1/2 tsp. vanilla extract

2 tsp. coconut extract (optional)

3 C. all-purpose flour, plus more for dusting the pans

1 tsp. baking powder

1/2 tsp. baking soda

1/2 tsp. salt

1 C. coconut milk (full fat is best)

110 grams / 4 oz. sweetened shredded coconut

Some sliced strawberries (optional)

Lavender-Infused Italian Meringue Frosting

1 3/4 C. sugar

1 tsp. lavender

1/2 C. water

6 egg whites, slightly warmed (in a bowl of water for a minute or two)

Pinch of cream of tartar

340 grams / 1 1/2 C. butter, at room temperature, cubed

Sweetened shredded coconut, for dusting


Start with the cake. Preheat the over to 175 C / 350 F. Grease two 22 cm / 9 inch round spring-form cake pans, then line the bottom with parchment paper. Grease the top of the parchment paper and dust the whole pan with flour, shaking out the excess. Add the two tsp. of lavender to the two C. of sugar and place in a seal-able Tupperware. Shake and let sit for at least 30 minutes. After the sugar has infused with the lavender, add it to the butter (lavender and all) in the bowl of a stand mixer. Cream together until light yellow and fluffy. Add the eggs one at a time. When fully incorporated, add the vanilla sugar (or vanilla extract) and coconut extract and mix well. In a separate bowl, sift together the flour, baking powder, baking soda, and salt. With the mixer on low, alternately add the dry ingredients and the coconut milk to the batter in three parts. Mix until just combined. Fold in the 4 oz. of coconut

Pour the batter evenly into the two prepared cake pans. Bake for 45 to 55 minutes, until a toothpick come out clean. Cool completely before removing from the spring-form and frosting. Now it’s time for the frosting. Add the tsp. of lavender to the 1 1/2 C. sugar in a sealable Tupperwave. Cover, shake, and allow to sit for at least 30 minutes. Combine the lavender-infused sugar (1 1/2 C.) and the water in a small saucepan (lavender and all) and bring to a boil. Using a candy thermometer, simmer the syrup until it reaches 238 F. Meanwhile, beat the egg whites and cream of tartar in the bowl of a stand mixer until it forms stiff peaks. Slowly add the remaining 1/4 C. sugar with the mixer on. Once incorporate, slowly pour in the hot syrup with the mixer running on high speed. Your white will deflate a good bit, but don’t panic J Once all of the syrup has been added, continue to beat the white for 7 minutes, or until they regain some of their height and are stiff again. With the mixer still running, add the butter a bit at a time, allowing each addition to be fully incorporated. Your mixture may look like it is separating, but continue to remain calm and just beat the hell out of it until it resembles frosting. Frost the bottom layer of your now-cooled cake with a healthy dose of frosting. If you’re feeling indulgent, add a layer of strawberries! Place the second layer on top, then frost the entire cake. Once frosted, dust the cake with the sweetened shredded coconut. This makes a very tall and large cake, so cut small pieces. Enjoy!

Pineapple Lemon Verbena Lemonade

Pineapple Lemon Verbena Lemonade

Pineapple Lemon Verbena Lemonade


2 ½ pound peeled, cored and chopped fresh pineapple

2 cup freshly squeezed lemon juice

1 ½ cup granulated sugar (or less to taste, depending on sweetness of pineapple)

40 large lemon verbena leaves

4 cup water


Place the chopped pineapple, lemon juice, sugar, lemon verbena leaves in the jar of a large blender. Put the lid on and pulse the mixture 10 or 12 times, then run the blender until the mixture is smooth. Work in batches if necessary.  Strain the mixture through a fine-mesh sieve and into a 2‑quart or larger pitcher, pressing the solids through with the back of a spoon. You should have at least 4 cups liquid. Pour in the water and stir to combine. Serve in glasses filled with ice cubes, garnished with lemon verbena sprigs

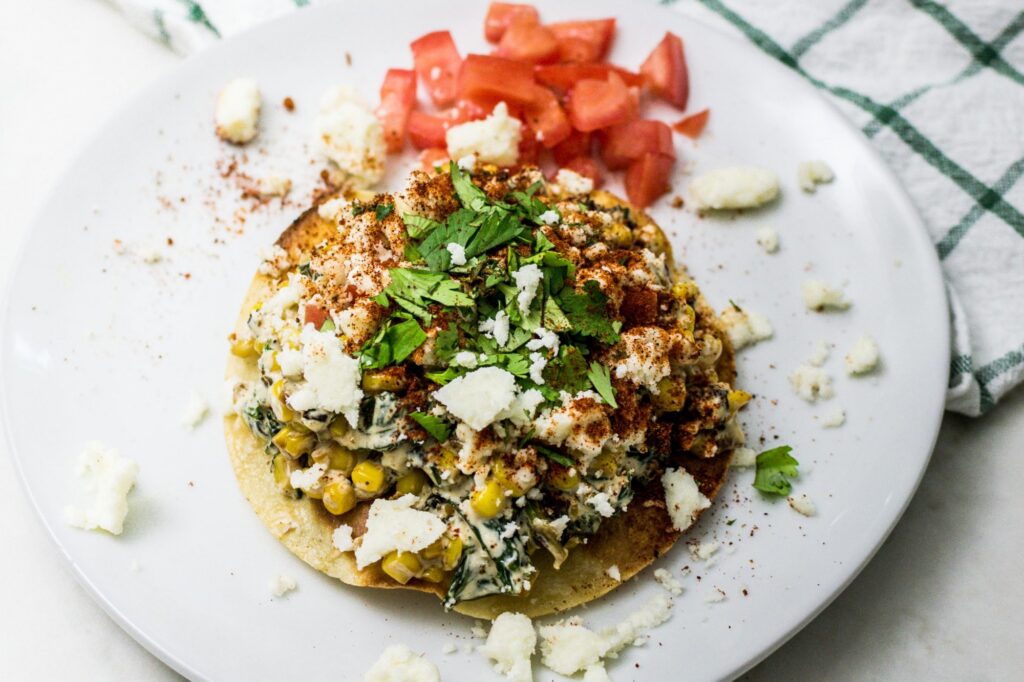
Mexican Street Corn Tostadas with Bacon and Kale

Mexican Street Corn Tostadas with Bacon and Kale

Mexican Street Corn Tostadas with Bacon and KaleMexican Street Corn Tostadas with Bacon and Kale


8 small corn tortillas (or pre-made tostada shells)

1-2 T. olive oil for crisping.

4-6 strips of thick-cut bacon, chopped.

4 C. of corn kernels (fresh sweet corn sliced off the cob is best, but drained canned or thawed frozen works)

2 C. chopped kale (stems removed).

3 T. mayonnaise

2 T. sour cream or Mexican crema

1 clove minced garlic

juice of 1 lime.

½ C. crumbled Cotija cheese

1 tsp. Mexican chili powder.


If you are making them from scratch, brush your corn tortillas lightly with olive oil and sprinkle with a pinch of salt. Heat them in a skillet over medium-high heat for 2–3 minutes per side until completely golden brown and stiffly crisped, then set aside. (Skip this if using store-bought crunchy tostada shells). Toss your chopped bacon pieces into a large skillet over medium heat. Cook until beautifully crispy and the fat has rendered out. Remove the bacon with a slotted spoon and let it drain on a paper towel, but leave the smoky bacon fat inside the skillet. Turn the skillet heat up to medium-high. Drop the corn kernels straight into the hot bacon grease. Let them cook undisturbed for 2–3 minutes at a time so they catch a deep, smoky char. Stir and repeat for about 8–10 minutes total until the corn is nicely caramelized and toasted. Push the charred corn to one side of the skillet and drop the chopped kale into the empty side. Let it sauté in the residual heat and moisture for 1–2 minutes just until it softens, loses its tough bitterness, and turns a vibrant green, then stir it all together with the corn. Turn off the heat. In a separate small bowl, whisk together the mayonnaise, sour cream (or crema), minced garlic, and fresh lime juice. Pour this directly over your warm skillet mixture of corn and kale, tossing until everything is coated in a velvety glaze. Fold the crispy bacon back into the mix. Lay your crispy tostada shells flat. Spoon a generous mound of the creamy bacon, kale, and corn mixture over each shell. Finish them off by heavy-handedly sprinkling the crumbled salty Cotija cheese and a dust of Mexican chili powder over the top. Serve immediately while the filling is warm and the shells are crunchy!

Chanterelles and Scrambled Eggs on Toast

Chanterelles and Scrambled Eggs on Toast

Chanterelles and Scrambled Eggs on Toast


8–10 ounce Chanterelle mushrooms

4 large eggs

2 T.  extra-virgin olive oil

sea salt (as needed)

1–2 clove garlic (peeled and minced)

¼ cup chopped flat leaf parsley

freshly cracked black pepper

1 T.  unsalted butter (at room temperature, divided)

2 slice rustic bread (toasted and buttered)


Gently clean the chanterelles then pull them apart lengthwise into evenly sized strips. It’s a small detail but tearing as opposed to slicing lets the heat get to a lot more edges of the mushroom creating a more interesting texture. Set aside. Crack eggs into a medium bowl and add a pinch of sea salt. Use a whisk to whip the eggs until uniformly pale yellow in color, about 30 seconds. Set aside. Heat a 12-inch sauté pan with a lid over medium-high heat add olive oil and swirl the pan to completely coat the bottom. Lay the torn chanterelles in as close to a single layer as possible. Let them cook undisturbed until they begin to brown at the edges, about 3 minutes. Stir, then cook undisturbed for another 2 to 3 minutes until golden brown. Stir in the garlic, parsley, and a few grinds of black pepper, and cook, stirring, another minute or so until the garlic is fragrant. Remove from heat add 2 T.  butter and stir until melted. Cover and set aside in a warm place. Melt the remaining 1 T.  butter in an 8‑inch nonstick slope-sided skillet set over medium-low heat. When the butter is completely melted and beginning to foam pour the eggs into the center of the skillet and cook, without stirring, until a thin layer of cooked egg appears around the edge of the skillet. Then, using a small rubber spatula scrape the cooked edges of the eggs around the circumference of the skillet then use the spatula to loosen the eggs in the center. Keep the eggs moving constantly until creamy. Cut any thick curds that form with the spatula. Do not stop stirring, or leave the skillet’s side for more than a few seconds. I like to remove them from the heat when they’re still a bit runny on the top. The whole process should take less than 2 minutes. Immediately top the buttered toast slices with the warm soft eggs, then spoon some of the garlicky mushrooms over the eggs. Finish with a sprinkle with sea salt and a grind of black pepper. Serve immediately.

Caramelized Celery and Mozzarella Crostini

Caramelized Celery and Mozzarella Crostini
Caramelized Celery and Mozzarella Crostini


2 T. unsalted butter

6 stalks of celery, thinly sliced (1/8-inch diagonal slices)

Salt, to taste

1 T. sugar

1/4 cup aged balsamic vinegar

4 slices of crusty bread, like ciabatta

Extra-virgin olive oil

6 oz. fresh mozzarella, thinly sliced (about 1/8- to 1/4-inch thick)

1 T. fresh snipped chives


Heat a large frying pan over medium-low heat (almost medium). Add butter. When melted, add celery, salt and sugar. Cook, stirring occasionally, until the celery is soft, olive green and slightly browned around the edges, about 40-45 minutes. Moderate heat to make sure celery does not cook too fast. Remove celery from pan. Heat a small frying pan over medium heat. Add balsamic vinegar and cook until reduced by about half. Set pan aside to cool slightly. Preheat oven broiler with rack about 5 inches from broiler. Place slices of bread on a baking sheet and brush with olive oil. Place under the broiler and cook until lightly toasted, about a minute or so (watch carefully or it will burn). Spread 1/4 of the cooked celery on top of each piece of toast, then top with a couple slices of mozzarella. Place under broiler and broil for about a minute until the cheese has melted a bit. Remove from oven and transfer toasts to a serving platter. Drizzle with balsamic vinegar and sprinkle with chives.

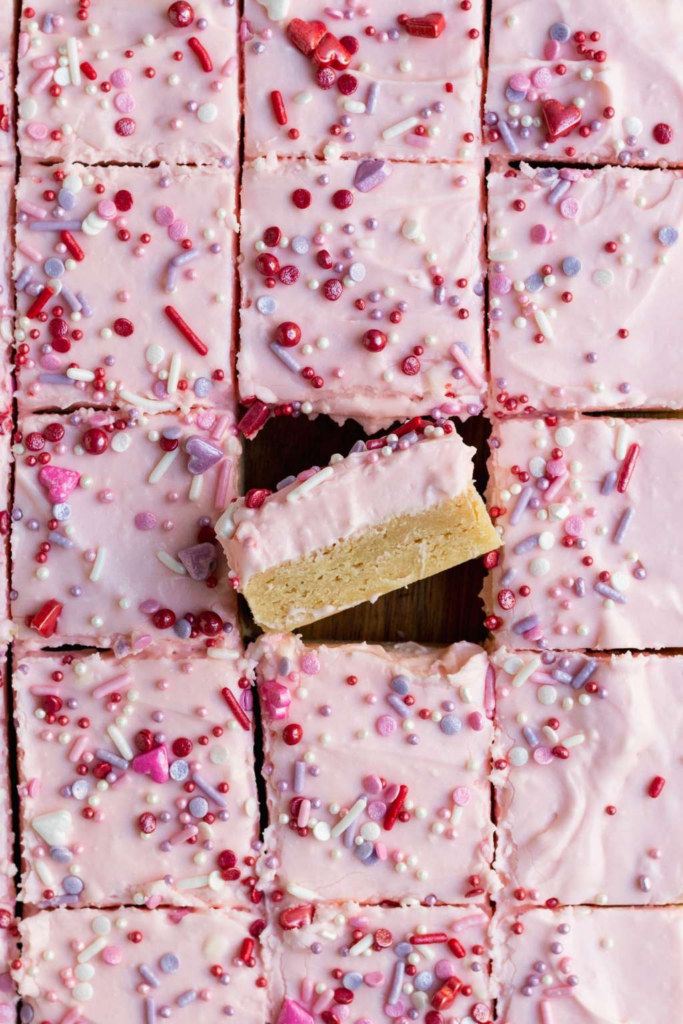
Frosted Sugar Cookie Bars

Frosted Sugar Cookie Bars

Frosted Sugar Cookie BarsFrosted Sugar Cookie Bars


1 C. butter, softened

1½ C. granulated sugar

2 eggs, at room temperature

2 tsp. vanilla extract

½ tsp. almond extract

2½ C. all-purpose flour

1½ tsp. baking powder

½ tsp. salt

¼ C. butter, softened

8 oz. cream cheese, softened

4 C. powdered sugar

1 tsp. vanilla extract

½ tsp. almond extract

3-4 T. heavy cream to thin

Pinch of salt

Food coloring, if desired

Sprinkles for topping


Preheat oven to 350 degrees Fahrenheit. Cream together your butter and sugar until light and fluffy. Then add in your eggs, one at a time, beating well after each addition. Add the vanilla and almond extracts and beat again. In a separate bowl, whisk together flour, baking powder, and salt. Then add to the dry ingredients and mix until just combined. Spray a 9 x 13 baking pan with nonstick cooking spray and line with parchment paper. Spread the batter in the prepared pan with oiled hands or an oiled spatula since the batter is sticky! Bake for 16-18 minutes. Do not overbake! Once cooled, make your frosting by mixing together the cream cheese and butter, then adding the powdered sugar and pinch of salt. Mix in the almond and vanilla extracts. While the mixer is running, slowly add in the heavy cream until the desired consistency is reached. Spread the frosting over the bars and top with sprinkles! To make it easier to get clean slices, refrigerate to chill first.

Air Fryer Pork Belly

Air Fryer Pork Belly

Air Fryer Pork Belly


1.5 lbs pork belly thick cut

1/4 cup BBQ Seasoning Rub

1/4 cup BBQ sauce


Pat pork belly dry with paper towel to absorb any excess moisture & slice with a sharp knife. If pork belly is thick – cut into slabs – like thick bacon slices – approx 3/4” thick.  If pork belly is thin – cut into bite size pieces – approx 1-2” – Preheat air fryer (if necessary) to 200º – we’re going low and “slow” here!

Coat all sides of pork belly with your favorite bbq rub. Place pork belly pieces into air fryer basket in a single layer. Be sure there is at least 1/2” space around each piece.  Air fry at 200º for 25 minutes – flipping halfway thru. Open air fryer and drizzle your favorite bbq sauce on top of pieces. Close air fryer and raise temp to 400º and air fry 5-7 additional minutes

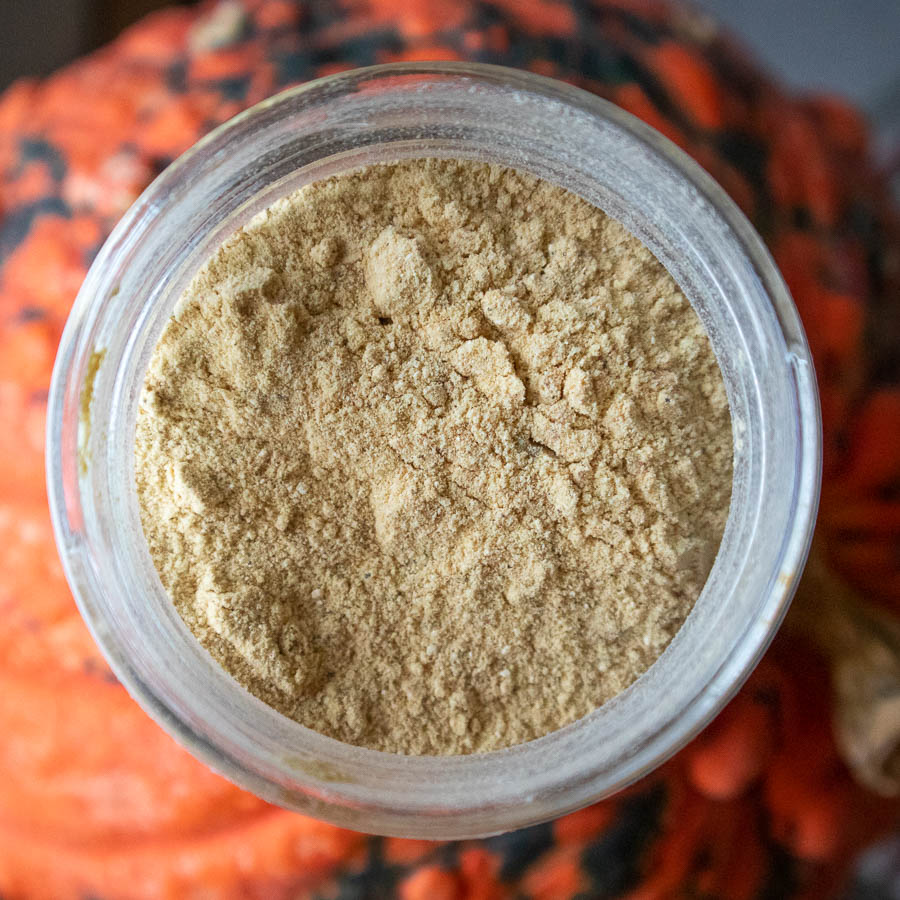
Chicken of the Woods Bouillon

Chicken of the Woods Bouillon

Chicken of the Woods Bouillon


1 ounce dried chicken of the woods pieces, about 1 ¼ cup

1 tsp. dried thyme

2 tsp. fine sea salt, or more to taste (optional)

2 tsp. onion powder

1 ½ tsp. garlic powder

½ tsp. ground black pepper

¼ tsp. turmeric powder, for color (optional)


Working in batches, grind your chicken of the woods pieces and thyme in a spice or coffee grinder until they are finely powdered. Pour the powdered mushroom mixture into a medium bowl. To the bowl, add the salt, onion powder, garlic powder, ground black pepper, and turmeric, if using. Stir well, and store in a tightly sealed jar. Use 1 ½ tsp. of bouillon powder per cup of water. I recommend using the powder in dishes where it will boil for at least 2-3 minutes to make sure that the mushroom particles are well cooked. I usually add an additional ¼ tsp. of salt per cup of water to bring out the chicken flavor. See the notes below for tips if your broth is flavorless.

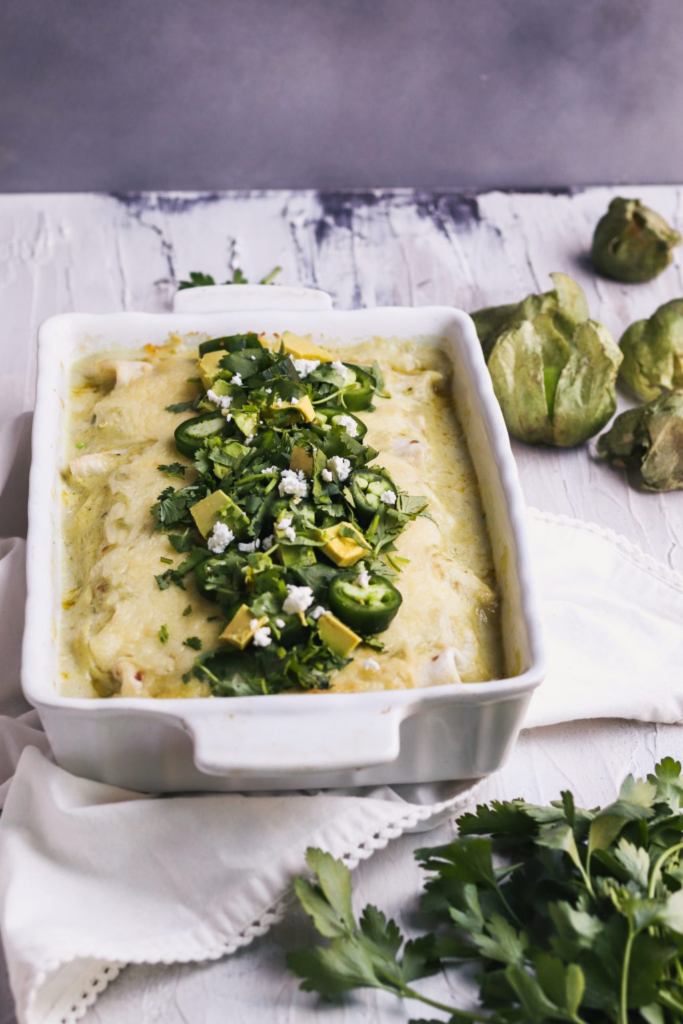
Salsa Verde Enchiladas

Salsa Verde Enchiladas

Salsa Verde EnchiladasSalsa Verde Enchiladas


1 T. olive oil

½ onion, diced

2 cloves garlic, minced

6-8 tomatillos, skins removed, diced

1 can diced green chilis

2 C. cooked shredded chicken

2 tsp. cumin

1 tsp. salt

1 tsp. pepper

1 tsp. chili powder

8 flour tortillas

1 T. olive oil

2 T. flour

1 C. chicken broth

1 C. salsa verde

½ C. sour cream

½ tsp. salt

1 C. shredded Monterey jack cheese


Preheat oven to 350 degrees Fahrenheit. Spray a 9×13 (a slightly smaller dish works too!) baking dish with nonstick cooking spray and set aside. In a large nonstick skillet, heat the olive oil for the enchilada filling. Add onions, garlic, and tomatillos and cook until fragrant. Add green chilis, chicken, cumin, salt, pepper and chili powder. To assemble your tortillas, add some of the filling to a tortilla, fold in the ends, then roll up. Place the seam side down in the bottom of the preparing dish and repeat until all 8 enchiladas are done. In the same skillet, heat the olive oil for the sauce. Add the flour and whisk to combine. Then add the chicken broth, salsa verde, sour cream, and salt. Simmer until thickened, then pour over the enchiladas. Top with shredded cheese and bake for 25-35 minutes until the cheese is melted and the sauce is bubbling. Enjoy!