 Jammy Eggs
A good jammy egg—the kind that walks the line between a runny yolk and a fully hard-boiled egg—makes a perfect addition to any snacking meal. You can eat them on their own or add any number of delicious toppings (I’ve shared my favorites on the next spread). The key to these eggs is their texture: centers should be firm enough to hold together but still be soft and velvety, right between liquid and solid. The time it takes your eggs to cook will depend entirely on their size and how cold they are to start with (this recipe assumes large, refrigerated eggs). To avoid runny, undercooked eggs, start out by testing just one; if after 8 minutes the center is still runny instead of just a bit gooey, add another minute to the cook time and test again. 8-MINUTE EGGS Heat 4 to 5 inches (10 to 13 cm) of water in a medium pot until it boils, then use a slotted spoon to carefully lower anywhere from one to four eggs into the water, making sure they’re fully submerged. When the water comes back to a gentle boil, set a timer for 8 minutes. While the eggs cook, combine ice cubes and cold tap water in a bowl to make an ice bath. When the eggs are done, use the slotted spoon to transfer them to the ice bath; let them cool for at least 5 minutes. Carefully peel the eggs, cut them in half lengthwise, and add toppings
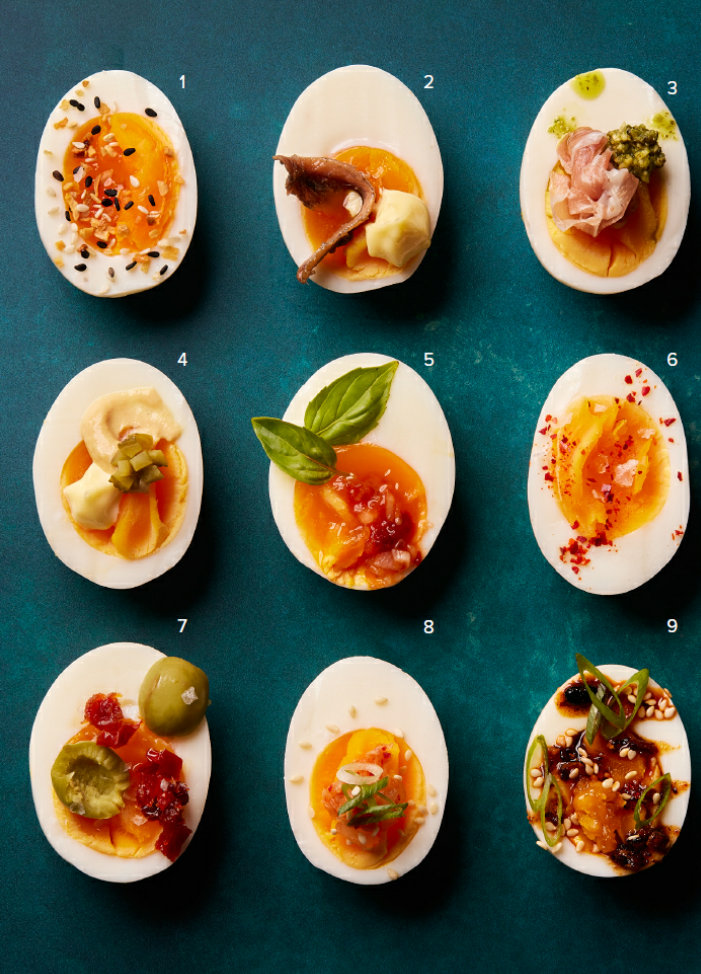
SATURDAY BAGEL Top it with: Everything spice (mix garlic powder, onion powder, poppy seeds, sesame seeds, and kosher salt)
THE BARTAVELLE Top it with: Small dollop of Kewpie mayonnaise and a high-quality anchovy filet
GREEN EGGS & HAM Top it with: Prosciutto and pesto
NOT-QUITE DEVILED Top it with: Small dollops of mayo and Dijon mustard plus a pinch of minced pickle
INSTANT SAMBAL TELUR Top it with: Jarred sambal and fresh basil leaf
SALT & SPICE Top it with: Aleppo pepper and flaky salt
À LA PROVENÇALE Top it with: Minced sun-dried tomatoes, green olives, and a pinch of salt
SHORTCUT BANCHAN Top it with: Chopped kimchi, thinly sliced scallion, and sesame seeds
SICHUAN ZINGER Top it with: Chile crisp, Sichuan pepper oil, sesame seeds, and thinly sliced scallion