Teaching Money

MONEY ROLL – Use duct tape to create a tape belt around your child’s waist, but make sure the duct tape is sticky side out. Lay down a tarp on the ground and spread coins all over it. Let your child roll around on the tarp and try to pick up coins on her tape belt. When she stands up, have your child pull off the coins and tell you the name of the coin and how much it is worth.

COIN SORTING – Gather several types of coins and let your child sort the coins into bowls, muffin tins, or an icecube tray. Older children can use different coin combinations that add up to 50cents, 75 cents or one dollar and place the combinations into the separate sections of the trays.

MONEY RUBBINGS – Tape every type of coin onto one side of a piece of paper. You can tape two of each type next to each other, so that you will see the front and back sides of each coin. Turn the paper over and let your child rub over the coins with a pencil or crayon so they can observe the details of the coins. Older children can make rubbings of certain monetary values. For example, ask your child to rub 35cents onto a piece of paper. How many ways can they rub this value?

“EYE SPY” with Dollar Bills & Coins – Let your child hold a dollar bill while you play a game of “eye spy”. “I spy with my little eye…an eagle.” Let your child point out the item that you spied and then your child can take a turn.

MONEY TOSS – Set a large bowl on the floor and then set a smaller bowl inside. Stand behind a marked spot or piece of masking tape on the floor. Let your child toss coins towards the bowl target. After she has thrown all of her coins, let her take each coin out of the middle bowl and identify the name and value of each coin. Older children can add up all of the values that land into the middle bowl. Then, they can add up the value from the larger bowl and subtract or add the two values.

PLAYING STORE – Playing store will strengthen your child’s awareness of money values. Place a few coins into your child’s purse or wallet. Put price tags onto a few of your child’s toys and encourage your child to collect a few items in a shopping bag. Have your child check-out and pay for each item. Help your child count out the correct value needed to purchase each item. This activity can accommodate young learners by only using pennies, to more the more advanced by using different types of coins and bills.

Tags:

  • Digg
  • Del.icio.us
  • StumbleUpon
  • Reddit
  • Twitter
  • RSS
read comments

Child Friendly Bathroom

rubber ducki and boatTake time to show baby how things work in the bathroom.  Run some warm water from the faucet, let her move her hands back and forth under the stream, and then dry her hands with a soft towel.  Show her how the toilet flushes, how you brush your teeth, how she can try out her own baby toothbrush and how to brush your hair and her hair in the mirror.


Look for child-safe step stools at tag sales and thrift stores.  Paint the stool her favorite color, personalize it with her name and add decorative touches with glitter glue and silver and gold paint pens.  A stepping stool will make your child self-sufficient, providing her with access to the sink and mirror when she needs to brush her teeth, comb her hair or wash her hands and face.  Make sure you keep her stool in a closet or cabinet when not in use and she can ask when she needs to use it.  This safety precaution will ensure that you are always present when she climbs up on it.


babyintub


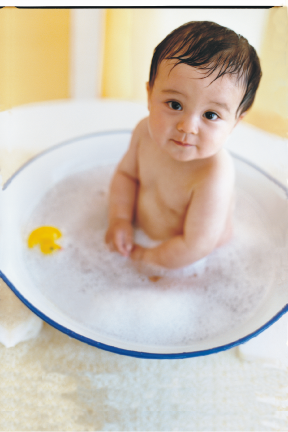
You don’t need to purchase a slew of commercial bath toys to make a splash in the tub – watered down favorites can be found right in your kitchen. In fact, items from baby’s personal storage space in the kitchen can do double duty in the bathroom.  Plastic cups, funnels, pitchers, measuring spoons and small food containers are great choices for filling up and pouring out water.


Let kids go on a fishing trip right in the tub.  Use permanent markers to turn old plastic measuring spoons into colorful fish and other aquatic creatures.  Children will enjoy chopping up their catches of the day with a kitchen strainer to serve as their fishing net.


Cut out ducks, turtles, frogs, dolphins and starfish from new sponges, using cookie cutters.  Let baby feel the rough porous texture of a dry sponge before plunging it into the water so the child can watch it magically expand in size.  Talk about how the sponge takes on a squishy texture when wet.  Encourage him to wring out the water from the sponge, then fill it up with water and watch it grow.


in_the_bath_bigPlastic soap dishes and margarine containers make terrific bath time boats, while square plastic container lids make ideal rafts for carrying small plastic figures.  For ring shaped floatation devices, let action figures float inside a few of baby’s stacking rings.


 Getting Ready. Before he gets in the tub, ask your child to recall what items he needs. “What do you need for your bath?” Items may include a washcloth, soap, shampoo, bath toys, and a towel to dry off. As he says each item, match it up with its use. “Yes, you need a wash cloth so we can scrub behind your ears!”

Body Parts. As you wash your baby, gently and slowly massage each of her body parts with a soft, soapy cloth. As you wash each part, make up a song about it, and sing it or say it softly. “Washie, washie baby’s fingers, baby’s fingers, washie, washie.” Repeat for each body part. This is a great way to relax your baby for bedtime.

Water Splash. Show your toddler how to use her hands and feet to move the water. Use words that describe what the water is doing like splash, flow, and roll and words that describe the water like flat, wave, and drops. Then you can make up some silly rhymes like splash- mash, flow- glow, and roll- pole.

A bath is the perfect opportunity to teach baby about her body parts.  Create silly shymes to teach her thier names.


“after dinner its such a messy place, so now its time to wash your face!

 I’ve got a rhyme and here it goes: I love to scrub your little nose.

 Is it dirty?  Lets go and check, and wash and clean sweet baby’s neck.

 Yes my baby has such charm with soapsuds up and down her arm

 it’s very cute and shakes like jelly, yes-siree, that’s my babies belly!

 Wash those legs, crub those knees, I’ll wash those feet now, if you please.

 Now we shampoo babies hair, then rinse it off with the greatest care.”


For a bath time hand puppet, cut off the fingers of a rubber glove and draw a silly face on the palm of the glove.  Wear the glove on your hand and animate it by wiggling your fingers, tickling baby, give the face a beard and hair with bubbles, making the puppet swim and using a funny voice as your gloved character washes baby.


Hang a visually stimulating toy from your shower spout, using plastic chain links.  To prevent soap from getting in her eyes, direct babies attention to the toy hanging above her when its time to rinse her hair.


For skeaky clean fun, here’s a great song to sing while washing baby with foamy bath time bubbles. 


“Bubbles, bubbles in the tub

Baby needs a rub-a-dub scrub.

Bubbles, bubbles in the air,

On your back and in your hair.

Bubbles, bubbles so much fun,

Rinse them off and bath time’s done!”


Hanging an unbreakable mirror from your tub spout so that its at eye level when baby is taking a bath will make even the shyest baby come out of their shells.  They’ll love playing peek-a-boo in the mirror with a washcloth, giggling at bubble beards on their face and splashing at their reflection.  For big laughs, give a spiky shampoo hairdo or make soapy hair stand up on end in the center of the head.


Tags:

  • Digg
  • Del.icio.us
  • StumbleUpon
  • Reddit
  • Twitter
  • RSS
read comments

Clean Mud Recipes

Clean Mud

2 rolls toilet tissue, torn into pieces; 1 1/2 bars Ivory soap, shaved; 2 qt. warm water


Let children help combine all ingredients in a big plastic dishpan or large bucket. Knead by hand until soft and gooey, adding more water as necessary.


Clean Mud 2

Unroll 6 rolls of white bathroom tissue paper into a very large container.  Generously add water until covered completely.  Grate 2 bars of Ivory soap into mixture, and add 1 1/2 c. of Borax.  Mix up well and PLAY!!  Will last a LONG time!

Tags:

  • Digg
  • Del.icio.us
  • StumbleUpon
  • Reddit
  • Twitter
  • RSS
read comments

Infant Play Activities

Hold and sing to young babies. Even when babies are able to hold their own bottle, they should be held. Being cuddled frequently assists to build the child’s self-worth, security, and tactile system. Propping an infant with a bottle is a choking hazard.  


Rock, sway, and swing your baby gently to help them develop a sense of movement and balance (vestibular system).


Talk to your infant and echo their babble. They may not be able to understand you now, but will learn words for the foundation of their speech later on.


Take your infant play activities outside on nice days.


Explain to them what you are doing throughout the day when you change them or feed them. Babies feel secure when their cries are responded to. When you provide them with the sense of security, they are willing to explore and try new things.


Be consistent so they know what to expect. Babies have their own schedule for eating, sleeping, and diaper changes. This may not be the same as another child’s.


Play different kinds of music such as classical, soft rock, and children’s folk music.


For newborns, use contrasting toys, such as black, white, and red. These are easier for them to see. As the child gets older, place bright toys near them.


Give them soft toys (a stuffed animal or soft rattle) to hold, grasp, and feel.


Give babies toys they can make noise with.


Provide children with the opportunity to experience various smells. This may include lemon, vanilla, apple juice, or natural smells such as grass or flowers.  


Hang up big pictures of people (can include their family members) and animals on the wall at their eye level.  


Hang toys up that you make yourself for babies to see and hear. You can hang aluminum pie plates on a string from the ceiling. Let the breeze blow them or move them with their hands.


Have a clean space for babies to crawl. Put bright toys near them so they can reach out for them or move toward them. Spending too much time in various child devices can delay gross motor milestones since they have not had the experience to develop their muscles and learn earlier skills.


Put a big cardboard box on the floor so the babies can crawl inside and play.


Put some chair cushions on the floor so the babies can roll and bounce on them. Make sure the child is able to roll and has decent head control to avoid a situation in which they will get “stuck” and have trouble breathing.


Read books aloud to them that have bright colorful pages. They will respond to the rhythm in your voice. Over time they will comprehend that these words have meanings and be able to identify objects.


Let the child practice with a spoon between 4-12 months. It will be messy, and they may not know what to do with it, but they need the practice.


Remember that infants put everything in their mouths, so wash toys frequently and be sure toys are large enough that the child is not able to swallow it. Babies should not play with anything less that the size of a half-dollar (1-1/4 inch).


Tags:

  • Digg
  • Del.icio.us
  • StumbleUpon
  • Reddit
  • Twitter
  • RSS
read comments

Egg Dye

1/4 tsp. food coloring

3/4 cup hot water

1 tbsp. vinegar


Use to color hard boiled eggs

Tags:

  • Digg
  • Del.icio.us
  • StumbleUpon
  • Reddit
  • Twitter
  • RSS
read comments

Rock Candy, and Experiment Extension for older kids

Have you ever looked at rock candy and wondered how it’s made? Rock candy is actually a collection of large sugar crystals that are “grown” from a sugar-water solution. Sugar, like many other materials, can come in many different physical states. As a solid it can either be amorphous, without shape, like when it forms cotton candy, or crystalline, with a highly ordered structure and shape, like when it forms rock candy crystals.  

Crystals form when the smallest particles of a substance, the molecules, arrange themselves in an orderly and repetitive pattern. Molecules are too small for us to see moving around and arranging themselves, but you can get a rough idea of what this would look like by taking a small shallow tray and filling it with marbles, ball bearings, or other spheres. As you add more spheres, the bottom of the tray becomes covered, then the spheres must form layers on top of one another, and a structure or pattern emerges.


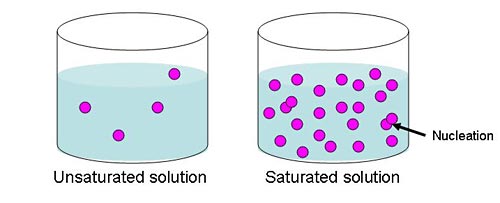
So how do the molecules of a substance get together to form a crystal? First there have to be enough molecules in one area that they have a high chance of bumping into one another. This happens when a solution, which is made up of a liquid and the compound that will be crystallized, is saturated. In the rock candy, the liquid is water and the compound is sugar. A solution is saturated when the liquid holds as much of the compound dissolved in it as possible. For example, when making rock candy, you dissolve as much sugar as possible in water to make a saturated solution. If you add more compound than can dissolve in the liquid, the undissolved bits remain as solids in the liquid. In a saturated solution, the molecules bump into one another frequently because there are so many of them. Occasionally when they bump into each other, the molecules end up sticking together; this is the beginning of the crystallization process and is called nucleation. Once several molecules are already stuck together, they actively attract other molecules to join them. This slow process is how the crystal “grows.”


Chem_img034


Figure 1. This diagram illustrates the large number of molecules in a saturated solution. With so many molecules in the liquid, there is a high chance of them bumping into one another and creating a nucleation event. 


In this science fair project you will make a saturated solution of sugar and water in order to grow your own rock candy sugar crystals. You will compare the rate of growth between rock candy that is left to nucleate on its own in the solution, and rock candy that starts off with some assistance. To assist this rock candy, you will jump-start the nucleation process by adding sugar crystals, called seed crystals, to the string first.


Here are some terms you should know, and questions you should think about before starting this science project. Have an adult help you look up these words and concepts.


Amorphous solid

Crystalline solid (also known as crystal)

Molecule

Solution

Compound

Saturated

Nucleation

Seed crystal


Questions

How do you make a saturated solution?

Which holds more sugar: cold water or hot water?

How do crystals grow?

What is nucleation?


Chem_img036Rock Candy


4 cups sugar     

2 cups water    

a small saucepan           

a wooden spoon           

a candy thermometer  

a small, clean glass jar  

a measuring cup            

cotton string    

a weight to hang on the string (such as a screw or galvanized washer) 

waxed paper    

a pencil (to suspend the string in the jar)  


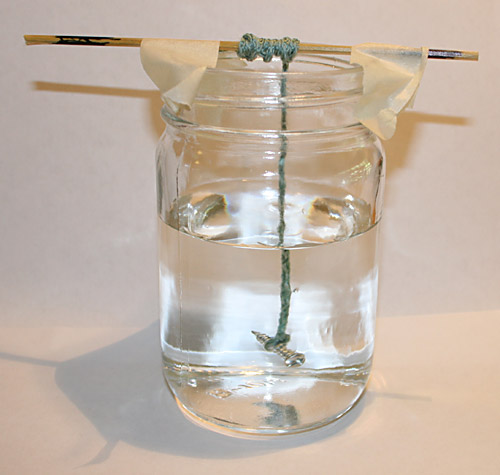
Heat the water in the saucepan over medium-high heat until it comes to a boil.            Completely dissolve the sugar in the boiling water, stirring continuously with the wooden spoon until the solution grows clear and it reaches a rolling boil.       Remove the solution from the heat, and then carefully pour it into the jar. Cover the jar with a small piece of waxed paper. Tie the weight to one end of the string, and then tie the other end to the middle of the pencil. The string should be about two-thirds as long as the jar is deep. Dip the string into the sugar solution, remove it, lay it on a piece of waxed paper, straighten it out, and let it dry for a few days. Gently suspend the prepared string in the solution and let sit at room temperature, undisturbed, for several days. You can check each day to see how much your crystals have grown. It’s tempting, but don’t touch the jar until the experiment is finished—it usually takes about seven days. At the end of the week, the crystals on your string should be clearly defined, with sharp right angles and smooth faces of various sizes. In the field of crystallography, these are called monoclinic crystals. Their shape is determined by the way the individual sugar molecules fit together, which is similar to the way the shape of a pile of oranges is determined by the shape of the individual oranges and the way they stack together.  Try adding food coloring or flavoring to your sugar syrup before making the rock candy.


Observations and Measurements


Look at your jars once a day. What do you see? Are there any crystals growing? Where are the crystals? Which string has more crystals: the one that was or wasn’t seeded? Make a data table, like the one below, in your lab notebook and record your observations every day. While you actually prepared your strings on the “Day 1” step above, for the purposes of the experiment, Day 1 in your data table will be the day you made your solution and began running the experiment.


Days Spent in Jar

Observations

Day 1 (the day the sugar-water solution was made)


Day 2


Day 3


Day 4


Day 5


Day 6


Day 7


Make observations of your sugar-water solution jars for one week. On the seventh day, remove the strings from the jars and take measurements of your rock candy crystals.


If there is a layer of hardened sugar syrup coating the top of your jar, you can use a spoon to gently break that layer before pulling out your sugar crystals.


Briefly rinse the rock candy crystals in cold water, then leave them on a paper towel for 30 minutes to dry.


Once you’ve recorded all your measurements and observations, you can enjoy all your hard labor by eating the rock candy you grew!

Tags:

  • Digg
  • Del.icio.us
  • StumbleUpon
  • Reddit
  • Twitter
  • RSS
read comments

Fairy Dust Necklace

When Fairy Magic enters your life, nothing is quite
the same.  Coincidences happen.  The unforeseen
takes place.  Miracles occur at an increasing pace. 
Fairies?  Of course!  All things are possible.

 Fairy Dust inspires us to live our dreams and
believe in the magic of infinite possibility!


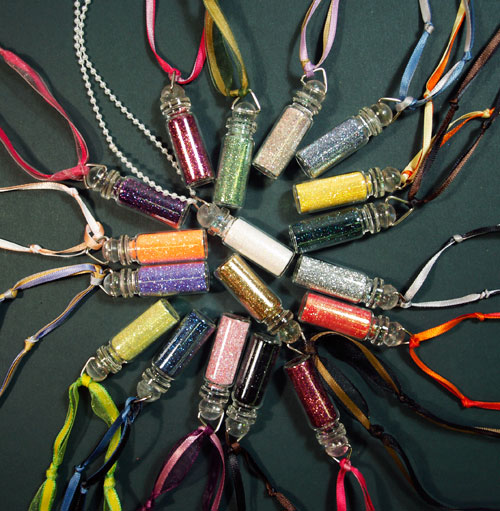
Fairies seem to be pretty popular these days, especially with the kids. You can try to capture a little bit of the mystical charm of fairies by making one of these fun necklaces. Make one for yourself and then make someone special smile when you present them with a special fairy dust necklace.


The hardest part about making these necklaces is finding a tiny bottle with a cork! Fortunately for all of us, the Internet makes this job a little easier. I found mine, approximately 1-inch high, at an online miniature store.


fairydustallOnce you have your bottle, carefully remove the cork and fill the bottle about 3/4 of the way full with your version of fairy dust. This can be glitter, seed beads, or anything else you can think of that will fit into the bottle; I prefer fine glitter. If you use glitter, it is easiest to fill the bottle if you make a funnel using a piece of paper.  Try mixing 1/4 cup of regular table salt in a baggie and added a couple of teaspoons of coarse glitter (the kind used for crafts) and a couple of drops of essential oil.


Next, push the end of the headpin through the cork; push it all the way down so the hoop is touching the cork. Use a wire cutter to cut off all but about 1/4 of an inch of the end of the headpin, and bend up the end to help hold the pin in place.


Cover the sides and the bottom (the side where you folded up the end of the headpin) of the cork with glue and put it back in the bottle. Set it aside and let it dry.


If your bottle does not have a cork or you don’t have headpins, you can glue a bead to the top of the bottle to cover the hole. You want to make sure the bead is not too big or too small, and you also want to make sure you glue it on sideways so you can see both holes.


Finally, once the glue is dry, you can string a chain, ribbon, piece of yarn, etc. through the hoop in the headpin to complete your necklace. You may need to use a split ring if your chain or ribbon is too wide to fit through the hoop in the headpin.


Tags:

  • Digg
  • Del.icio.us
  • StumbleUpon
  • Reddit
  • Twitter
  • RSS
read comments

Robot, Alien or Bear Magnet

Turn the front of your ‘fridge into an art gallery.


24481-v3-150xThree adhesive-backed magnetic disks

Colored card stock, two different colors

Colored construction paper

White craft glue

Scissors

Pencil

Circular dish, preferably with a 2 1/4-inch diameter

A quarter

A half dollar

Two buttons for the robot, four for the alien, and three for the bear


For the Robot:


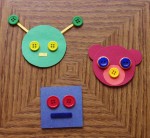
Cut a 2-inch square from the cardstock.  Peel the backing from the magnet and attach it to the center of the back of the square.  On the front of the square, glue on two buttons for eyes.  Cut a thin rectangle of construction paper and glue it on as a mouth.


For the Alien:


Use the circular dish to trace a 2 1/4-inch diameter circle from the cardstock. Cut out the circle. Peel the backing from the magnet and attach it to the center of the back of the circle.

In a contrasting color of card stock, cut two thin rectangles to create the antennae and another shorter rectangle to create the mouth. Glue the antennae to extend from the back of the circle. Glue the mouth onto the front. Glue on two buttons for eyes and another two of a different color at the ends of the antennae.


For the Bear:


Use the circular dish to trace a 2 1/4-inch diameter circle from the cardstock. Cut out the circle. Peel the backing from the magnet and attach it to the center of the back of the circle.

Use the quarter to trace two small circles for ears from the same card stock. Cut out the circles. Glue them to the large circle (as shown). On a contrasting color of construction paper, use the half dollar to trace a circle for a mouth. Glue that circle to the large circle (as shown).

Glue on two buttons for the eyes and another of a different color for the nose of the bear. To make the eyes pop, you can layer the buttons, as shown, with bigger buttons under smaller buttons.

Tags:

  • Digg
  • Del.icio.us
  • StumbleUpon
  • Reddit
  • Twitter
  • RSS
read comments
 Page 85 of 103  « First  ... « 83  84  85  86  87 » ...  Last »