D’Nealian Handwriting
03/31/08
The Letter F is a generally reliable letter. It usually makes the “fuh” sound as in fall. Â
F sometimes makes the /v/ sound (as in of)
The “gh” diagraph represents the /f/ sound when it follows a vowel (as in tough)
Â
1. Present a capitol and lower case F to your child. Ask if he knows what sound the letter makes. Give examples of words that start with the F sound, such as fan, farm and finger. Find fun ways to reinforce the F sound. For example, give him a fan and have him make the F-F-F sound as he waves it back and forth. She if he can name other words that start with F.
Â
2. Read Fish is Fish
Â
3. Create an F bag for the week with objects from around the house such as fruit, foil, fire truck, frog, flowers, fan, flashlight, fox, fork, fish, feather, etc.
Â
4. Create an F collage, searching through magazines for F words and then gluing them to a paper for his alphabet book.
Â
5. Finger paint an F. Provide a large cutout F, taped to wax paper for easy cleanup. Provide finger paints for coloring their F’s. When dry, glue to a sheet of paper for his alphabet book.
Â
6. Provide a worksheet with F’s to trace across the top and a blank spot below, cut outs of fruit and a bowl shape (freehand or copy from book). Have child color their basket, glue it to the page, and add fruit.
Â
7. Other activities: Taste different fruits. Cover tag board with foil and paint it. Talk about friends and families. Examine feathers. Paint with feathers.
Â
Fruit with Dip such as Creamy Marshmallow Dip (
Go Fish Snack Go Fish SnackÂ
Funky Frito Fruckies Funky Frito Fruckies
Fruit Critters with Peanut Butter Yogurt Dip Fruit Critters with Peanut Butter Yogurt Dip
Fish in the River
Fishing Poles
Fruit Skewers for Children – Child Safe


Â
We chose a book by Lisa Shulman, The Moon Might Be Milk. The story is about a little girl who wants to know what the moon is made of. Awakening before dawn, Rosie looks past the cat on her windowsill to the moon and says, “I wonder what it’s made of.” Cat replies that the moon is a saucer of milk. Rosie concedes that it might be, but she gets dressed, goes outside, and asks several other animals the same question. Hen thinks that the moon is an egg. Butterfly believes it’s made of sugar, Dog says “butter,” and Mouse is sure that it’s made of flour. Each animal joins Rosie on her quest. Finally, they arrive at Rosie’s grandmother’s house, where Gran combines milk, egg, sugar, butter, and flour to make moon-shaped sugar cookies, satisfying everyone. The mixed-media artwork features Hillenbrand’s strong, distinctive lines that define the characters, colors that range in intensity from brilliant to muted, and a rich array of patterned surfaces that make the settings varied and vivid. Though some of the illustrative elements fade into the background, even the shadows here contribute to the storytelling. The story reads aloud well, and in an open-ended conclusion, Rosie asks a new question for readers to explore on their own. The final page offers a recipe for Gran’s Sugar Cookie Moons, for those who want to extend the story into the kitchen.Â
Â
Activity: The book itself provides the activity! Everyone she asks says what they think the moon is made from. When it all gets mixed together, it makes moon cookies. Use the recipe in the back of the book to make your own delicious moon cookies. Have children help measure and mix ingredients, and flatten the cookies with sugar to make them sparkle. You may wish to discuss the phases of the moon as children nibble their cookies into crescent moon shapes!
Â

Each animal in the book says that the moon is made of something white or light colored: milk, egg, sugar, butter, flour. Ask children to think of other things the moon could be compared to. Invite them to compare the moon with things that are round or crescent-shaped, things that are bright, etc.
Have each child write a metaphor about the moon. Encourage children to expand their metaphors with descriptive details, for example: The moon is an egg. Small shining chicks hatch from it to become the stars. You may wish to have children illustrate their metaphors and then collect them into a class book.
At the end of the book, Rosie wonders what the sun is made of. Have children brainstorm a list of things the sun could be compared to. Work with them to write a group story about Rosie’s quest to discover what the sun is made of. Encourage children to use metaphors in their story (see previous activity).
Explain to children that for thousands of years, people have wondered about the moon, sun, and stars. There are many stories that explain what these celestial bodies are, their movements, and how they came to be in the sky. Use The Moon Might Be Milk to introduce some of these other stories, myths, or legends about the moon, or to complement studies about the moon or the solar system.
Click here if you would like a printable PDF of these activities.
Make a bird feeder, reusing the can and the lid (scroll down on link for instructions).
Â
Reuse a can and lid to make a bank. Both sizes of cans would work for this craft.
Â
Reuse a 200g size Pringles can to make yourself a pinhole camera. This is a great science project.
Â
Make Pringles Can Bird Castles using both sizes of cans.
Â
Make a Pringles Can Mailbox
Â
Make classroom treat containers using empty Pringles Cans and other supplies. One school year I made these for an entire class. They loved them.
Â
Decorate a 200g Pringles can with red felt, and other supplies to make a Santa for the holidays. You can also make a cute reindeer this way.
Â
Make a Pringles Can Nutcracker for the Christmas Holiday. Make several, fill them with nuts and give as gifts.
Â
Reuse a small (50g) Pringles can and lid to make a pencil keeper craft
Â
Make homemade kaleidoscopes using directions on the link provided in resources below.
Â
Kids can make a silo out of a Pringles can
Â
Use empty Pringles cans (200g) to store paint brushes, storing the brush side up in the can.
Â
Use an empty Pringles can to mail cookies to someone, or use the can to give cookies as a gift. You can be as creative as you want by decorating the can when hand delivering your packaged gift.
Â
Use an empty Pringles Can (200g) to store cooking thermometers in. Line the inside with a piece of thin foam or felt. You will be able to locate them easily and keep them safe.
Â
Donate empty, washed and dried, cans to schools, scouts, preschools, and other organizations.
Â
If you have a S.C.R.A.P. store in your area, donate your Pringles cans to them. Scrounge Centers for Reuseable Art Parts are non-profit.
Â
Additional Ideas (some repeats) at Artists Helping Children
Â

Use materials with interesting textures to make a fun book for your baby or toddler.
Scraps of materials with interesting textures. (textured *papers, fabric, household items, etc.)
Spiral-bound book with blank pages. (I used a watercolor pad because the pages were nice and heavy.)
Exacto knife
Glue (Bookbinding glue will work really nicely.)
Glue brush
Binder clips
Computer/printer
Â

Â
Gather together your textured materials. The watercolor pad that I bought had 15 pages, so I needed to find seven items–one for every other page. Leave the first page of your book for the cover. On the next page, use an exacto knife to cut a square out of the center of the paper. Continue to cut a square out of every other page of the book. Cut your textured items into squares a little larger than those that you cut out of the book. You are basically going to sandwich the textured items between two pages of your book. Use book-binding glue and brush to glue your pages together. Use binder clips to hold the pages together while they dry. (You could use another type of glue, but the bookbinding glue is nice because it is strong and it dries nice and flat. You can find it at an art supply store.) Print out some text to add to your book. I just did some texture vocabulary words, and a simple title.
Â
This would make a nice gift for a baby or toddler. Or just pass it on to your child to enjoy!

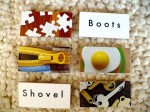
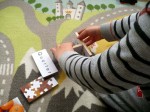
They incorporate images from around our house so it’s a fun way to build vocabulary with objects/images that are personal and relevant to a young person. You could use this technique for learning a second language as well. They also double as blocks, so you can build with them. They are great for the 2-4 year set when language is starting to develop. Kids can help take the photos or at least pick out the images. Older kids could make their own set documenting their favorite things or a field trip or family vacation.”
Â
By choosing images that have meaning to your child you create a time capsule of this special time in their life that they likely will have few memories of. You could also use her technique to create a wood memory game.
Â

Â
Â
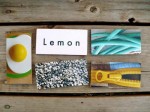
Wood Photo Flashcards
Â
26 wood pieces cut to 2″ x 4″
Sand paper
Jar of Paper Mod Podge glue
1-2 small poly foam paint brushes
Exacto knife or scissors
Avery 2 x 4 inch white shipping labels
26 photographs – one for each letter of the alphabet
Newspaper or other material to protect your work surface
Â
1) Begin by snapping photographs for each letter of the alphabet. I chose images from around our house that were visually interesting yet obvious enough to be identified by a 4 year old. Remember that your photos will be trimmed down to 2 x 4 inch pieces so pick images (i.e. clouds or grass) that will aren’t too abstract once they have been cut. You can print these up on your home printer (USING MATTE PHOTO PAPER) or have them printed professionally (I used Shutterfly which is cheap and fast).
Â
2) Sand the edges of your wood pieces until they are smooth and splinter-proof.
Â
3) Print out the words that will go on the text side of the flashcards and format them on the template provided with the Avery labels. You can play around with different fonts and sizes until you get a combination that you like. I used Futura, my old standby font. I like that it has a bit of a vintage feel to it and is very easy to read. These are flashcards after all, legibility is key!
Â
4) Lay out your wood pieces on top of newspaper or another protective surface.
Â
5) Apply the labels to the wood. Seal the labels into place by painting on a layer of Mod Podge using your foam brush. Be sure to only use a thin layer – more is definitely less with this stuff. You can do a second layer but don’t go too crazy with it because the labels will pucker up if they are too moist. Let them dry completely.
Â
5) Once that side is dry you can start applying the photos to the other side. You will want to figure out what part of the photograph you want to use, since only half of your original image will fit. BUT DON’T CUT THE PHOTO JUST YET.
Â
6) Apply glue to the back of the photograph evenly and then adhere the wood piece to the photo. Use your finger to smooth down the photograph.
Â
7) When the glue is dry, you can cut out your image to size using an exacto knife or scissors.
Â
8) After you are done cutting, apply another layer to the front of the photograph to add a protective surface.
Â
9) All done!
Â
Keep in mind that you will want to make or buy a box or pouch to store these so that they stay together as a set.
It seemed simple enough in the beginning. Why not make the party favors for my daughter’s birthday, rather than buy something? So I started with some colorful felt and decided to make crowns. The party was fairy-themed, as it seems every little girl’s party is these days. We had boys and girls come celebrate with us, so I wanted something to fit the theme and suit everyone.Â

Â


The scraps from the crowns were so pretty that I decided to make a teeny-weeny garland with them. I don’t really know what to do with it, so for now it is adorning Gnome Land. Thank goodness for magical realms!

Little babies are not big fans of change. In fact, they often have trouble dealing with transitions like going from being warmly and snuggly dressed to being half naked for a diaper change. Singing rhyming songs can help your baby tolerate and even learn to anticipate transitions.
Â
Diaper changes aren’t the only events that can upset a young baby. There are many other such transitions in the course of a regular day, like bath time or getting dressed. Add to that the fact that babies are not exactly patient by nature and you can see why a baby’s day is chock full of stressful times.
Â
Why rhyming and chanting soothes babies
Babies have finely tuned ears and they love to listen to the rhythmic structure of language. By accentuating the rhymes or the sing song quality of a chant you’ll help your baby focus on what’s coming out of your mouth instead of what’s happening to his body.
Â
Rhymes to get through transitions
Rhymes and songs teach babies what to expect next. If you always sing the same diaper changing song, the same bath time song, or even the same “I’m getting your bottle ready†song your baby will soon learn that what she thought was a new and scary event is actually that same old one she’s already been through many times. In fact, she might even learn to look forward to the comforting tunes!
Â
Rhymes as a teaching tool
Rhymes and songs have the added advantage of being a great educational tool that can help you teach your baby her name, her body parts, or common household words. Sure, when she’s at the infant stage she might not take particular note of the lessons you’re sharing, but she’ll be talking sooner than you can possibly imagine and it’s never too early to start giving her the right tools.
Â
Coming up with the perfect rhyme
Don’t consider yourself to be particularly musical or gifted when it comes to making up songs? Don’t worry. You can just take songs you already know and change the words slightly. “Mary had a little lamb†can become “Mommy’s making a little bottle.†The “itsy bitsy spider†can become “the sticky icky diaper.†Let your imagination run wild and have fun; getting giggles out of your baby is always an added bonus!
Â
Rhymes help mommies too
Singing songs and making rhymes doesn’t just help your baby, it can help you too. Hearing your child cry through a diaper change or during a bath can be very stressful. Singing a silly ditty or working to find a soothing rhyme can help distract you and make it possible for you to get past the tough moment.

