stART: Rainbow Fish Paper Craft

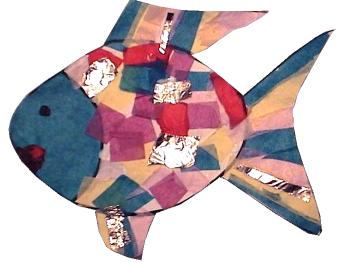
  Read The Rainbow Fish, by Marcus Pfister.  It’s about a little fish who learns a lesson about sharing.  The best thing about this book is the really neat shiny foil scales that glitter wonderfully during bedtime story!  


trainbowfish

This craft is simple but ends up looking amazingly rainbow fish-like.  This is SUCH a fun craft for young children to do.  To make the Rainbow Fish Crafts look underwater, stick it to a blue sheet of construction paper and glue on top one sheet of slightly crumpled plastic wrap.         


Template of the fish (or you can draw your own)

1/2 inch or so bits of various colored tissue paper or construction paper (we used tissue paper in the photo above).

Small amount of tinfoil

Thin strips of various colored tissue paper or construction paper

One big blue piece of tissue or construction paper OR a blue marker or crayon

Glue

Scissors


Print rainbow fish template (or draw the outline of a fish on a piece of paper).  Color the head in blue, or glue on a piece of tissue or construction paper.   It doesn’t have to be perfect as we’re going to cut out the fish at the end. Glue strips of various colored tissue or construction paper on the fins and tail.  Glue 1/2 inch (ish) squares of tissue paper or construction paper onto the body.  Glue a few strips and 1/2 inch squares of tinfoil over the fish  (or just glue on one square scale to show Rainbow Fish after he shared). Cut out along the lines (if you used tissue paper you’ll be able to see the lines through it… if you used construction paper, just estimate where the lines are).  This step will require adult assistance for younger children. Cut out the mouth and eye and glue them onto the head.  (you can color them in with markers if you wish.)


Tags:

  • Digg
  • Del.icio.us
  • StumbleUpon
  • Reddit
  • Twitter
  • RSS
read comments

How to Batik Cloth


old towels

paper towels

irons

old newspapers

water-based pens, colored pencils or colored crayons

cothespins

coffee cans

latex gloves

fabrics – preferably cotton

skim milk

hobby paintbrushes

electric skillets

1 lb. clear paraffin waxes

batik dyes or inks


Make a plain shirt or skirt fancy with this easy – but messy – technique.


1.  Wash and dry fabrics to remove sizing before batiking.

2.  Start with easy fabrics ‘ cottons are very good; silks are difficult. Old, white bed sheets cut into 18-by-18-inch squares are excellent for learning and practicing.

3.  Draw your designs on the fabric with colored crayons, colored pencils or water-based markers.

4.  Make a double boiler using an electric skillet filled with water and a coffee can.

5.  Put a pound of clear paraffin wax in the coffee can and melt it.

6.  Paint over the design with wax. Make sure the wax penetrates the fabric completely ‘ you should see it on the back of the cloth.

7.  Remember that everywhere the wax goes, there will be no dye.

8.  Let the wax cool. You can put the fabric in the refrigerator or freezer to hurry things up.

9.  Crumple the fabric to create cracks in the wax after the wax has cooled completely.

10.  Put on a pair of latex gloves.

11.  Prepare dyes or inks as suggested by the manufacturer. Use cool dyes so they won’t melt the wax onto the fabric.

12.  Dye the material the first color. Immerse it for about 20 seconds.

13.  Rinse it in cool water to remove excess dye. If the color isn’t dark enough, dye it again.

14.  Allow it to dry by hanging it with clothespins over a stainless steel sink or an old, folded towel.

15.  Use hot wax, and paint the areas that you want to remain the same color as the first dye.

16.  Let the wax cool.

17.  Crumple the fabric again to make cracks in the wax.

18.  Dye the material the second color.

19.  Remove the wax, either by scraping it off or by ironing it between a few paper towels. Put newspaper under the paper towels to absorb the wax and moisture. This can be done while the fabric is still wet.


Tips:

Dye in a well-ventilated area.

Batiking is best done near a sink. Cover the counters with cardboard to protect them from stains.

Wear old clothes when batiking.

Brush skim milk on the fabric before dyeing; it helps the fabric accept colors more readily.

Tags:

  • Digg
  • Del.icio.us
  • StumbleUpon
  • Reddit
  • Twitter
  • RSS
read comments

Beat a Leaf Journal

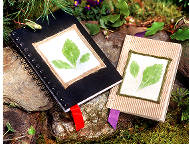
famf88campcrafts_jrnlThis project combines your kids’ most primal gathering instincts with another activity they love: banging rocks. Although the name sounds decidedly un-eco-friendly, leaf-beating is a favorite with the thousands of kids who take part in the naturalist programs run by the Appalachian Mountain Club in New Hampshire’s White Mountains. Put the finished print on the cover of a blank notebook, and your kids have a journal for recording their juiciest summer adventures.


Leaves

wooden board

small square of muslin

thumbtacks

a flat, smooth, palm-size rock or small hammer

blank journal

glue and twine

ribbon or colored paper.


After selecting a leaf or two, lay them on the board (put a piece of paper on the board first if you don’t want to stain it). Place the piece of muslin on top, tacking the fabric down at the corners so it won’t shift. Using the rock or hammer, beat the fabric carefully but with consistent, even force. Lift up the fabric, and the leaf will have left its image in green. Glue the muslin square to the front cover of the blank book. To cover the fabric’s edges, glue on a border of twine, flat ribbon or colored paper.


In addition to leaf-print journals, your kids can bang out fabric bookmarks, small pillows stuffed with potpourri, stationery or botanical wall hangings. Wide, flat leaves make the clearest prints, but experiment with all kinds (staying away from any plants with leaves of three) or even flower blossoms.

Tags:

  • Digg
  • Del.icio.us
  • StumbleUpon
  • Reddit
  • Twitter
  • RSS
read comments

Pearly Soda Clay

This is gorgeous stuff. Smooth and silky in your hands, it has a porcelainlike finish and a soft, eye-catching shimmer when dry.


1 cup baking soda

½ cup cornstarch

 ¾ cup water

 Food coloring (optional)


In a saucepan, stir together the baking soda and cornstarch. Add the water, mixing well.  Cook the mixture over low heat (adults should supervise), stirring occasionally, until it resembles mashed potatoes, about 7 to 10 minutes. You will need to stir it almost constantly the last few minutes as it thickens.  Remove the pan from the heat and set it aside. When the dough has cooled, turn it out onto a floured board. Knead the dough with your hands, adding more cornstarch as needed, to create a workable clay.  For tinted clay, knead in a few drops of food coloring. Allow creations to air-dry overnight. Refrigerate any leftover dough in a ziplock bag for up to three days.

Tags:

  • Digg
  • Del.icio.us
  • StumbleUpon
  • Reddit
  • Twitter
  • RSS
read comments

Paper Bag Fish

A paper lunch sack, plain or colored

Plastic grocery sacks, crumpled newspaper, junk mail or other material to stuff the sack

Nontoxic craft glue or tape

Pipe cleaner, wire or rubber band

Decoration material such as glitter glue, googly eyes, sequins or metallic confetti, markers, colored paper etc.


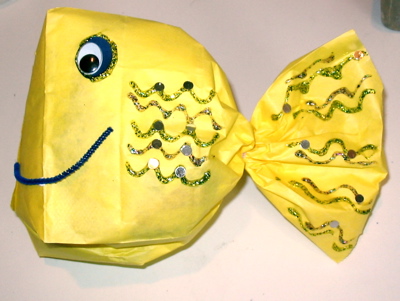
paperfishStuff half the sack with crumpled newspaper or grocery sacks. Twist on a pipe cleaner, piece of wire or rubber band right above the stuffing to form the body and tail. Glue on a mouth (the mouth on this fish is a pipe cleaner, but you can use paper, yarn, or draw it on) and eyeball (again, use what you have–a paper eyeball works great). Decorate the tail and body. Let dry completely and then place wherever you need a little fishy fun.

Tags:

  • Digg
  • Del.icio.us
  • StumbleUpon
  • Reddit
  • Twitter
  • RSS
read comments

8 Bathtub Activities

Your kids will love these splish-splashing bathtub games.


Bath time doesn’t have to be a struggle, or even just a wash-and-go affair. Try these activities for tons of tub fun, and both you and your child will look forward to happy bath time:


1. Make a hand puppet by sewing two washcloths together. Have the puppet talk to her in a funny voice as you soap her up with it.


2. Try the new shampoos and conditioners or “bath crayons” made of soap. These often have kid-friendly scents like strawberry and watermelon (but make sure your child understands they’re not for eating!).


3. Sculpt your child’s shampooed hair into different shapes. Let her peek in a handheld mirror to see how funny she looks.


4. Use a small sand shovel or other toy to wet and rinse your child’s hair. This makes hair washing more fun, and he won’t have to put his head under water if he doesn’t want to.


5. Throw some plastic toys in the tub to see which ones float. Have your child play “lifeguard” to rescue the toys that sink.


6. Create an assembly line. You wash your child as she washes her waterproof doll or toy.


7. Put a tub twist on old familiar tunes. For example, sing, “Wash your right hand in, wash your right hand out. Do the Hokey Pokey as you rinse it off right now. That’s what it’s all about!” Or, “If you’re happy and you know it, wash your tummy!”


8. Punch holes in the bottom of an empty yogurt container. Have your child fill it with bath water to make it “rain” in the tub.

Tags:

  • Digg
  • Del.icio.us
  • StumbleUpon
  • Reddit
  • Twitter
  • RSS
read comments

Pencil Bookmark


Have you ever been reading a book and run across a word you didn’t know? Instead of skipping over it, jot it down on this fun bookmark and look it up later. You’ll always get the point with this place holder.

pencil


Construction paper

Scissors

Glue

Ruler

Marker

Using construction paper,  cut out pencil shape.  Add accents such as lead and eraser with scraps of construction paper.  Use ruler and marker to add lines for the list.

Tags:

  • Digg
  • Del.icio.us
  • StumbleUpon
  • Reddit
  • Twitter
  • RSS
read comments

Alphabet Poem

Aa
A is for
alligator.
A is for ants.
A is for apples
 on my pants.

Bb
B is for bear.
   B is for boat.
B is for buttons
on my coat.

Cc
C is for cow.
C is for cat.
C is for caterpillar
on my hat.

Dd
D is for dinosaur.
D is for dog.
D is for doll
on my log.

Ee
E is for envelope.
E is for eggs.
E is for elephant
on my legs.

Ff
F is for fire engine.
F is for fish.
F is for fox
in my dish.

Gg
G is for girl.
G is for goat.
G is for gorilla
in my boat.

Hh
H is for horse.
H is for hair.
H is for hippopotamus
on my chair.

Ii
I is for igloo.
I is for ink.
I is for iguana
in my sink.

Jj
J is for jelly.
J is for jeep.
J is for jacket
on my sheep.

Kk
K is for kite.
K is for king.
K is for key
on my string.

Ll
L is for lion.
L is for log.
L is for leaves
on my frog.

Mm
M is for mittens.
M is for mouse.
M is for monkeys
on my house.

Nn
N is for newspaper.
N is for nest.
N is for numbers
on my vest.

Oo
O is for octopus.
O is for ox.
O is for ostrich
in my box.

Pp
P is for pizza.
P is for pan.
P is for pencils
in my can.

Qq
Q is for queen.
Q is for quail.
Q is for quarters
in my pail.

Rr
R is for rose.
R is for ring.
R is for rabbit
on my swing.

Ss
S is for sun.
S is for socks.
S is for snails
on my blocks.

Tt
T is for tooth.
T is for truck.
T is for tie
on my duck.

Uu
U is for underwear.
U is for up.
U is for umbrella
in my cup.

Vv
V is for violin.
V is for van
V is for violets
in my pan.

Ww
W is for worm.
W is for wagon.
W is for wings
on my dragon.

Xx
X is for x-ray.
X marks the spot.
X is for kisses.
I have a lot!


Yy
Y is for yo-yo.
Y is for yak.
Y is for yarn
in my sack.

Zz
Z is for zebra.
Z is for zoo.
Z is for zipper
on my shoe.


Tags:

  • Digg
  • Del.icio.us
  • StumbleUpon
  • Reddit
  • Twitter
  • RSS
read comments
 Page 86 of 103  « First  ... « 84  85  86  87  88 » ...  Last »