Wood Photo Alphabet “flash cards”
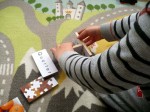
They incorporate images from around our house so it’s a fun way to build vocabulary with objects/images that are personal and relevant to a young person. You could use this technique for learning a second language as well. They also double as blocks, so you can build with them. They are great for the 2-4 year set when language is starting to develop. Kids can help take the photos or at least pick out the images. Older kids could make their own set documenting their favorite things or a field trip or family vacation.”
Â
By choosing images that have meaning to your child you create a time capsule of this special time in their life that they likely will have few memories of. You could also use her technique to create a wood memory game.
Â

Â
Â
Wood Photo Flashcards
Â
26 wood pieces cut to 2″ x 4″
Sand paper
Jar of Paper Mod Podge glue
1-2 small poly foam paint brushes
Exacto knife or scissors
Avery 2 x 4 inch white shipping labels
26 photographs – one for each letter of the alphabet
Newspaper or other material to protect your work surface
Â
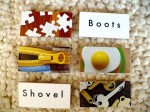
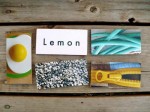
1) Begin by snapping photographs for each letter of the alphabet. I chose images from around our house that were visually interesting yet obvious enough to be identified by a 4 year old. Remember that your photos will be trimmed down to 2 x 4 inch pieces so pick images (i.e. clouds or grass) that will aren’t too abstract once they have been cut. You can print these up on your home printer (USING MATTE PHOTO PAPER) or have them printed professionally (I used Shutterfly which is cheap and fast).
Â
2) Sand the edges of your wood pieces until they are smooth and splinter-proof.
Â
3) Print out the words that will go on the text side of the flashcards and format them on the template provided with the Avery labels. You can play around with different fonts and sizes until you get a combination that you like. I used Futura, my old standby font. I like that it has a bit of a vintage feel to it and is very easy to read. These are flashcards after all, legibility is key!
Â
4) Lay out your wood pieces on top of newspaper or another protective surface.
Â
5) Apply the labels to the wood. Seal the labels into place by painting on a layer of Mod Podge using your foam brush. Be sure to only use a thin layer – more is definitely less with this stuff. You can do a second layer but don’t go too crazy with it because the labels will pucker up if they are too moist. Let them dry completely.
Â
5) Once that side is dry you can start applying the photos to the other side. You will want to figure out what part of the photograph you want to use, since only half of your original image will fit. BUT DON’T CUT THE PHOTO JUST YET.
Â
6) Apply glue to the back of the photograph evenly and then adhere the wood piece to the photo. Use your finger to smooth down the photograph.
Â
7) When the glue is dry, you can cut out your image to size using an exacto knife or scissors.
Â
8) After you are done cutting, apply another layer to the front of the photograph to add a protective surface.
Â
9) All done!
Â
Keep in mind that you will want to make or buy a box or pouch to store these so that they stay together as a set.


