The Itsy Bitsy Spider

Isn’t it funny that once a year, things that we try to keep out of our house…like spiders…become a decoration?


None

I love these hand print spiders because any craft which includes a hand print or foot print deems itself worthy to be kept.  My three year old daughter loved this activity as she was able to turn her hands into a spider, hopefully your kiddos will enjoy it to!


Black paint (washable is a must!)

Paper plate

Wiggly eyes

Paper (I used card stock)

String (optional)

spider2

Have your child dip each hand in the paint, spread their fingers wide, and then lay them on the paper with the heals of their hands touching.  After the spider has dried, cut the spider out and then slightly bend the finger prints to make the legs.  Add the eyes and you are done!  It’s that easy!  If you want to hang it, poke a hole in the middle and tie a ribbon or string in the middle of the spider.

Tags:

  • Digg
  • Del.icio.us
  • StumbleUpon
  • Reddit
  • Twitter
  • RSS
read comments

How to Meet a Book: Simple ways to introduce your little one to reading

One of the best ways to introduce books to your child is to put a board book in her hands. The small-sized, thick cardboard pages that can easily be turned and the bright illustrations will engage your child’s attention and will put this particular reading event under her control.

Spend time with the cover. What things does your child see? Does he think that these things will also be pictured inside? Read the title, pointing to the words as you go.

Let your child lead your first exploration of the book. It is not necessary to begin reading at once. You can take a “picture walk” and talk about the pictures together. This process not only gives your child an initial sense of the book, but it also develops book concepts, such as front and back and forward progression of reading a book by turning its pages.

Notice the particular structure of the book. In this case, the rhyme is on the left page and the picture is on the right. Notice also that some words in the rhyme are illustrated. You can use this structure to invite your child to join in the actual reading. After the first few rhymes, pause when you come to a word that is illustrated. Your child is likely to naturally say the name of the picture. You can run your finger under the word as she speaks. This will help her learn to distinguish between pictures and words.

Reading together is a critical way to build vocabulary. We encounter words in books that we may not use in everyday conversation. You can explore words and concepts together by looking at the pictures and discussing them. The riddle format of this book is perfect for this kind of activity as it will become a game to hunt for the objects mentioned in the riddle.

Make this treasured shared-reading experience last beyond the moment where you close the book and move on to other things. Talk about things around your home that were mentioned in the book, make up a riddle using its language (“I spy a teddy bear somewhere in this room”), compare colors and shapes of objects you see to those in the book. This develops your child’s oral language and also helps him think abstractly by comparing a remembered experience to the actual context at hand.

Most of all — have fun meeting new books!

Tags:

  • Digg
  • Del.icio.us
  • StumbleUpon
  • Reddit
  • Twitter
  • RSS
read comments

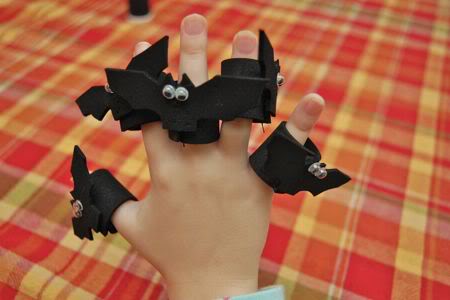
Finger Puppet Bats


Five Black Bats


Five black bats

Ready to soar;

One stayed behind,

Now there are four.

Four black bats

Hanging from a tree;

One fell down,

Now there are three.

Three black bats

Wondering what to do;

One flew away,

Now there are two.

Two black bats

Sitting in the sun;

One fell asleep,

Leaving only one.

One lonesome bat

With no place to go,

Went hiding in a cave,

Now there are zero.


batplayset1


They are made from black craft foam. We cut 10 pieces 1/2 inch x 2 1/2 inches. I used 5 of them to cut out bat shapes, and the other five became the finger bands. Emily loves attaching googly eyes! Who doesn’t? Just a few quick stitches to hold them together, and they were done.


Tags:

  • Digg
  • Del.icio.us
  • StumbleUpon
  • Reddit
  • Twitter
  • RSS
read comments

Doing ‘Jack’ With Seeds

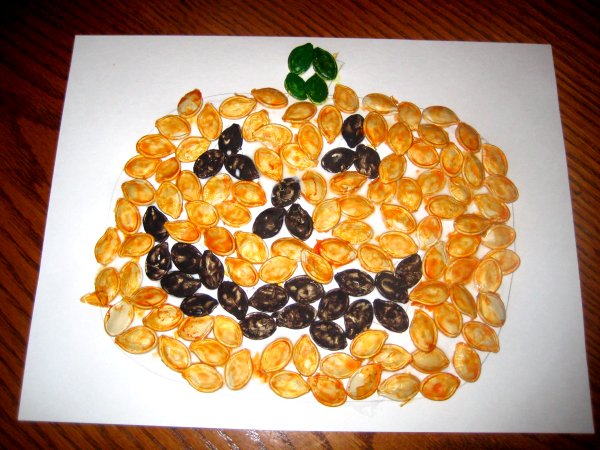
Carving a pumpkin is a messy job that I usually just enjoy watching my hubby take care of.  I did that again, but I decided to salvage the seeds and get creative because usually I don’t do ‘Jack’ with the seeds.  I’m trying to keep these weekly crafts easy and cheap to entice you all to enjoy doing them with your kiddos.  Since we all spend money on pumpkins each year…and sometimes they aren’t cheap, you might as well get your money’s worth. 


Pumpkin seeds

Orange, black, and green paint

Elmer’s glue

White sheet of paper (I used card stock…I love card stock paper!)


jackseeds2


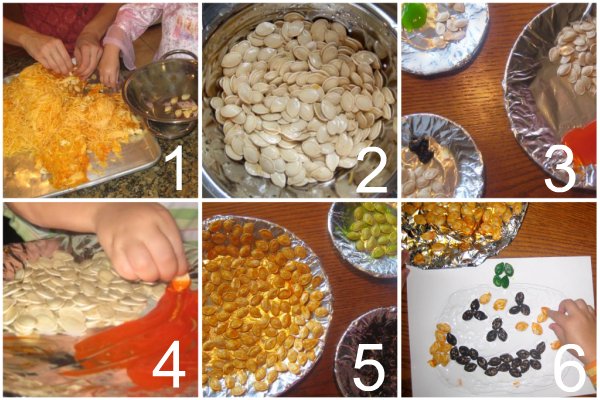
1. Separate the pumpkin seeds from the stringy pumpkin.


2. Wash the seeds and then lay them on a plate or pan to dry.  ( I first put them on a paper towel, but as they were drying the paper towel was sticking to the seeds.)


3. To make it easy for the kids I covered 3 plates with tinfoil and put seeds on each of the plates with the color of paint.


4.  Paint the seeds!  I used finger paint because I thought it would be easier to just let my little girl mix the seeds around in the paint.  Depending on what your child would like, you could let them paint each one with a paint brush, because really you only need one side painted. (The green finger paint wasn’t dark enough so we had to paint the stem seeds again.)


5.  After painting all the seeds, spread them out on the plate to allow them to dry.


6.  Sketch a picture of ‘Jack’ and glue the seeds on.


jackseeds

Tags:

  • Digg
  • Del.icio.us
  • StumbleUpon
  • Reddit
  • Twitter
  • RSS
read comments

Waxed Paper Stained Glass Butterfly

  • Waxed paper
  • Crayon shaving (crayons shaved with a scissors or a knife – by an adult)
  • Scissors
  • An iron
  • Holepunch
  • A few inches of string     

Fold a piece of waxed paper in two. Draw half a butterfly with the body at the fold.  Flip the paper over and draw the other half of the butterfly (using the original as your template). Open the waxed paper and put it on a flat surface. Put some crayon shavings on the waxed paper (and inside the butterfly). Cover the waxed paper with another piece of waxed paper. Have an adult iron the two layers of waxed paper together on low heat (protect your iron by putting a paper towel on top of the waxed paper while ironing). Cut out the butterfly. Punch a hole near the top. Put a string in the hole for hanging it. This butterfly looks beautiful hanging in a window. For a more finished look, sandwich the butterfly between two pieces of paper cut into a butterfly “frame”.

Tags:

  • Digg
  • Del.icio.us
  • StumbleUpon
  • Reddit
  • Twitter
  • RSS
read comments

Salt Dough Pumpkin Patch

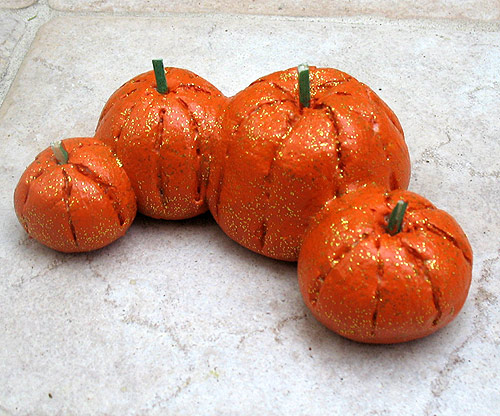
Salt dough is a great medium for fun and creative crafting. Take this sparkly pumpkin patch for instance! Salt dough recipes aren’t just for kids. Make these fun and festive pumpkins this Fall for your holiday decorating. 


1 cup salt

2 cups all purpose flour

1 cup water

orange acrylic paint

paintbrush

Gold glitter paint

2 green toothpicks, broken or cut in half


IMPORTANT NOTE: This recipe for salt dough makes a lot of projects. If you only plan on making a few, cut this recipe into fourths or in half.  Preheat oven to 250 F. Mix together, salt, flour, and water until a dough is formed. Knead the dough on a floured surface until the mixture is elastic and smooth. If dough is too sticky, sprinkle with flour, continue to do so until stickiness is gone. BE CAREFUL. Do not add too much flour, this will dry out the dough and will cause it to crack before you get a chance to bake it.


THIS DOUGH IS NOT EDIBLE, though it won’t hurt you or your kids, it just won’t taste very good!


sdpumpkinbig


Roll dough in your hands to form different sized balls. Line them up on a cookie sheet, touching each other so that they will be one piece after baking. Use a toothpick to draw lines on the pumpkins.  Insert toothpick halves, point size down, into the top center of the pumpkin to create the stem. Be sure to do this step BEFORE baking.  Bake for approximately 2 – 2.5 hours. Remove from oven and allow to cool completely. For best results, allow to cool and dry overnight, or for at least 4 hours. Paint pumpkins with two coats of orange paint, allowing to dry in between coats. When dry, paint with a coat of gold glitter paint or glitter glue. Let dry.

Tags:

  • Digg
  • Del.icio.us
  • StumbleUpon
  • Reddit
  • Twitter
  • RSS
read comments

Craft Materials List


Basic Materials

Computer printer

*Paint brushes

*Computer paper (white & colored) 

*Hole punch

*Construction paper

Paints: tempera, *watercolor pan paints, *watercolor pencils, *tempera paints, poster, finger paints

*Crayons

*erasable colored pencils or 

*traditional colored pencils 

*white and color chalk

*Glue stick

*Washable glue

*Craft knife (for adults)

Wood craft sticks (small and large)

*Pencils with eraser and pencil sharpener

*Scissors:

*Washable felt-tip color markers

Cover up: old t-shirt

*Dry-erase color markers (great for penmanship practice on covered tracers (D’Nealian or Zaner-Bloser with sheet protectors)

File box & files to organize

activities and materials

*Tape & tape dispenser

*Stapler


Extras

Stickers

*Hole punch

brass fasteners 

*Pipe Cleaners

*Wax paper

Paper plates Standard 9″ and dessert size

*Paints: acrylic and fabric

Easel or butcher paper

Plaster of Paris

Poster board to use as a portable easel or bulletin board

Liquid starch

Clear contact paper or laminating sheets

Used craft sticks (from Popsicles)

Glitter in small shaker container or Glitter glue

*Wiggly Eyes Round (Assorted colors & sizes)

Cotton balls

Cookie cutters 

Tissue Paper (various colors)


Recyclable Materials for crafts

Cardboard tubes (sanitary, paper towel or wrapping paper tubes)

Catalogs, newspaper and old comic books

Drinking straws

Clear plastic soda bottles & caps

Paper bags: lunch size & grocery size

Baby food jars

Cardboard: cereal boxes, etc.

Old cookie sheets

Sand paper scraps

Paper cups (foam or paper)

Styrofoam trays

Old socks

Newspaper

Milk cartons

Large & small boxes and lids (shoe boxes)

Wrapping paper & wallpaper scraps

Yarn, ribbon or string scraps

Clean sponges

Plastic containers (margarine cups, etc.)

Frozen juice cans & lids

Old sheets or old pillowcases

Throw-away paper (junk mail that one side is clean for printing)

Empty match boxes

Aluminum foil scraps

Some large glass jars & jar lids

Corks

Old file folders

Old pasta-assorted

Tissue paper boxes and gift boxes

*Felt or fabric remnant pieces


Materials from Nature

Smooth stones or pebbles

Driftwood

Fresh or dry leaves

Dried grasses

Pine cones

Twigs

Sea shells

Nuts

Sand

Dried beans

Wood shavings

Popping corn

Egg shells

Dried flowers

Bird seed and other seeds

Tags:

  • Digg
  • Del.icio.us
  • StumbleUpon
  • Reddit
  • Twitter
  • RSS
read comments

Pumpkin Spice Playdough {Recipe for Fun}

While it may not be the most attractive looking of all playdoughs, this recipe is guaranteed to have your house smelling absolutely yummy in no time at all! We pulled out our pumpkin cookie cutters and the kids had a great time playing with this soft and pumpkin spiced playdough.


2 cups of flours {I had whole wheat on hand}

1 cup salt

4 tsp. cream of tartar

1/4 cup cinnamon

2 Tbsp. cloves

2 Tbsp. nutmeg

2 tsp. ginger

2 cups water

2 Tbsp. oil


Mix the flour, salt, cream of tartar, and spices together in a mixing bowl. Add the water and oil to the dry ingredients and mix together well. Transfer mixture to a medium sized saucepan and heat over medium heat, stirring constantly. The dough will begin to thicken and form. When it becomes difficult to stir and is more solid, remove from heat and carefully knead the dough. {Note: dough will be hot!} When dough has cooled, have fun playing. Store in the fridge to help the dough last longer ~ this is great for the holidays!!

Tags:

  • Digg
  • Del.icio.us
  • StumbleUpon
  • Reddit
  • Twitter
  • RSS
read comments
 Page 74 of 103  « First  ... « 72  73  74  75  76 » ...  Last »