Alligator Sewing Kit

This snazzy ‘gator (aka a sewing book for pins and needles) is a great gift for any seamstress.

  • Scissors 
  • Felt (green, white, and red) 
  •  Pinking shears (optional) 
  •  Iron 
  •  Green yarn 
  •  Needle 
  •  Green pompons 
  •  Googly eyes 
  •  Green sequins or beads 

1. Begin by cutting an oval (about 8 by 2 inches) from green felt. From white felt, cut the same shape, but slightly smaller. Then cut one from red felt that?s a bit smaller still. Create jagged teeth around the edge of the white felt by trimming it with pinking shears.

2. Center the pieces on top of each other (green, white, then red). Fold the stack in half and press with an iron (a parent?s job).

3. Use the yarn and needle to sew two or three large stitches through the center of the stack of felt to bind the three layers. Then tie the ends of the yarn into a double knot (on the outside of the alligator) and trim off any excess.

4. For the alligator?s eyes, glue green pompons and googly eyes, and for a snout, glue or sew on the sequins or beads.

Variations: Have a different animal in mind, like a spotted dog, perhaps? Simply choose other felt colors and add ears.

Tags:

  • Digg
  • Del.icio.us
  • StumbleUpon
  • Reddit
  • Twitter
  • RSS
read comments

Popsicle Stick Halloween

6a010537157159970b0120a6012a7c970b-500wi

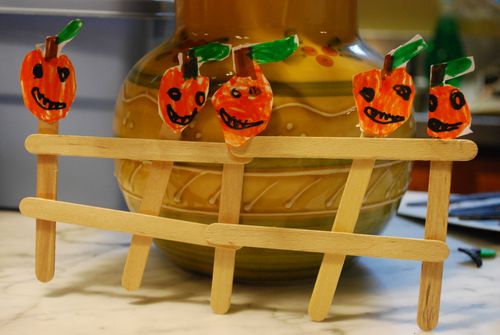
Five little pumpkins sitting on a gate  (five fingers up)


The first one said “Oh my! It’s getting late!”  (hands on cheeks)


The second one said “There’s a chill in the air!”  (hug self)


The third one said “But we don’t care!”   (shake pointer finger “no”)


The fourth one said “We’re ready for some fun!”


The fifth one said “Let’s run and run and run!” (swing arms in running motion)


Then WHOOOOSH! went the wind,


And OUT went the lights, (clap)


And the five little pumpkins rolled out of sight! (rolling motion with arms)

6a010537157159970b0120a6014b4f970b-500wi

Tags:

  • Digg
  • Del.icio.us
  • StumbleUpon
  • Reddit
  • Twitter
  • RSS
read comments

A Paper Palace

Tall spires, stone walls and a wooden drawbridge–this home-styled castle has all the makings for an afternoon of adventure.

Start with an assortment of toilet tissue and paper towel rolls. Color the tubes with a coat of gold poster paint. Once they are dry, you can create the appearance of cut stone by applying a contrasting color with a small sponge square. Using a utility knife, cut windows in the tube towers (a parent’s job) or just draw them on with a black marker. Cut notches around the tops of several turrets.

When assembling the castle, start from the center. Glue together two or three taller tubes for the main towers. Then, stack smaller rolls around them, interlocking the towers with tabs cut in the tube bottoms. Create the castle’s front wall using a 4-inch square of construction paper. Draw on an ornate door frame and sandwich the wall between the front two rows of towers.

Now you’re ready to start roofing. For each roof, cut a circle out of construction paper. Make a single snip into the center and form a cone by overlapping and gluing together the cut edges. Glue the roofs in place on top of the towers. For a miniature drawbridge, glue Popsicle-stick planks side by side onto a piece of cardboard. Attach the drawbridge to the castle wall with metallic cording or paper clip chains.

Tags:

  • Digg
  • Del.icio.us
  • StumbleUpon
  • Reddit
  • Twitter
  • RSS
read comments

Magnetic Jack-o-lantern

bpIMG_1775


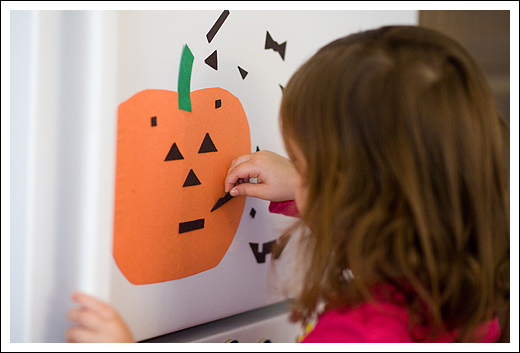
Eloise is a huge fan of magnetic play sets, so I made this one up today for her with construction paper and a couple advertising magnets that came in the mail. Without magnets, this would work well as a felt board activity, too. Eloise helped me think of different shapes she’d need (including the bow toward the right, of course), and she likes talking about how the pumpkin is feeling as I work in the kitchen.

Tags:

  • Digg
  • Del.icio.us
  • StumbleUpon
  • Reddit
  • Twitter
  • RSS
read comments

Edible Chocolate Play Dough

4 T. Cocoa powder
2 C. Powdered sugar
1/2 C. Flour
1/4 C. Honey
1/4 C. Butter
1/2 t. Vanilla

Knead the ingredients until combined.

Tags:

  • Digg
  • Del.icio.us
  • StumbleUpon
  • Reddit
  • Twitter
  • RSS
read comments

Pipe Cleaner Farm Animals

animalmagnet

Note:  This project calls for a hot glue gun.  Only a parent should perform the steps using that tool.

  • Cardboard Cereal Box
  • Chenille in desired farm animal colors
  • 10mm Wiggly Eyes
  • Felt Scraps in farm animal colors
  • Magnet squares
  • Hot Glue Gun
  • Scissors
  • Ruler
  • Protractor or 2.5 inch diameter glass/cup
  • Pencil

Make the Head Base of the Animals:   

Using your protractor or glass/cup, draw circles onto the cereal box cardboard and then cut them out. (The circles should be 2.5 inches in diameter.) Take three pieces of chenille stems in the color you want for your animal. Connect all three pieces together into one long piece by winding about 1 inch of the ends around each other. Beginning at one end of the long chenille piece, bend the chenille into a circle around a finger and then tighten that circle so there is no hole in the center. Continue winding the chenille around that circle into a spiral about four times.  Put some hot glue onto the center of a cardboard circle about the size of the spiral of chenille you have started and place the spiral into place on the glue. Continue winding the chenille around in a spiral about 1 inch at a time, each time adding a line of hot glue to the cardboard just before winding the chenille.

Make the Muzzle / Snout:

Muzzle for Cow or Dog:  Take one piece of chenille and bend the end around your pointer finger into a small triangle shape. (The triangle point with the end of the chenille stem will be the bottom of the muzzle.)  Continue to bend the chenille again into a small triangle shape just behind the first triangle and just a little bit larger. You should be able to do this 4 times and have about 1/2 inch long end left over at the bottom of the triangle.  Squeeze the pieces together at the bottom point of the triangle then take what is left of the chenille stem and wrap it around all the pieces at that bottom point to hold them together.  At the front of the muzzle, turn the end of the stem in a little so that it will cover up some of the opening.

Snout for Pig:  Take half a piece of chenille and wind it around your finger about three times, there should be a tiny bit left over at the end.  Squeeze the wound pieces together in one place and wrap the little bit of the stem that is left over around all the pieces to hold them together. (This spot where the stem end is wound will be the bottom edge of the snout.)  At the front of the snout, turn the end of the stem in a tighter circle so that it will cover up the opening.

Add the Beaks, Ears, Noses and More:

Make each of the animals by adding beaks, ears, noses and more as indicated below. Follow the directions below for each of our animals shown or make up your own ideas.

Chick – To make the chick use a yellow background

  • Cut a diamond shape out of orange felt. This diamond will fold into a beak.
  • Put a tiny dot of hot glue in the center of the diamond and pinch the felt from the other side onto the glue. This creates the beak.
  • Glue the beak and eyes onto the head and glue a tiny piece of yellow feather on the top of the head.

Cow – To make the cow use a white head background

  • Make a white muzzle following the instructions above and glue the muzzle to the head at 6:00.
  • Cut out the following shapes in black felt: two oval shapes about 1 and 1/2 inches long, two circles about 1/8 inch in diameter, three pieces that are in irregular shapes for the spots.
  • Cut out a 2 inch long letter C with pointy ends, then cut the C in half, this will form the two horns for the cow.
  • Glue about 1/4 inch of the ears behind the head of the cow at 10:00 and 2:00, then glue about 1/4 inch of the horns behind the head of the cow at 11:00 and 1:00.
  • Glue the tiny circles onto the muzzle of the cow, glue the eyes on and the irregular black pieces wherever you like for the spots.

Pig – To make the pig use a pink head background

  • Make a pink snout following the instructions above and the glue the snout to the head right in the center.
  • Glue the eyes into place.
  • To make the ears, cut a piece of pink chenille about 3 inches long. Bend it in half to form the top of a triangle. Then about 1/2 inch down from the top of the triangle, bend the whole tip forward and down to form a droopy ear. Glue the two ends of the ear to the back of the pig head at 11:00 and 1:00.

Dog – To make the dog use a brown head background.

  • Make a brown muzzle following the instructions above and glue the muzzle to the head at 6:00.
  • Cut a black triangle out of felt and glue to the end of the muzzle.
  • Glue the eyes on.
  • Cut out two brown, tear drop shapes of felt for the ears that are about 2 inches long.
  • Glue the pointed end of the tear drop onto the front of the dog’s head at 11:00 and 1:00 with the rounded ends of the ears pointing straight up.
  • Place a small dot of glue on top of the end that you just glued to the head.
  • Fold the ear down onto the glue dot. This will give the ears a flopped over look.

Finishing: 

For Magnet: Glue medium to large square or strip magnets to the back of your animal head.

For Stick Puppets: Instead of the adding the magnet, glue the end of a large popsicle stick to the back of your animal head to make fun stick puppets for a stick puppet show.

Tags:

  • Digg
  • Del.icio.us
  • StumbleUpon
  • Reddit
  • Twitter
  • RSS
read comments

Halloween Jar Luminaries


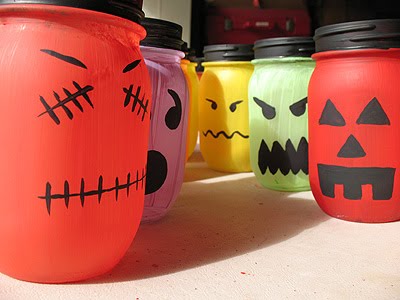
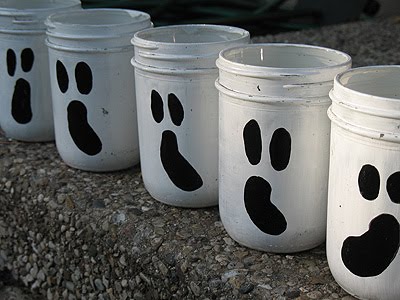
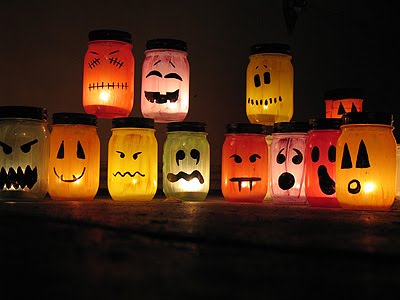
Over the summer I bought a couple of boxes of canning jars with the intention of canning. Well that didn’t happen. So I opened a box, went inside and grabbed my acrylic craft paint, paintbrushes, and a dish of water and went to work. 


lum3


One layer of acrylic craft paint was enough for these, but you can add another if you like. Just be careful if you do, glass is picky about being painted and will peel if you don’t allow the first layer to dry completely. Anyway, one layer gives you a nice rustic look, which I prefer, and you don’t have to wait forever.  


lumm


You can make stencils out of cardboard cereal boxes or freehand the faces. On a few I used a Sharpie marker to draw on the face, then I simply painted the facial features with black paint.   I painted the jar rims with black paint. Then let them all dry for about half an hour. Spray with glaze, I use two coats. Let dry for several hours.  After they’ve dried for several hours, you can have some fun displaying them. I use tea lights, I light them with a wooden skewer. I find it easiest to take a votive candle outside with me, light the skewer off the candle, then light the tea light inside the jar.


 lum

Tags:

  • Digg
  • Del.icio.us
  • StumbleUpon
  • Reddit
  • Twitter
  • RSS
read comments

Paper Mache

Paper Mache is one of the most versatile crafts around! There is no right or wrong way to do it. There is not even a right or wrong way to spell it – Paper Mache, Papier Mache?!

Using paper mache techniques, you can create almost anything. The best part is you probably have everything you need to create paper mache masterpieces laying around your home right now.

Paper Mache Paste

  • 1 cup water
  • 1/4 cup flour
  • 5 cups lightly boiling water 

Mix flour into one cup water until mixture is thin and runny, stir into boiling water. Gently boil and stir for 3 minutes. Cool before using. Use with newspaper/newsprint strips for Paper mache. If you live in an area with high humidity, add a few tablespoons of salt to help prevent mold.  You should be able to store this glue in a covered bowl or jar, in the refrigerator, for a few days.

Paper Mache Pulp

  • Newspaper
  • 2 cups water, plus additional for soaking pulp
  • 1/2 cups flour
  • 1 tbsp. white glue

Tear newspaper into small pieces to pack a small (1 quart) jar. Cover with water and let soak over night. Add 2 cups water, flour, glue and 1 cup of pulp, with excess water squeezed out to a blender and blend well. Use this for a smoother / final coat on paper mache projects. Allow to dry overnight before painting.

Tags:

  • Digg
  • Del.icio.us
  • StumbleUpon
  • Reddit
  • Twitter
  • RSS
read comments
 Page 75 of 103  « First  ... « 73  74  75  76  77 » ...  Last »