Boo Boxes


Small, Sturdy Boxes (school boxes, match boxes, cigar boxes, etc)

Pictures of family, or other comforting and interesting objects

Contact Paper

Glue

Scissors


Cut pictures to fit inside the boxes and glue or tape them to the inside bottom of the box.  Cover the outside of the boxes with patterned contact paper if desired.  Replace top and set out boxes for toddler to explore.

Tags:

  • Digg
  • Del.icio.us
  • StumbleUpon
  • Reddit
  • Twitter
  • RSS
read comments

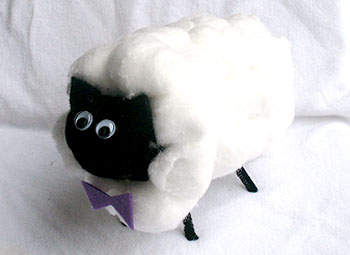
Paper Tube Sheep


1 toilet paper roll tube

Bunch of cotton balls

Glue

Tape

Scissors

1 black pipe cleaner

2 googly eyes

Scrap of white cardstock

Something black for the head (pom pom, crumbled-up tissue paper, etc. We used a piece of fleece fabric rolled into a ball.)


Cut pipe cleaner in half (adult job). Fold each pipe cleaner into a U shape and tape to bottom of toilet paper tube for legs. (These will probably not be sturdy enough for your sheep to stand on, so he’ll need to be resting, or use something stronger, such as painted dowels.) Use glue to cover top and sides of paper tube with cotton balls. Stuff black pompom, tissue paper or fabric into one end of tube for head. Cut two ear shapes from white cardstock and glue to head. Glue on googly eyes.

Tags:

  • Digg
  • Del.icio.us
  • StumbleUpon
  • Reddit
  • Twitter
  • RSS
read comments

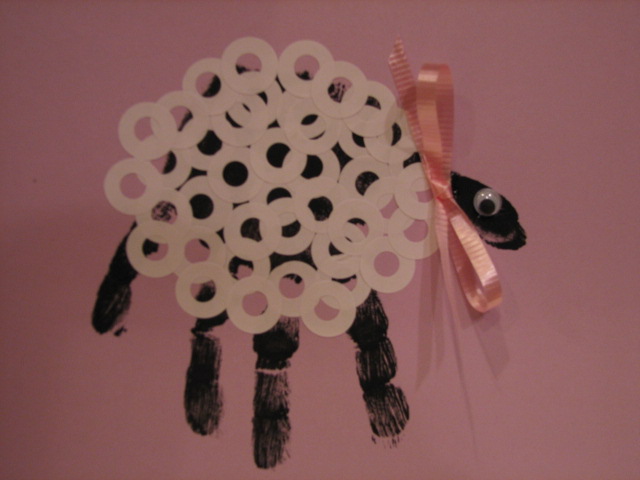
Easter Lamb Card

If your kids love peeling stickers, then this is the right craft for your child.


Card Stock or construction Paper

Black Paint

Sponge Brush

Glue

Wiggly eyes

Reinforcement labels


First, paint hand with the black paint.  If you do not want to paint the hand, you can always trace it with a black marker and color in the hand print. Place hand on paper and make a hand print.  Place reinforcement labels on the palm part of the hand print. Then decorate with eye and ribbon.  Decorate around the lamb with a field scene.


Tags:

  • Digg
  • Del.icio.us
  • StumbleUpon
  • Reddit
  • Twitter
  • RSS
read comments

Jell-O Rainbow


6-1/4 cups boiling water, divided

2 pkg.  (4-serving size each) JELL-O Gelatin, any red flavor,

2 pkg. (4-serving size each) JELL-O Orange Flavor Gelatin

2 pkg.  (4-serving size each)

JELL-O Lemon Flavor Gelatin

2 pkg. (4-serving size each)

JELL-O Lime Flavor Gelatin

2 pkg.  (4-serving size each) JELL-O Berry Blue Flavor Gelatin

1-1/2 cups thawed COOL WHIP Whipped Topping


STIR 1-1/4 cups of the boiling water into each flavor dry gelatin in separate bowls at least 2 minutes until completely dissolved. Pour each flavor of gelatin into separate 8- or 9-inch square pans.   REFRIGERATE 3 hours or until firm. Cut gelatin in each pan into 1-inch cubes.  ARRANGE the gelatin cubes in rows on a large tray or baking sheet to resemble a rainbow, using a different color of gelatin in each row and double stacking the cubes if necessary to fit on tray. Spoon whipped topping evenly into 2 small serving bowls. Place 1 bowl at each end of the rainbow to resemble “clouds.” To serve, dip the gelatin cubes into the whipped topping.

Tags:

  • Digg
  • Del.icio.us
  • StumbleUpon
  • Reddit
  • Twitter
  • RSS
read comments

Fly a Kite Day

June 15th is Fly a Kite Day every year, it is held on this day to help honor the anniversary of Benjamin Franklins kite experiment. Kites are a fun pastime for children and adults alike today. Today kites are not your old time fabric and sticks shaped like a diamond, rather there are kits shaped like just about anything. Get a kite and take your children to the park and go fly it.

Many adults love making it a craft project for children to make a kite. Making your own kite is very simple. You take two sticks, one longer than the other, and place the shorter one horizontally across the longer stick. Tie those two sticks together with a string, also adding a dab of glue will make sure the joint is even stronger. Then cut a notch at the end of all the sticks, and take a string and stretch it all around the kite frame. Then get some material and lay it down, and then place the kite frame on top of the material. Then cut the material out in the shape of the frame, leaving a few inches on the side to bend over the string and glue or tape down, but be sure the material it tight. Then you can cut another piece of string and tie one end to the loops at each end of the kite. Then you need to make a tail for your kite, simply tie small ribbons every so often along the length of the sting, and attach this to the bottom loop on the kite. You know have a kite, go out and fly it!

Kites a common staple when the weather is warm and there are open spaces and it’s a breezy day. Children and adults seem to love flying kites, no matter what shape or size they are. I remember always going to the beach to fly a kite, I loved it, running down the beach so the wind would catch the kite and then just sit there and watch it go higher and higher, those were the best days.

Tags:

  • Digg
  • Del.icio.us
  • StumbleUpon
  • Reddit
  • Twitter
  • RSS
read comments

Art and Craft Activities for Toddlers

Expressing themselves through arts and crafts is not just fun for toddlers. It’s also an important part of their mental and emotional development.


In this article we will look at some generally good ideas when it comes to art and craft activities for toddlers. Then we will share some great art and craft projects.


Some tips: Art and craft activities for toddlers


•These activities are inherently messy and they should be. I prefer to take things outside where I can use the water hose to clean afterwards. On a rainy day spread out some news papers for your toddler to work on. With some paints, if you mix a little dish washing liquid in there, it comes out easier.


•Especially with younger toddlers, keep the craft projects simple. If things get too complicated it will only frustrate your toddler.


•If your toddler has problems holding crayons, because they are too small. Try taping 3 crayons together or buy some larger crayons.


•Try to keep in mind that it’s the process that is important more than the end result, when it comes to toddler art projects.


•Toddlers tend to like to taste things, so everything you use has to be non-toxic, the glue, paint, clay and so on.


•Your toddler may have different ideas on what to do than you have. Feel free to make suggestions, but don’t try to make them do things ‘your way’. The whole exercise is about letting them be creative. Sitting down and talking with them about what they are doing is a good idea. Expressing their goals in words is a positive exercise for them.


•You can use empty yogurt containers to mix paint in, when you are done just toss them away.


Painting


Toddlers love to paint with brushes, but you should have them try different tools like their fingers, an old toothbrush or rollers to get the creativity going.


It’s fun to add mixes to paint to give it some texture try sawdust, soap flakes, flour sand and cornstarch. Also try painting on different mediums like wood, paper plates or fabric.


Dough Art


1 cup flour

1/2 cup salt

Food coloring (optional)

1/2 cup hot tap water

Put the flower and salt in a bowl, add the water and then let your toddler knead the mix for 5 minutes. Then you add your food coloring. You can keep the mix in the fridge for up to a week.


The dough is great for making any kind of figures. After you are done, air dry them for 5 days. At this point you can paint them, if you want to.


Making Prints


Making prints are easy and good fun. They just take the shapes, dip them in paint and push them down on the paper.


There are a number of things you can use to make the shapes for instance wine corks, shapes cut from potatoes, building blocks, paper cups and cookie cutters.


Paper Face Masks


Scissors

Paper plates

Paint

String


What you do is to cut the paper plate in two, down the middle. Each part is a mask. Cut eyes into each one. Then help your toddler to decorate the mask using paint or magic markers. When it’s dried use a hole puncher to make holes on both sides of the mask. Then use string to finish the mask. If your toddler likes animals, you can add ears made of construction paper or whiskers from pipe cleaners to it.


Popsicle Sticks


If you have a couple of kids you know there are always some popsicle sticks lying around. Collect them for a few weeks. Let your toddler color them with water washable magic markers. Then glue them together into a picture frame. Glue one of your toddlers paintings or a picture into the frame. Tie a piece of string along the back of the frame. Then it’s ready to hang in your toddler’s room.

Tags:

  • Digg
  • Del.icio.us
  • StumbleUpon
  • Reddit
  • Twitter
  • RSS
read comments

Just a Neat Site

http://wonderfl.net/c/6Z8A/fullscreen

Tags:

  • Digg
  • Del.icio.us
  • StumbleUpon
  • Reddit
  • Twitter
  • RSS
read comments

Summer Camp Strategies

summercamp1
Sun, s’mores, and a few kindred spirits may seem like all a kid needs to have a great time at summer camp. But as we heard when we asked for your best off-to-camp ideas, a few simple preparations can make a big difference in your child’s experience. On the following pages, our readers share their favorite family-tested strategies for stowing gear, staying in touch, and easing homesickness. You may not see these tips on standard camp packing lists, but they just might help keep your kids happy campers from the first day to the last. Also, be sure to check out fun camping activities and recipes below!

SMART PACKING
Help your children keep track of their gear — and keep it dry — with these easy, field-tested solutions.

summercamp1 Photo Inventory
No matter how many lists or labels Pamela Willett used, her kids never came home from camp with all the items they’d taken — until she hit on the idea of a visual packing guide. “We laid out each child’s bag with its contents on the floor. Then we stood on a chair and took a digital photo of the items,” says the Ithaca, New York, mom. After printing the photos on 8 1/2- by 11-inch sheets of paper, Pamela sealed each in a gallon-size Ziploc bag and tucked it into a pocket of the appropriate duffel. The result? When Allegra, then age ten, and Jacob, eight, were ready to leave camp, they could easily see which items they needed to look for, and nothing was left behind.

summercamp2 Double-duty Tote
The Brown family of Columbia, Tennessee, uses waterproof plastic bins instead of suitcases when shipping daughters Elizabeth, age 16, and Kaitlin, 12, off to camp. “The totes have hinged lids just like a trunk and are stored at the end of their beds, where they become a table too,” says mom Sharon. They also keep gear from getting wet in rain or mud. The Browns use the 44-gallon Wheeled Tote Locker by Sterilite — wheels and a handle make it easy for kids to transport — which they purchased on sale at Wal-Mart for $13.

summercamp3 Self-service
When Brian MacIntosh of Irvine, California, went away to camp for the first time at age nine, his mom, Becky, packed his bag with everything she thought he might need. Trouble was, Brian had no idea what was in it. He borrowed a hat from a camp counselor because he didn’t know his mom had sent one, for instance. So the next summer, she asked Brian to pack his own bag, which she then double-checked. “I find that if he makes an attempt at pulling needed items from the closet, he’s more likely to remember what he has with him and use it,” she says.

Pack each days outfit in a large ziplock bag, which can then be reused to store soiled clothing.  Send flip flops to wear to/from and in the showers.  Include an old pillowcase and encourage your child to stash her dirty laundry in it.  Provide a waterproof disposable camera for picture taking in wet and sandy settings.

KEEPING IN TOUCH
Absence makes the heart grow fonder… at least for Mom and Dad! Here are a few ways to stay connected while your camper is away.

summercamp4 Fun Form Letters
Jacquie Fisher knows that even reluctant letter-writers can’t resist the chance to say something silly. So when her then seven-year-old son, Taber, was headed to camp, she created a collection of preprinted notes to make keeping in touch fun and quick. “You write the statements, and the child either circles the answers or fills in the blanks,” says the Olathe, Kansas, mom. For example: “On Tuesday, we went (circle one) swimming/hiking/boating.” To tickle Taber’s interest, she added lines like: “One crazy thing the camp counselor did today was _______.” Even busy campers and younger kids can keep you up-to-date on activities with these fun form letters. “Kids hate blank paper,” says Jacquie. And, she adds, “These lead to good discussions when they return home.”

Download the fun form letters below!

Fun Form Letter 1

Fun Form Letter 2

Fun Form Letter 3summercamp5 Hidden Notes
When her daughters go off to camp, Peggy Kinzler of Glencoe, Minnesota, sends them messages of encouragement without licking a stamp. “I hide notes and other little things among the articles in the suitcase for them to find as the week goes by,” she says. Among the offerings: stationery, extra money, and snacks. To keep her girls from finding them all at once, Peggy tucks them into pants pockets, rolls them up in shirts, and slips them into their toiletry bags. Over the years, this simple trick, begun with Peggy’s eldest, now age 24, has helped lift the spirits of all five of her daughters.

summercamp6 Postcard Kit
Keeping folks back home apprised of camp adventures was easy for Leah Fleischhacker, thanks to the correspondence kit her mom, Chany, prepared. “I remember when I went to camp, there were only a few minutes available for letter writing,” recalls the Memphis mom. So when it was time for Leah, then age 11, to make the trek, she filled a cute pencil case with markers, stickers, and prestamped, preaddressed Harry Potter postcards. The kit allowed Leah to take advantage of brief breaks to dash off a note home.

Mail a letter to your child before she leaves for camp so that it will arrive while she is there.  Be sure to send her with a small journal for recording autographs, addresses, and e-mail addresses of new friends.

HEADING OFF HOMESICKNESS
There may be no place like home, but these clever strategies can help comfort your camper wherever he lays his head.summercamp8 Good-night Message
Bedtime is often prime time for homesickness to set in. And when kids are missing their family, a familiar voice can serve as an instant cure. The McMillans of Newcomerstown, Ohio, suggest sending a mini tape recorder to camp. Prerecord a bedtime message or story read by Mom or Dad that your child can listen to before lights-out. Include a blank tape too, so he can record new friends’ addresses and voices before he leaves. Inexpensive recorders are available at discount stores for less than $30. For added privacy, consider a model with a headphone jack and send along an earbud.

summercamp9 Homesickness Kit
One of the first things Zoie Johnson mentioned when she called home from camp was the homesickness kit she and her mom had created using a collection of symbolic treasures. “I made a little satchel, and inside it we put a picture of all of us, so that she could see us, a rubber band and a chocolate kiss to remind her of my hugs and kisses, a tissue to dry any tears, and a bandage for any boo-boos,” says mom Michelle Dickens of Hawaiian Gardens, California. The tote was small enough for Zoie, then age seven, to carry in a pocket or stow in a backpack.

summercamp7 Pillowcase Pals
To keep her daughter, McKaela, from feeling lonely at camp, Debbie McFarlane of Fond du Lac, Wisconsin, printed a digital photo of the then ten-year-old and her friends on a sheet of iron-on transfer paper (available from craft and office supply stores), then pressed the image onto a pillowcase. Each friend then signed her name with a fabric marker. The result was a comfy reminder of home that also worked as a conversation piece to break the ice with fellow campers, giving new meaning to the phrase “pillow talk.” “I really liked using my pillow at camp,” says McKaela. “It was fun to look at the picture and fall asleep.”

Creative Care Packages


Send several small packages. Even though this might cost more in postage, I’ve learned that 4 small packages has a longer-lasting effect on a camper than one huge package the day before the child goes home.


Send something other than food! Trust me, campers are fed well.  The last thing they need is Suzie all hyped up on pixie sticks and M&M’s. Yeah, I know…the kids love it. Send some candy…just not 8 pounds of it. Be original with it too. Candy necklaces go over better than a bag of Skittles.


If budget allows, send extras for sharing with bunkmates and friends.


Letter (of course!)

Pre-addressed, stamped envelopes for letter home

Money (if camp has a canteen)

Pictures (Silly ones like the dog waving are fun)

Extra socks and underwear (make them silly ones!)

Silly string

Squirt guns

Bubble Solution

Embroidery Floss for friendship bracelets

Temporary tattoos

Glow sticks

Playing cards

Drawing pads

Colored pencil

Yo-yos

Paddleball

Magic Slate

Joke Book

Slinky

Paper fans

Kazoos

Super Balls

Beach Ball

Tags:

  • Digg
  • Del.icio.us
  • StumbleUpon
  • Reddit
  • Twitter
  • RSS
read comments
 Page 20 of 103  « First  ... « 18  19  20  21  22 » ...  Last »