Think Prints

Invite your child to explore patterns, colors, and textures through these easy activities.


washable finger paints
washable tempera paint
paintbrushes
blocks
pipe cleaners
glue
old shoes
paper

1. Finger Paint Prints. Pour one or two colors of washable finger paint onto a tabletop tray. Invite your child to use his fingers to mix the colors and draw in the paint. Explain that he will make a print of his drawing. When he is finished mixing the colors, help him lay a sheet of paper on top of the painted surface. Press down gently, lift, and let dry. How is the paper print different from what the paint looked like in the tray?

2. Block Prints. Make a block stamp. First, bend pipe stems into zigzags, swirls, lines, or other shapes. Then glue them onto the bottom of an old wooden block. Place washable tempera paint on some plastic plates or trays. Invite your child to dip the stamp into the paint and print onto the paper. She might enjoy making a repeating pattern — or just a fun hodgepodge!

3. Shoe Prints. Roll out some mural paper. Give your child paintbrushes, washable paint, and a smock. Invite him to paint the bottom of an old pair of shoes — ideally some with an interesting pattern on the sole. Press the soles onto the paper. Try experimenting with several colors at a time.

Learning benefits:
• Encourages creative expression
• Develops fine-motor skills

Tags:

  • Digg
  • Del.icio.us
  • StumbleUpon
  • Reddit
  • Twitter
  • RSS
read comments

Seasonal Scenes


shoebox
construction paper (different colors, depending on the scene)
art supplies
clay
small toys that reflect the environment
glue
pictures of different outdoor environments (optional)

Talk to your child about different outdoor environments and seasons. Help him pick a place he has been to or that he is interested in, such as the ocean or the desert. Cut out a piece of construction paper the size of the bottom of a shoebox. The paper should be a color that will reflect the scene (white for snow, blue for underwater, and so on). Ask your child to draw the scene and then glue the paper to the bottom of the shoebox. Turn the shoebox on its side so you can look in the opening to see the background scene. Ask your child to create additional pieces with clay or to glue small toys in the box to complete the diorama.

Learning benefits:
• encourages imagination and creativity
• builds small-motor skills
• introduces social studies concepts

Tags:

  • Digg
  • Del.icio.us
  • StumbleUpon
  • Reddit
  • Twitter
  • RSS
read comments

Birthday Crown


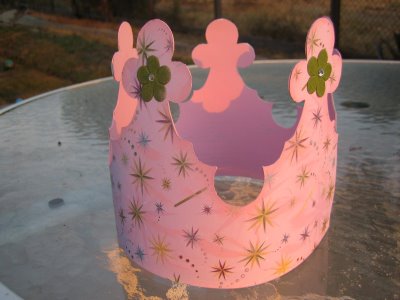
Do you have a little one whose birthday is coming up? Need to celebrate a loved one on a special day? Why not make them a crown and esteem them as royalty for the day! I covered a Burger King Crown (found for free at any local BK!) with scrapbook paper. I used a glue stick to adhere the paper to the crown and then using an exacto/craft knife I cut around the template of the crown. I then painted the inside with craft paint and adorned it with paper flowers and gems.


2008-09-11_014

Tags:

  • Digg
  • Del.icio.us
  • StumbleUpon
  • Reddit
  • Twitter
  • RSS
read comments

Think Outside the Box


Explore geometry with a boxy sculpture.


milk or egg cartons, cereal boxes, shoeboxes, lids, and paper towel rolls
paint
crayons
glue
construction paper
scissors


To start, go on a materials hunt around your home for interestingly shaped items. After she has collected her “treasures,” talk to your child about what she would like to make: A robot? A building? A self-portrait? Or would she just like to experiment with the items and create an “abstract” sculpture?  Together, cut out shapes, paint the boxes, and put it all together. As you work, encourage your child to put the shapes together in different ways. Also help your child notice if her creation is symmetrical or if she is creating a color or shape pattern.  When she finishes, challenge your child to name all the shapes and colors she sees. She can also name her creation!
• develops creativity
• supports fine-motor skills

Learning benefits:

Tags:

  • Digg
  • Del.icio.us
  • StumbleUpon
  • Reddit
  • Twitter
  • RSS
read comments

Have a Ball!


Try this game with your baby’s next play date.


balls of different sizes
medium-size cardboard box (about 12 inches long)

Seat the babies on the floor. Give them all of the balls. Help them to pick up the different balls and roll them to each other.  Prop up the cardboard box to make a ramp. Show the babies how you roll a ball down it. Encourage them to do the same. Help each baby roll a ball at the same time to see which one goes further. Let them have fun seeing how high the balls bounce and how far and fast they can roll them.

Learning benefits:
• builds large- and small-motor skills
• promotes cooperation
• introduces concept of cause and effect

Tags:

  • Digg
  • Del.icio.us
  • StumbleUpon
  • Reddit
  • Twitter
  • RSS
read comments

Potato Prints

Make stamps perfect for little hands.


potatoes (smaller white potatoes work best)
knife (adults only!)
tempera paint
paper plates
construction paper (different colors)
aluminum foil (optional)

Prepare for this activity by cutting potatoes to a size small enough for your child to grasp. Next, cut away the outside of the potato so that a shape, such as a circle, remains in the middle. Repeat for different shapes. The shapes should be about ½ inch deep. Pour paint into paper plates for easy dipping.  Show your child how to dip the potato into the paint and use it to make prints on paper. As you make prints with your child, discuss the different shapes and colors.  For an added twist, use foil instead of construction paper for printing. Notice how shiny the foil looks!

Learning benefits:
• supports vocabulary development
• enhances small motor skills

Tags:

  • Digg
  • Del.icio.us
  • StumbleUpon
  • Reddit
  • Twitter
  • RSS
read comments

Preschool/Toddler Activity Bags


1. Clothesline play (rope clothesline, mini wooden clothespins, cloth diapers, and doll clothes).


2. Lacing cards (rainbow laces purchased separately from Montessori Services, and handmade foam shapes for lacing — I couldn’t find any lacing cards to buy for less than $15, so I was forced to get creative and thrifty).


3. Bear counters (three colors and three sizes of plastic bears for counting/sorting).


4. Square tiles for counting/sorting.


5. Open & close (various items to open and close — boxes, hair barrettes, empty makeup compacts, mini plastic bottles).


6. Alphabet & number magnets (to use with small cookie sheet).


7. Pom-pom sorting (1″ multicolored pom-poms with various tweezers and grabbers).


8. Viewmaster with slides.


9. Geoboard with rubber bands (for geometric introduction, dexterity, AND open-ended creative designs).


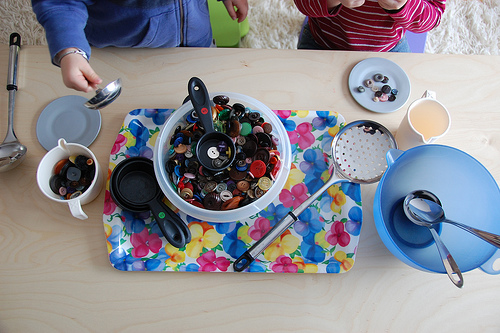
10. Buttons! (tons of buttons I found for $2 at a closeout education store; for sorting, counting, etc.).


3180258794_4ebe6724e6


11. Various pasta shapes (for sorting).


12. Nuts, bolts, and washers.


13. Rubber insects (for sorting/counting/pattern completion).


14. Paper plate alphabet caterpillar (a leftover from our Unplugged Week).


15. Transportation memory game (any memory game will work).


16. “Magnetic Personalities” (Photos of family AND cartoon characters with tops and bottoms separated, glued onto magnetic paper — just for open-ended mixing and matching fun).


I lined them all up in a wicker laundry basket, left in an accessible spot in the study/school room so the kids can pull them out at leisure.

Tags:

  • Digg
  • Del.icio.us
  • StumbleUpon
  • Reddit
  • Twitter
  • RSS
read comments

Make Believe: Home Office

Dramatic play (a.k.a. “make believe”) is an excellent way to encourage language development and pre-reading exposure in your child. And it’s just darn fun! Period. We’ve done it all – Restaurant, Family, “Chores”, Beauty Shop, Car Wash…The one we haven’t done (until now)?


Home Office.


In this ever increasing age of technology, children are watching their parents on the computer more and more with a desire to emulate mommy and daddy. So, naturally, the time came when my children wanted “an office of their own”. My son’s preschool classroom has a faux keyboard and telephone and I knew they would love one at home!


playoffice


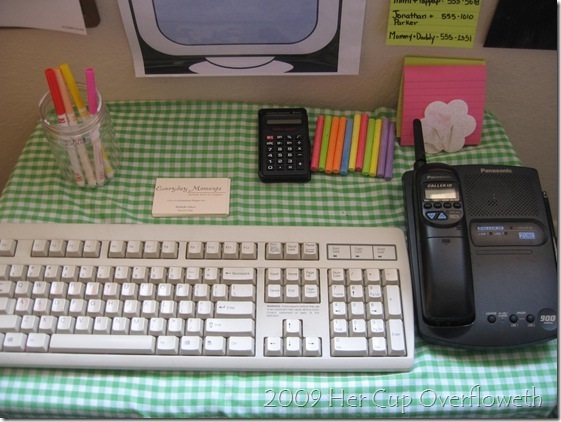
You can make a “home office” for your child with a few simple items found around the house! We had such fun putting this together! We even made our own chalkboard (piece of plywood + chalkboard spray paint).


Here’s what we included:


-Old Computer Keyboard


-Old phone


-Pens, Paper, Post-its, Clipboard


-Chalkboard, chalk


 A few “extras” I included:


– “Computer Screen” (printed image from a Google search)


– Blank printable calendar


-Relatives phone numbers (great for learning the real thing!-ours have been changed for the photo)


-My old business cards


How I made this idea work for me:


-Pen holder is a recycled peanut butter jar


– “Desk” is a large Rubbermaid plastic storage bin cover with a tablecloth


Have you played “make believe” lately?

Tags:

  • Digg
  • Del.icio.us
  • StumbleUpon
  • Reddit
  • Twitter
  • RSS
read comments
 Page 43 of 103  « First  ... « 41  42  43  44  45 » ...  Last »