Focus on Homework

Homework time can be a struggle for many students. Often the struggle stems from disorganization and not having the needed supplies on hand. A special homework space will keep all the supplies in one location and ease the transition into homework time. Stock a homework center with these essentials to help your child stay focused and organized.

Large table or desk : Ideally, you would have a separate desk for your child, where supplies are stored.  However, a kitchen table will work as well. Just keep the supplies close at hand in a storage box. Any large table or desk with plenty of space for spreading out books and papers will work well; a small computer desk will not. When buying a computer desk that will be used at homework time, look for one that positions the monitor away from the workspace and has a drawer for the keyboard.

Lamp : An essential at homework time, a lamp focuses your child’s attention and prevents eye strain.

Timer : They have a multitude of uses for parents, but at homework time they help the child learn persistence and take needed breaks.

Electric Pencil Sharpener : They are just so cool. Plus, they cut down on frustration and make it easy for the child to get back to the task. Use appropriate caution around little ones.

Calculator : Check with the teacher and monitor your child’s calculator use, especially in the early elementary years.

Computer : The educational uses for your computer are just too convenient to leave it out at homework time. That doesn’t mean your child should necessarily do his homework in front of a computer screen. A separate area for reading and writing is probably better. Expect to help your child when it’s time to do research for school work on the computer.

Reference Books : A dictionary and thesaurus geared to your child’s reading level are tops on the list. A grammar helper is also nice. This is where your computer comes in handy, since you can click to great reference sources in a sec.

Storage box for supplies : A lightweight rolling shelf is perfect for organizing homework supplies. It can be rolled into a laundry room or pantry when the kitchen table is needed for mealtime. Or, use a stationary chest of drawers next to your child’s homework desk.

Dry Erase/Bulletin Board : Place it in a central location to post papers that have to be signed, school events, and daily reminders. Use a smaller dry erase board to teach your child during homework time. 

Radio/Tape/CD Player :Use your discretion here. Many children and adults find it easier to concentrate with some background music. Audio tapes are a great learning tool for a child with visual-perceptual and reading problems.

Supplies : Stock up on these basics at your favorite discount store. Catch the before and after season sales for more bargains for home and school supplies. Crayons, markers, pencils, drawing paper, writing paper, folders, scissors, glue,  writing paper, pencils, markers, folders, scissors, tape, stapler, compass, protractor, hole punch, etc.

Consider taking a portable homework container outdoors on nice days. The fresh air could be the extra boost a reluctant student needs to focus. A picnic table or the lawn makes a great homework surface. Alternatively, when a large project needs completing or a major test requires serious studying, spending time at the library may increase homework efficiency.

Tags:

  • Digg
  • Del.icio.us
  • StumbleUpon
  • Reddit
  • Twitter
  • RSS
read comments

Why Bento?

Why Do I Bento?

1.  Health.  Better control over your childs diet.  You know what’s in it, and can make sure you are packing a nutritionly sound meal that your child will eat.  You can’t necessarily count on your school providing that.  My kidlet is only in Kindergarten and although there is a healthy option each day, there is also always a junk food option (deep fried nuggets, fries, pizza, etc). When the kidlet was our foster child he was in early head start and I learned that federal guidelines say that a little ranch dressing provided as a dip counts as a dairy serving.  Boggle.

2. Cost.  Packing a lunch is almost always cheaper than a school lunch.

3. It’s a “Green” Solution.  It has been estimated that on average a school-age child using a disposable lunch generates 67 pounds of waste per school year. That equates to 18,760 pounds of lunch waste for just one average-size elementary school. Packing a bento box means no plastic baggies, aluminum foil or other excessive packaging to go into the landfills. If you send a cloth napkin instead of paper (and the japanese make a lot of cute little “Oshibori” cloths for their lunch packing, so you can find something that appeals to your child, although you likely will have to shop ebay or the internet to find one if you happen to live in the US, as I do), and rely on a reusable drink container, that’s even better. 

4. Overcoming Picky Eating.  Kids love colorful, attractive foods.  It’s often more appealing for a picky child to eat something they normally would avoid when its shaped like a smiling animal or fashioned in the form of their favorite toy.  A sandwich in a bag smushed under an apple in the bottom of the lunch bag sure doesn’t look very good next to a candy bar in its shiny wrapper or the deep fried chicken nuggets shaped like stars.

5. Self Esteem.  It’s a daily reminder that they are worth the effort of packing such a cool lunch. It’s not the food that is the love (I’m completely against the idea of food as reward or pushing food to show you care), but that you are willing to spend the time for them.  My son also LOVES the attention that he gets from him lunches.  Other teachers come by each day to see what he has.  The kids in class think his lunches are super cool.  It’s a little thing, but it makes him feel  good.  I remember that every time I think about sending a plain jane lunch =)

6. Weight Control. Bento boxes are the perfect meal size (I know they seem small, but you pack them tightly, that’s the whole point!) so your child gets just how much they should be eating.

7. It’s fun.  I am a creative person.  But I don’t always have time or space to dig out all my scrapbooking materials or to sit and work on a cross stitch.  Creating a bento is a creative outlet that I can start and finish in an hour (usually much less than an hour).

You don’t have to run out and buy nori and furikake and ongiri shapers to make an attractive bento lunch.  Your normal every day lunch – sandwich, fruit, veggies (and maybe a snack food) will fit into a box just fine.  Take the dinosaur sandwich lunch.  The sandwiches were made in 10 seconds, using a 3 dollar crust-cutter found at targets, walmartss, even some groceries.  Cheese suns were punched using a small cookie cutter, and the rest is just fruit and veggies (It was too much broccoli, and next time I’m pack less of that, but you get the idea!).  There’s a little ranch dressing in the apple container, but you could easily send it on the side in a small tupperware (which is what I do now, those little mayo cups don’t hold enough dip).

 You certainly don’t have to wrap them in a scarf like the japanese do.  I stick my sons bento in a regular cute insulated lunch bag along with his ice pack, stainless drink container, a side of dressing, occasionally a treat that won’t fit in the bento (like a gogurt, which I hate for the packaging, but he loves, so I give in occasionally), and a little note from me.

Tags:

  • Digg
  • Del.icio.us
  • StumbleUpon
  • Reddit
  • Twitter
  • RSS
read comments

File Folder Activity, Numbers 1 – 10

File Folder Activities are a convenient way to help toddler and preschool age children learn concepts. File folders are portable, store easily in a filing box, and provide a compact learning space. You can make several different kinds of file folder activities and simply pull them out when you are ready to use them.


003_thumb[23] 

For this particular activity, I focused on Numbers 1-10. I used the same shape for my design (circles), but varied size and color. I wanted to give the activity a little bit of interest, but not too much, as it might overwhelm early learners.


1 Manila file folder

Scrapbook/construction paper

Circle cutter ( punch or scissors work great too)

Black sharpie

Adhesive/Glue

Clear ”Con-tact” paper (often used as shelf liner to line kitchen cabinets)

Ziplock Baggie


Cut out two set of shapes. Label them, individually with the numbers 1 through 10.  Mount one set of shapes to the inside of the file folder. Set others aside. Title the front (if so desired). Cover both sides with contact paper (this provides durability). Be sure to smooth out any wrinkles. Use the remaining set of shapes to match up the ones in the file folder. Store shapes in ziploc baggie in folder when not in use.

Tags:

  • Digg
  • Del.icio.us
  • StumbleUpon
  • Reddit
  • Twitter
  • RSS
read comments

Magic Wand

Help your child make her very own.


The Sheep Fairy, by Ruth Louise Symes (optional)
12″ stick (about 1/4″ wide) or dowel rod from craft store
glue
lucky charm chosen by your child
non-toxic tempera paint
paintbrush
thick piece of Styrofoam (about 5″ square)
star-shaped cookie cutter
tablespoon
cellophane
glitter, ribbon, lace, sequins, feathers, or other decorative touches

If available, read The Sheep Fairy with your child. This beautifully illustrated book is about a sheep who saves a fairy and is granted a wish. For the base of your wand, use a dowel rod (available at craft stores) or search out a “magic” stick with your child. Look in the park or yard to find a dry stick about 12″ long and 1/4″ wide. Help your child find a “lucky charm,” any object larger than a quarter (such as a stone, seashell, or small toy). Ask him why he thinks the object is magical, and have him imagine the sort of wishes it will grant. (Avoid objects that are very tiny and may be a choking hazard for small children.) Ask your child about his favorite colors. Which colors does he thing are magical? Let him paint the stick however he likes. Put it aside to dry. Help your child press the cookie-cutter through the piece of Styrofoam to create a star shape. If you’ve read The Sheep Fairy, look through the book together to find pictures of stars.  Use the spoon to gently scoop out a section of Styrofoam from the star’s center. Make a space large enough for the lucky charm to fit. Cut cellophane into a star shape (significantly bigger than the hollow). Glue the charm into the hollow. Then glue the cellophane star over it.  When the rod is dry, help your child gently poke it into the bottom of the star (about 1″ deep). Pull it out, tap some glue into the hole you’ve made, and push the rod into the glue-filled hole again. Apply light pressure until it dries in place. Your child can finish decorating the wand with the remaining materials.

Learning benefits:
• encourages creativity
• teaches shapes
• promotes imaginative play

Tags:

  • Digg
  • Del.icio.us
  • StumbleUpon
  • Reddit
  • Twitter
  • RSS
read comments

“Love Bird”

2009-2-12_026


Construction Paper in white and one other color of your choice.

Pencil or Pen

Scissors

Washable Tempera Paint

Stapler or glue ( I used a stapler!)

Hole Punch

Ribbon (for hanging)


Trace the bird’s body pattern onto colored construction paper. Cut it out with the scissors. Using the paint brush, paint the child’s hand and have them make a handprint on the white paper. When they’re hand is on the paper, press down on each finger to make sure the handprint is even. Left straight up off the paper. Cut out handprints. Make sure you leave a little extra paper at the base of the palm when cutting.  Make a “sandwich” with the handprints and bird body, matching the handprints evenly, and making sure the printed side is FACING IN. Staple the hands to the body where the little excess part is at the base. One staple worked for the whole thing. Bend the handprint “wings” over, pressing the crease down. Doing it this way, makes the wings able to move and “fly”.  Punch a hole at the top of the body and tie a ribbon through so you can hang it anywhere you please!

Tags:

  • Digg
  • Del.icio.us
  • StumbleUpon
  • Reddit
  • Twitter
  • RSS
read comments

Art for a Sunny Day


Cooking pot

Mixing bowl

Large mixing spoon

Measuring cup

Plastic bag

Plastic trays or paper plates


2/3 cup water

2 cups salt

1/2 cup water

1 cup cornstarch


Children will use fine-motor and creative expression skills as they experiment with a different type of clay.


Warm-Up: Talk about the things your children like to do on a sunny day. Make an experience chart. Can children think of any art projects to do in the sun?


In Advance: To prepare the sun clay, place the salt in the pot and add 2/3 cup water. Stir and cook over medium heat for 4-5 minutes, until salt is dissolved. Remove from heat. Gradually mix 1/2 cup water with cornstarch in a separate container. Stir until smooth, and then add to the salt mixture. Return to low heat and, while stirring, cook until smooth. The beauty of this clay is that when it hardens in the sun, it doesn’t crumble like play dough. Store in a sealed plastic bag.


If possible, take this project outside. Provide children with a plastic tray or paper plate to work on. Give each child a glob of clay to model. Encourage children to search nearby for natural objects they can use to decorate their sun sculptures. Place the finished products in the sun. Predict how long it will take for the sculptures to dry.


Extension: Take these books outside and read them in the shade.


The Wonderful Tree by Adelaide Holl (Golden Press)

Wake Up, Jeremiah by Ann Himler (Harper & Row)

The Sky Dog by Brinton Turkle (Viking Press)

Frog and Toad Together by Arnold Lobel (Scholastic)

Tags:

  • Digg
  • Del.icio.us
  • StumbleUpon
  • Reddit
  • Twitter
  • RSS
read comments

Weave and Wind

Turn ordinary objects into an interesting sculpture.


plastic berry basket
cereal box
plastic beverage carrier
egg cartons
paper-towel tube
plastic soda bottle
child scissors
assorted colors of thick and medium yarn
masking tape


Collect a variety of recyclable items that your child can weave yarn through or around, such as a berry basket, paper-towel tube, plastic beverage carrier, egg carton, and plastic bottle. Another idea: Help your child cut the top off a cereal box and make deep cuts every inch or so along the edge. Make a point on a piece of yarn by wrapping a strip of tape around one end. Then let your child weave the yarn through the holes in the berry basket, around the holes in the beverage carrier, around the cardboard tube, or in and out of the slits in the cereal box. Use different colors of yarn, and talk about the interesting designs she makes.. Tape the end of a piece of yarn to the egg carton or bottle to start the winding action. Hold the item while your child winds and overlaps the yarn around it in colorful patterns. Discuss whether the yarn slides more on one surface than another. Why does she think that is? Work together to weave the separate pieces together with yarn to create a magnificent weaving sculpture.

Learning benefits:

• builds fine-motor skills (wrist movement, pincer grasp)
• enhances problem-solving skills
• encourages creativity

Tags:

  • Digg
  • Del.icio.us
  • StumbleUpon
  • Reddit
  • Twitter
  • RSS
read comments

Yogurt Cup Animal

2009-02-10_033


Empty Yogurt Cup

Various Colors of Felt (for the dog, black, white, and a snippet of red)

Glue (tacky glue works great, but for a more secure finish-try hot glue)

Scissors

Googlie Eyes (small/medium size)

Small Pom-Pom for a nose!


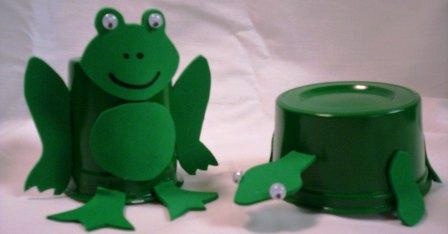
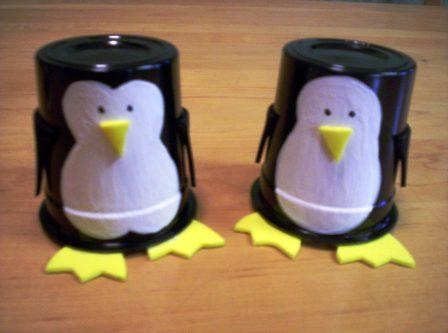
Start with an empty, (washed and dried) yogurt cup. Turn in upside down. Measure your cups perimeter and cut one long piece of felt to go around the entire outside. This will be the animals main color- so, for our dalmatian puppy, we chose white. Because I was working with small children, I also guesstimated and cut out ahead of time, the spots, ears, mouth, & tongue. Next, glue the large piece of felt to the yogurt cup. Then glue on your spots, eyes, mouth (two small thin pieces of felt) and tongue. Glue on your ears. I made mine double thick for stability, but it’s your choice! I also trimmed down my original ear design(see below). I also ended up using hot glue for the ears after much trial and error. Lastly, don’t forget a nose!  If time allows, make him a kitten to chase around.


Some other animal ideas:


648232_com_greenfrien


707460_com_yogurtcupp

Tags:

  • Digg
  • Del.icio.us
  • StumbleUpon
  • Reddit
  • Twitter
  • RSS
read comments
 Page 42 of 103  « First  ... « 40  41  42  43  44 » ...  Last »