Chalk Art

Make sidewalk chalk art reproductions

AGES: Seven to 13

  • Masking tape (optional)
  • Colored chalk
  • White chalk
  • Illustrations from books or comic books, or reproductions of master paintings (postcards work great)
  • A sidewalk or paved driveway

Be advised that some kids, especially younger ones, may rather make their own art as opposed to reproducing someone else’s. If that’s the case with your kids, let them follow their own inspirations, decorating their names or drawing an original chalk masterpiece.

Gather any art books, comics or any other book with lots of good illustrations. If you don’t have a good variety at home, make a trip to the library with the kids. Another wonderful source is an art museum gift shop–in addition to stocking art books, they often carry hundreds of art postcards. Let the children pick the piece of art they’re most attracted to, but try to steer them gently away from pictures with lots of intricate details. We worked with some Impressionist paintings which, with their pastel colors and interpretive lines, were perfect.  On a clear day, mark out a rectangle in chalk or masking tape on your sidewalk or other paved surface. Make it larger than the original but be sure to keep the same shape. Place the picture of art beside the “frame” and begin.  Give the kids their chalk and encourage them to draw the major elements in white. If the original has a complex perspective, explain that they can begin by drawing the objects in the foreground and work their way back. Remind them that none of the lines have to be perfect!  Fill in the colors and detail, layering colors on top of each other and blending with fingers to get different effects. When the painting is finished, be sure to have the “artists” sign their work!

Tags:

  • Digg
  • Del.icio.us
  • StumbleUpon
  • Reddit
  • Twitter
  • RSS
read comments

Simple Playdough

  • 3 cups flour
  • 1 ½ cups salt
  • 6 tsp. cream of tartar
  • 3 cups cool water
  • 3 Tbsp oil
  • Food coloring

Mix dry ingredients in a big cooking pot. Blend liquids together in a bowl. Combine with dry ingredients and cook over medium heat, stirring constantly. Remove from heat when dough pulls away from the sides of the pot and can be pinched without sticking (about 5 min.) Turn onto board or counter and knead until smooth play dough consistency. Store in an airtight container.

Tags:

  • Digg
  • Del.icio.us
  • StumbleUpon
  • Reddit
  • Twitter
  • RSS
read comments

Pancake Mix Cookies

I’m not much of a baker.  It’s generally too much work and requires too much preciseness for me to really enjoy it, ESPECIALLY with the kidlet.   Getting exactly one cup of this and 25g of that and 2 teaspoons of this other thing is hard enough for me.  Add the kidlet in — some ingredient ends up on the counter, floor, shirt, anywhere but the bowl.  This recipe has few ingredients and seemed very forgiving.  These cookies are very easy — even young children can help.  The dough is mixed and kneaded in a zip top bag.  After a brief chill, you can shape and bake.

After we made these I realized that I should have taken “in process” shots with the kidlet, but I didn’t, so words will have to suffice today!

I started with the pancake mix cookie dough post over and Anna the Red’s bento site.  I changed the recipe a little bit.  I used a high fiber oat-bran pancake mix and I substituted one tablespoon of that for ground flax seed. I also added an extra teaspoon of sugar to make them just a little sweeter and added a touch of cinnamon.  This makes a crisp cookie; good for dunking!

Pancake Mix Kawaii Cookies

  • 3 T. unsalted Butter
  • 2 tsp. Sugar
  • 1 Cup minus 1 T. Oat Bran Pancake Mix (ie, 15. T instead of 16 T.)
  • 1 T. ground Flax
  • Sprinkle of Cinnamon
  • 1 T. Milk or Water
  • Candy decorations, if desired

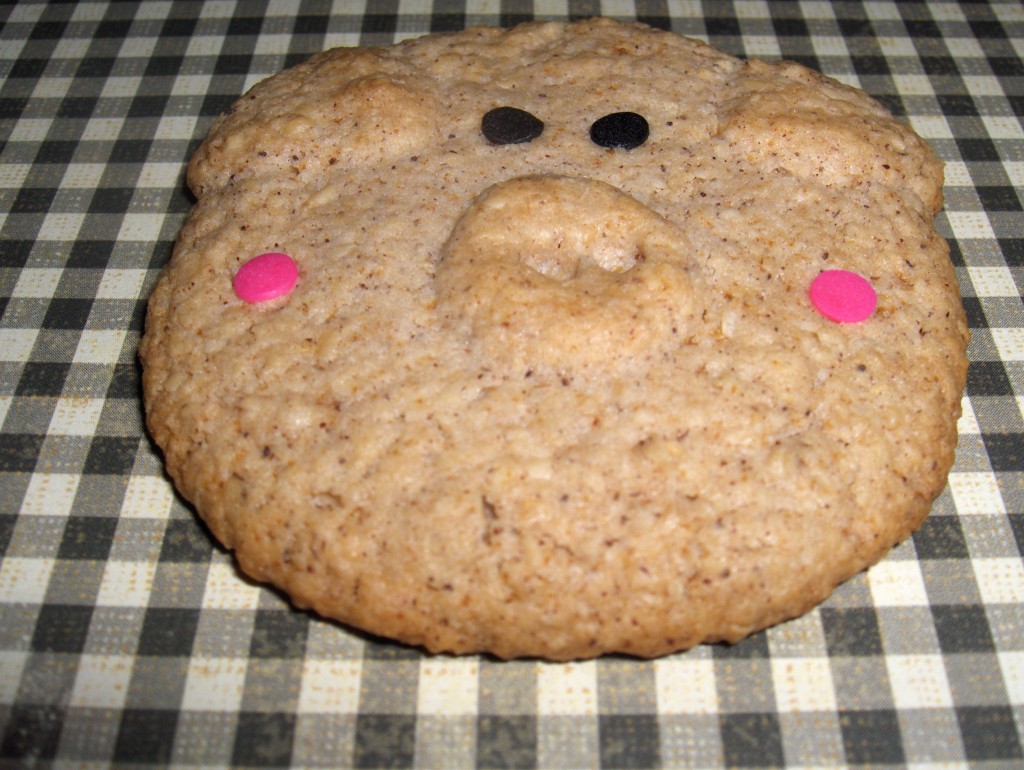
Preheat oven to 350F.  Place the butter in a zip top bag, seal it and let your kidlet squish it until soft.  Open and add the sugar, and knead again to mix.  Add the pancake mix, flax and cinnamon and squash it around really good.  Pour in the milk (or water) and knead a final time to finish the dough.  It’s usable now, but pretty sticky.  If your little one has any patience, I’d refrigerate a little bit to make the dough easier to handle and not gum up your fingers.  Roll and shape the dough any way you want – I don’t think it will roll like a sugar cookie with a rolling pin to be cut; you need to do it by hand, which makes this really fun for the kids.  We just rolled a small ball in our hands, flattened for the face, then made even smaller balls for snouts, ears, etc.  Decorate if desired.  Depending on thickness, bake for 10-12 minutes.

004

The really great thing about this dough is that it doesn’t spread out or puff up very much.  So when you sculpt a cookie, it retains most of its details.  As you can see from the pig cookie, even the little holes I made in his snout remain visible after baking, as do his ears.

Tags:

  • Digg
  • Del.icio.us
  • StumbleUpon
  • Reddit
  • Twitter
  • RSS
read comments

Peanut Butter Playdough

  • 18 oz. peanut butter
  • 6 tbsp. honey
  • Few tablespoons of Cocoa for flavor
  • Non-fat dry milk as needed

Mix all ingredients, adding enough dry milk to give make dough pliable. Shape, decorate with edible treats, and eat!

Tags:

  • Digg
  • Del.icio.us
  • StumbleUpon
  • Reddit
  • Twitter
  • RSS
read comments

Dryer Lint Modeling Material

  • 3 C. Lint (from laundry dryers)
  • 2 C. Cold or warm water
  • 2/3 C. Non-self-rising wheat flour
  • 3 drops oil of wintergreen
  • Old newspaper

Put lint and water in a large saucepan. Stir to dampen all parts of the lint. Add flour and stir thoroughly to prevent lumps. Add oil of wintergreen. Cook over low heat, stirring constantly, until mixture holds together and forms peaks. Pour out onto several thicknesses of newspaper to cool. Use as you would papier-mâché pulp or shaped over armatures (boxes, bottles, balloons, and so forth) or press into a mold. This material will dry in 3 to 5 days to a very hard, durable surface. When wet it has a felt like consistency. It dries to smooth or rough, depending on how it is used. When pressed into a mold, a hard, smooth finish is obtained. Stored in an airtight container, it will keep for several days.

Tags:

  • Digg
  • Del.icio.us
  • StumbleUpon
  • Reddit
  • Twitter
  • RSS
read comments

Egg Yolk Cookie Paint

  • 1 egg yolk
  • 1/4 tsp. water
  • Food coloring

Mix egg yolk with water and lots of food coloring. Use a paint brush to paint on baked cookies. Return cookies to oven until egg has solidified.

Tags:

  • Digg
  • Del.icio.us
  • StumbleUpon
  • Reddit
  • Twitter
  • RSS
read comments

Finger Paint Recipes

Laundry Starch Finger Paint

  • 1 cup laundry starch dissolved in cold water
  • 1 qt boiling water
  • 1 cup pure white soap flakes or powder
  • Food coloring or poster paint

Add boiling water to starch and cold water mixture and boil until thick. Remove from heat and stir in soap. Divide into small containers and add food coloring as desired.

Cornstarch Finger Paint

  • 3 tbsp. sugar
  • ½ cup cornstarch
  • 2 cups cold water
  • Food coloring
  • Soap flakes or liquid dishwashing soap

Mix sugar and cornstarch in medium saucepan over low heat. Add cold water and stir until mixture is thick. Remove from heat. Divide into four or five portions (in muffin tins or cups). Add a drop or two of food coloring to each portion and a pinch of soap flakes or soap. Stir and let cool. Store in airtight container.

Liquid Starch Finger Paint

  • 1/4 cup liquid laundry starch
  • 2 drops food coloring or 1 tsp. tempera paint

Mix ingredients in small plastic bowl until blended.

Tags:

  • Digg
  • Del.icio.us
  • StumbleUpon
  • Reddit
  • Twitter
  • RSS
read comments

Homemade Sidewalk Chalk

  • 2 C. Water
  • 2 C. Plaster of Paris
  • 2 Tbl Tempera Paint (Wet or Dry)
  • Toilet Paper Tubes
  • Duct Tape

Prepare paper tubes by covering one end with duct tape, making sure it is sealed.  Combine water, plaster of paris and tempera paint and stir together.  If desired, divide mixture among several containers and add different colors of paint.  Let stand a few minutes. Place tubes on cookie sheet lined with foil or wax paper. Pour mixture into holders, let stand until semi-firm. Remove holders and let dry completely – ready to use in about 1 to 1 ½ hrs. Note:  Never pour plaster down sink.

Tags:

  • Digg
  • Del.icio.us
  • StumbleUpon
  • Reddit
  • Twitter
  • RSS
read comments
 Page 41 of 103  « First  ... « 39  40  41  42  43 » ...  Last »