Fairy Craft

Looking at different ideas for Laurel’s fairy garden party this year.  I’ve seen some actual dolls with heads and all made with embroidery floss and wire, and we might be able to pull those off.  These pics I pulled from somewhere I can’t find now are good closeups though, and give some great ideas.  I don’t expect the little ones to do as well, but it would be a fun craft for them.

Tags:

  • Digg
  • Del.icio.us
  • StumbleUpon
  • Reddit
  • Twitter
  • RSS
read comments

Cupid’s Arrow Game

Cupids Arrow.

1 box of wide straws. (the basic grocery store straw with stripes.)

I box of Q-tips

2 large bowls (heart shaped are cute, any dollar store has plastic heart shaped bowls right now)

Masking tape

Divide the group into teams. Place a heart shaped bowl in front of each team and place some tape about 2 feet back from each teams bowl. Each team member needs a straw and the team needs a large pile of arrows (Q-tips). Tell the “Cupids” they have one minute to get as many “arrows” into their heart as possible. To do this you must place the straw in your mouth, load it with an “arrow,” and then blow the “arrow” out the end of the straw towards the heart bowl. The team with the most arrows through the heart wins.

Tags:

  • Digg
  • Del.icio.us
  • StumbleUpon
  • Reddit
  • Twitter
  • RSS
read comments

Frank Lloyd Wright – Geometric Flowers

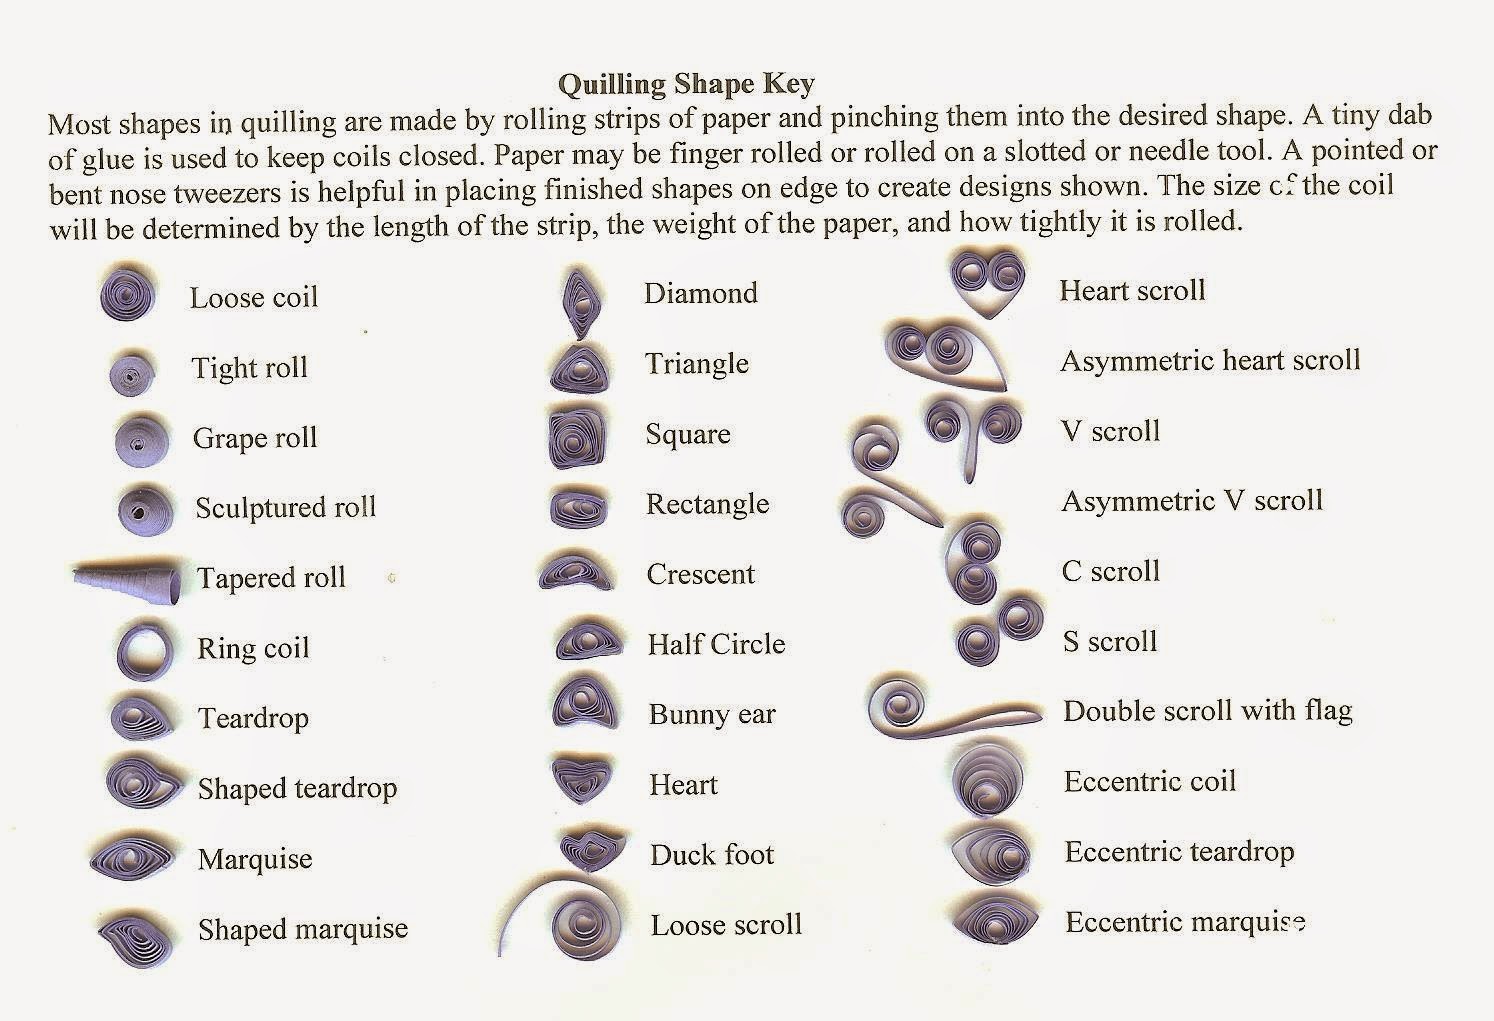
DRAWING REALISTIC AND ABSTRACT FLOWERS

The flowers Frank Lloyd Wright used to decorate the Hollyhock House were simplified to the basic shapes of the Froebel blocks. Some of the flowers that decorate the house are drawn using plane geometry, and some use shapes from solid geometry.

There is not much difference between the photograph of the flowers, and the first drawing below because both the photograph and drawing are realistic pictures that show us how hollyhocks look when they have length, width, and thickness. We see the flowers as shapes in solid geometry.

In the second drawing, the flower shapes have only length and width. They are shapes in plane geometry.

In the last drawing, the flower has been drawn using only flat geometric shapes. The process of simplifying shapes from the very realistic, shaded shapes of solid geometry to the flat, one-color shapes of plane geometry is called abstraction.

Frank Lloyd Wright simplified or abstracted the realistic shapes of a real hollyhock flower to the flat geometric shapes of the flowers he used to decorate the Hollyhock House. We do not know how many drawings he made before he drew the final patterns for the abstract hollyhocks, but, if we work with a photograph and several drawings, we can begin to see the process he used.

Choose a simple flower (such as a tulip).  On a clean sheet of paper, draw the flower using the basic geometric shapes in the same way Frank Lloyd Wright drew the hollyhock flower.

Tags:

  • Digg
  • Del.icio.us
  • StumbleUpon
  • Reddit
  • Twitter
  • RSS
read comments

Learning How Nature Grows Above and Below the Ground


  • 2 small pieces clear glass
  • Small piece blotter paper or one sheet of absorbent paper toweling that has been folded several times to make it thicker
  • 1 package bean seeds
  • 2 rubber bands
  • Small dish
  • Water
  • Sunny window

Place one piece of glass on a table top and lay the blotter on top of it. Put the bean seed on the blotter and cover it with the second piece of glass making a sandwich of glass, blotter, seed, and glass. Fasten the sandwich together using rubber bands. Place it in a small dish and fill the dish with water. Draw the bean seed. You may wish to include the blotter, dish, and outline of the plastic in your drawing. When you have finished the drawing, put the dish in a warm, dark place. The seed must remain in the dark until the roots develop. When the bean leaves begin to sprout, place the dish in a window with the bean side facing the sun. Check the water in the dish every day. Add water when the dish is dry. Make a second drawing of the seed when it begins to sprout. Make a third drawing of the bean plant when you notice growth. When the bean has grown into a plant, you may wish to move it outdoors to a pot or plant it in the ground.

Spread your drawings, in the order you drew them, on a table and answer the following questions.

How long did it take the seed to sprout? How long did it take the sprout to grow into a plant? Did the roots develop before the sprout? Did you see a pattern or a shape that repeated itself in the leaves of the plant? Did you see a pattern in the roots?


Tags:

  • Digg
  • Del.icio.us
  • StumbleUpon
  • Reddit
  • Twitter
  • RSS
read comments

Charming St. Nick

Polymer Clay – beige, white, dark red, green and black

Colored Wire – 1 1/2″ piece medium weight

Shape a golf ball-size piece of beige clay into an oval and flatten until the shape is approximately 1/2 inch thick. Place the oval in the center of the baking dish. For the nose, roll two pea-size beige balls and one slightly larger ball. Press a smaller ball on each side of the larger one. Position the nose in the center of the oval. Using half a golf ball-size piece of red clay, shape a ½ inch-thick triangle. Pull and shape one triangle point to form the hat tip. Bend the tip slightly to the left. Place the hat on one end of the oval and press together.  For the hat brim, roll a piece of white clay into a 3-inch-long cylinder, approximately the diameter of a pencil. Roll the ends into points. Shape the piece into an arch. Form each end into a small coil. Press the shape firmly over the area where the hat meets the oval. Make a large white coil for the tip of the hat. Make small white coils for the beard, mustache, and eyebrows, noting the shapes for each in the photo. Make three small green coils for the hat embellishments. Press the coils in place. For the eyes, roll two tiny black ovals. Press into place just above, the nose. Bend the wire into a U shape. Push the ends into the top of the hat, leaving a small loop for the hanger. Bake the clay in the oven according to the manufacturer s instructions. Let cool.


Tags:

  • Digg
  • Del.icio.us
  • StumbleUpon
  • Reddit
  • Twitter
  • RSS
read comments

Duct Tape Purses

Sophie’s World has a collection of totally adorable, 100% kawaii duct tape purses.

Tags:

  • Digg
  • Del.icio.us
  • StumbleUpon
  • Reddit
  • Twitter
  • RSS
read comments

Quilled Letter

quill1Acrylic Paint
Foam Paintbrush
Papier Mache Letter
Quick Drying Paper Glue with Fine-Tip Applicator
Small sheet of wax or scrap paper
¼” wide Quilling Paper Strips
Slotted Quilling Tool
Quilling Needle
Tweezers

Paint Letter with acrylic paint. Let dry completely. Add a second coat of paint, if desired. (You could also trace your shape onto scrapbook paper, cut it out, and glue it to your letter.) Fold one quilling strip in half width wide, then tear into two strips. Insert both into the slotted quilling tool. Hold tool with your dominant hand, and rest the tool on your other hands forefinger. Roll the tool to quill the paper.

quill2

When you get to the end, hold the rolled securely with your thumb and middle finger and push the paper off the tool. Using the quilling needle, apple glue to the rolled paper end. Press and hold until secure. Repeat the steps to create several rolled strips. Be creative with the shapes. Some can be rolled completely, Roll part of some strips, leaving a tail. Squeeze a rolled circle to create a teardrop or oval. Keep some rolls tight, and let some get loose before gluing.

quill5

Arrange your shapes onto your letter until you get a design that pleases you. Take a picture with a cell phone or other digital device to use as a reference. You can also skip this step and just play it by ear. When you are ready to adhere your quilled papers, squeeze a small puddle of glue onto wax or scrap paper. Pick up a quilled shape with the tweezers and dip the bottom edges into the glue. Place the shape onto the letter and gently press down with your fingers to secure. Repeat until the letter is as full as you want / your design is complete.

Tags:

  • Digg
  • Del.icio.us
  • StumbleUpon
  • Reddit
  • Twitter
  • RSS
read comments

Leaf Stamped Banner

Card Stockbanner1
Ruler
Scissors
Pencil
Brown Paper Grocery Bag
Paper Towels
Tempera or Acrylic Paint
Leaves
Paintbrush
Yarn or String
Cellophane Tape
Glitter Glue (optional)
Self-Stick Rhinestones (Optional)

Cut a 5 ½ inch square from card stock. Using a ruler, draw a triangle. Cut out; this is your triangle pattern. Use pattern to trace 7 triangles on the grocery bag (only use the areas that don’t have a seam and aren’t doubled up). Lay a leaf on a paper towel. With the brush, cover leaf with paint. Lay the painted side of the leaf on one of the triangles, cover with another paper towel and press gently to transfer the paint to your triangle – don’t wiggle or your leaf print won’t be as clear. Peel off the paper towel and the leaf. Repeat stamping process with all your triangles. Use different leaves, different color paints, and lay the leaves in different directions to add interest to your banner. Cut about 5 feet of string. When paint is dry, fold the bottom of a triangle about a half inch over the string on one end, leaving about a foot of loose string on that end. Tape the folder flap of your banner so it will stay on the string. On the other end of the string, wrap a little tape around the end to make it easier to string beads onto the string. Add a few beads to your string, push them up against your first triangle. Now repeat the steps to add another triangle to your string, up against the beads. Continue in this pattern until the last triangle has been added. If desired, you can use glitter glue or stick on rhinestones to make your banner sparkle.

banner2

Tags:

  • Digg
  • Del.icio.us
  • StumbleUpon
  • Reddit
  • Twitter
  • RSS
read comments
 Page 3 of 103 « 1  2  3  4  5 » ...  Last »