Kid Made Ponchos (no hood)

An easy way for kids to make a quick rain poncho for camp.  From Kids Camp!: Activities for the Backyard or Wilderness. 

poncho

Make a simple poncho to protect you from rain showers.  Spread a plastic tarp or vinyl shower curtain out on the floor and fold it in half.  Lie on it with your arms spread out along the fold.  Have a friend mark where your wrists are on the plastic.

Cur the poncho to make a square long enough to cover your arms.  Cut a hole in the center just large enough to fit your neck.  Use glue, or needle and thread, to attach Velcro pieces along the front opening.

Tags:

  • Digg
  • Del.icio.us
  • StumbleUpon
  • Reddit
  • Twitter
  • RSS
read comments

Duct Tape Kite

duct tape kite1/8” Dowel, 36” long
1/8” Dowel, 33” long
Black Marker
Large Spool of String
Colorful Duct Tape
Large Plastic Garbage Bag

Measure 10 inches from the top of the longer down and make a mark. Measure and mark the exact center of the shorter dowel. Place the dowels together where they are marked to form a t shape. Cut a 12-inch piece of the string. Start 3 inches from the end and wind it tightly around the point where the dowels cross. Tightly wind the string around both dowels in a repeating X pattern. Tightly tie the two ends of the string together. To make it extra sturdy, wrap a small piece of duct tape around the string. Cut two sides of the garbage bag so it is a single piece of plastic. Lay the kite frame on the sheet of plastic. Draw a kite shape around it with the marker. Leave a 1 inch margin beyond the end of the dowels.

kite2

Turn over the plastic sheet. Cover the plastic where the kite shape is drawn with strips of duct tape, overlapping the strips by about a quarter inch.

kite3

Flip the plastic over again and cut out the kite shape. Lay the kite frame on the kite and tape the dowels in place. Fold in the margin around the edges of the kite and over the ends of the dowels. Tape the edges down with small strips of duct tape. Make the corners neat by folding them in before folding in the sides.

kite4

On the horizontal dowel, make marks 6 inches from the vertical dowel on each side. Punch small holes through the kite at both marks. Tie the end of a 28 inch long piece of string to the horizontal dowel at one mark. Thread the string through the holes in the kite and tie the other end of the string to the horizontal dowel at the second mark. Cut an 18 inch long piece of duct tape in half lengthwise. Overlap them a bit at the end to make a long strip about 36 inches long. Fold the tape in half lengthwise to make a tail. Cut six 6 inch pieces of duct tape in half lengthwise. Place them on the tail 5 inches apart with the tail sandwiches between them.

kite5

Then tape the tail to the bottom of the kite. Tie the spool of flying string to the center of the front string on the kite. Now find a wide open, windy space to fly your new kite.

Tags:

  • Digg
  • Del.icio.us
  • StumbleUpon
  • Reddit
  • Twitter
  • RSS
read comments

Natural Chimes

wind chimesYou can get creative with placement of your shells, adding other things to the line such as sand dollars, small dried star fish, or beads, or choosing a different mounting item.

Tags:

  • Digg
  • Del.icio.us
  • StumbleUpon
  • Reddit
  • Twitter
  • RSS
read comments

Leaf Print Garden Stepping Stone

Fresh leaves
8 inch plastic plant saucer
Petroleum jelly
Newspaper
Plastic Gloves
Face Mask
Safety Glasses
4 lb. Concrete (home improvement stores)
Old bucket
Water
Wooden Paint Stirrer

leaf-print-concrete-stepping-stones-concrete-masonry-gardening-how-to

Collect some fresh leaves. Make sure to choose ones where the veins on the back really stand out. Rub saucer with petroleum jelly to keep concrete from sticking to your mold. Cover your work surface with newspaper. Put on your gloves, mask and safety glasses. Place concrete powder into the bucket. Add about 1 cup of water. Mix with pain stirrer. Keep adding a bit more water at a time, mixing after each addition, until you don’t see any more powder. The mixture should have the consistency of soft ice cream. Pour concrete into the plastic saucer. Use stirrer to level off the top and make it as flat as possible. Gently place the leaves, back side down, into the concrete. Flatten them the best you can. If some edges curl up, you can hold them down with small stones; be careful not to let the stones touch the concrete directly or they will stick. Let your stepping stone sit in a place where it won’t be disturbed for 24-38 hours. Peel the leaves off the stone and remove the stone from the mold. Let the stone sit in a dry place a few more days before you put it out in your garden or yard.

Note: Concrete can be harmful if you breathe in the powder or touch it with bare skin. Wear the proper gear as described above, and ask an adult for help. Clean the bucket and stirrer outdoors or use disposable ones you can throw away. Wash your hands well with warm soapy water after you finish.

Tags:

  • Digg
  • Del.icio.us
  • StumbleUpon
  • Reddit
  • Twitter
  • RSS
read comments

Nature Wall Hanging

pinesSturdy straight twig, about 2 feet long
Pinecones and Acorns (or other natural item)
Paint
White Glue (optional)
Glitter (Optional)
String or Yarn in one or more colors
Hot Glue Gun

Go on a nature hunt for a twig (about 2 feet long), pinecones and acorns. When you find a good trig, remove any small shoots or leaves left on it so it is smooth. Paint the pinecones and acorns your favorite color, or a color to match your room, or leave them natural if you prefer. You can also apply white glue to the cones and seeds and dip them into glitter to make them sparkle. When they are dry, you can assemble your hanging. Cut one string/yarn about 2 feet long and tie one end to the center of your twig. Glue the largest pinecone to the bottom and an acorn or two along its length, using the hot glue gun. Cut two 1 ½ foot lengths of string and tie them on either side of your first string, about 3 inches away. Glue a pinecone to the end of each and an acorn around the center of the string. Cut 2 final lengths of string, about a foot long. Tie one end to the twig, another 3 inches from the last set. Attach your pinecone to the end and an acorn to the center. To hang, cut a long piece of your string 3-4 feet long. Tie one end on one side of the twig and the other end to the other side of the twig. This will give you a “handle” to hang over a nail, hook, or thumbtack.

pines2

Tags:

  • Digg
  • Del.icio.us
  • StumbleUpon
  • Reddit
  • Twitter
  • RSS
read comments

Solar Oven & Recipes

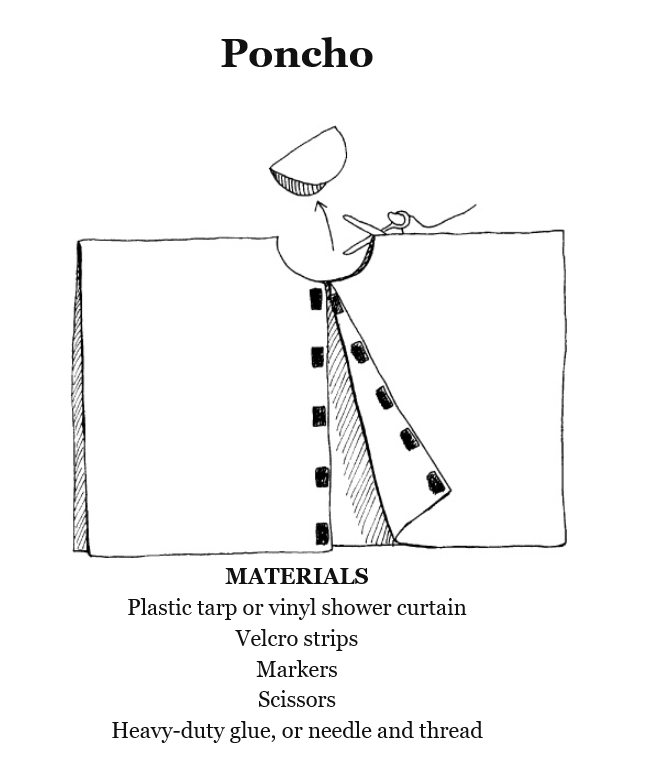
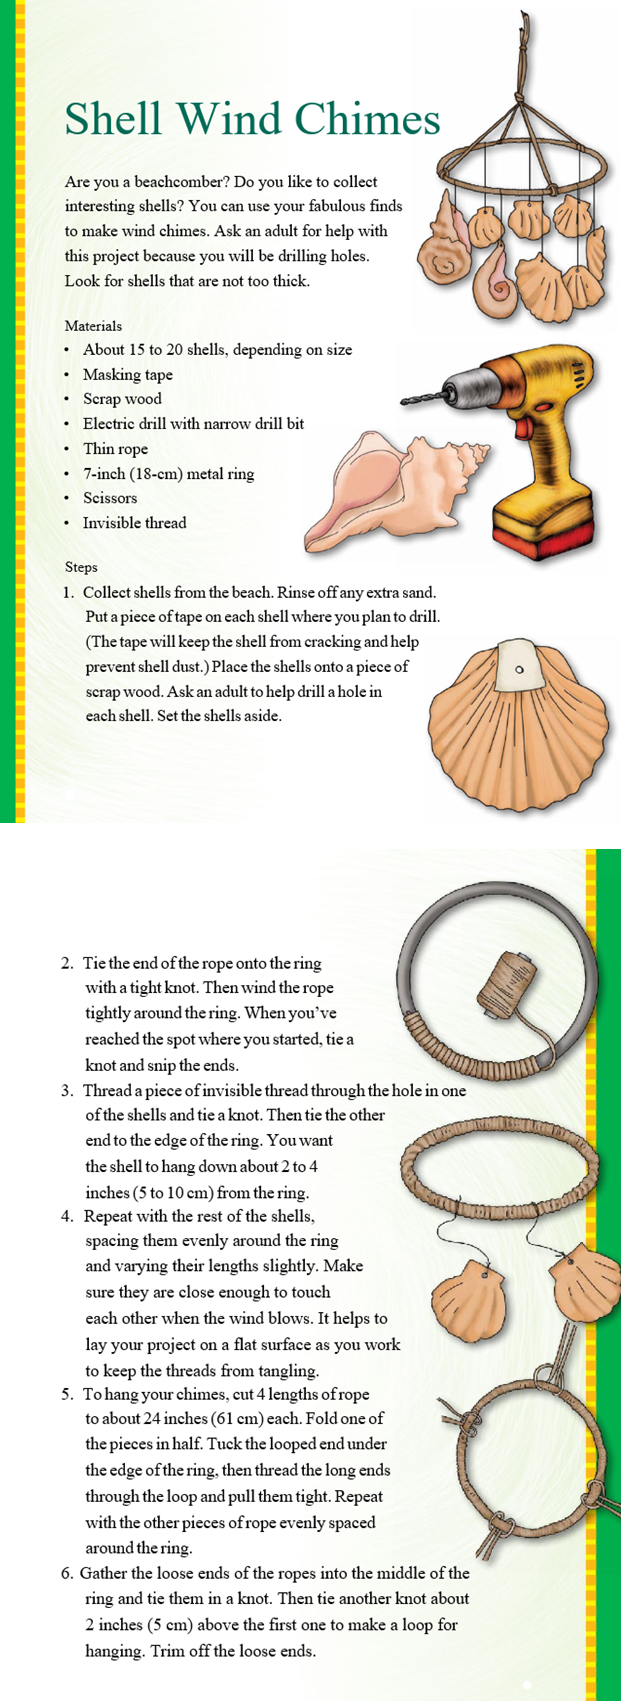
Cardboard box with attached lid. Lid should have flaps so that the box can be closed tightly. Box should be at least 3 inches deep and big enough to set a pie tin inside.
Aluminum foil
Clear plastic wrap
Glue stick
Tape (transparent tape, duct tape, masking tape, or whatever you have)
Stick (about 1 foot long) to prop open reflector flap. (Use a skewer, knitting needle, ruler, or whatever you have.)
Ruler or straight-edge
Box cutter or Xacto knife (with adult help, please!)

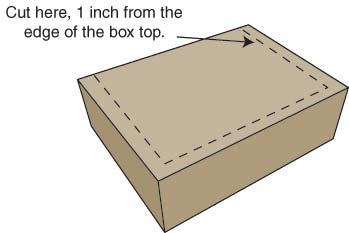
Using the straight edge as a guide, cut a three-sided flap out of the top of the box, leaving at least a 1-inch border around the three sides.
box-cut
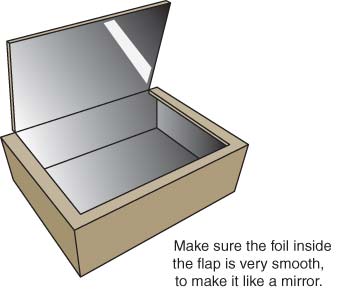
Cover the bottom (inside) of the flap with aluminum foil, spreading a coat of glue from the glue stick onto the cardboard first and making the foil as smooth as possible. Line the inside of the box with aluminum foil, again gluing it down and making it as smooth as possible.  The shiny side should be facing out.
foil-step1
Tape two layers of plastic wrap across the opening you cut in the lid—one layer on the top and one layer on the bottom side of the lid.
plastic-wrap-step
Test the stick you will use to prop the lid up. You may have to use tape or figure another way to make the stick stay put.
Put the oven to work

You’ll want to cook on a sunny, warm day when the sun is at its highest, which is between 11 and 3.  Plan ahead! Find a very sunny spot to leave the box.  Which direction is the sun moving? Make sure the box won’t be in the shade soon.

Set the oven in the direct Sun, with the flap propped to reflect the light into the box. You will probably have to tape the prop in place. Preheat the oven for at least 30 minutes.

solar-oven-complete

The solar oven will be much slower to heat foods than a normal oven, so plan ahead and be patient.  When you put food in, take the lid off the box and then readjust the flap to make sure that light is reflecting into the box.  Always use an oven mitt to move food from the oven.  It really does get hot.

Mini Pizzas:  Put tomato sauce and cheese on top a slice of bread or English muffin.  Place in a pie tin and place inside oven.  Check every 10 minutes to make sure the flap is still reflecting sun and to see if they are done.  When cheese is melted, the pizzas are done.  Depending on how hot and sunny it is outside, this will likely take twenty minutes to an hour.

Smores: Place half graham crackers on your pie tin, and place a marshmallow on each one. Carefully place in preheated oven and close lid and cook until marshmallows are squishy – 20 to 60 minutes.  Then place a square of chocolate on each, cover with another graham cracker and close oven for another few minutes until chocolate starts to melt.

Snacks that only need to be warmed and melted are good choices, such as nachos or quesadillas, but it is possible to cook entire meals in your oven.  You may want to get a small oven thermometer to be sure your oven reaches at least 160 degrees to kill any bacteria, especially if you are baking cookies or the like.  If you have several hours of sun available, you can try drying fruit or tomatoes in the oven as well.

Sunshine Eggs

Try this unique way of cooking an egg! You will need a thin black sock (cotton or nylon). Set up your solar oven in a sunny area, and make sure that sunlight is being reflected into the window. Carefully wrap an egg in a clean black sock. If you’re using the foot of a pair of nylons, wrap the egg several times, until you can’t see any white. Put the egg in the center of a pre-heated box oven, and cover with a small glass dish. If it is a bright day, your egg will take about 2 hours to cook, or longer on a less sunny day. Remove the egg using a potholder. Peel off the shell, to reveal a solar-cooked egg.

Sun Baked Potato

Vegetables cooked in the sun take on a delicious flavor! Try it out by making a baked potato in your
solar oven. You will need a small metal rack (the kind used to cool baked cookies), and a large glass
bowl or baking dish.

Remove the plastic wrap from your solar oven. Put the metal rack inside the pizza box, so that it is surrounded by newspaper insulation. Set up your oven in a sunny area. Scrub 1-2 small potatoes to remove all of the dirt from the skins. Use a fork to pierce the skin of each potato a few times, to let steam escape while it is cooking. Rub the skins with a little butter or olive oil, and then sprinkle salt over the potatoes. Put the potatoes onto the metal rack, and then put the glass bowl to cover the opening of the box, so it seals air inside of the box. Your potato will cook slowly in the sun, taking most of the day. Reposition your oven every half hour or so. You can test when the potato is done by using a fork. If you can easily pierce the center of the potato, it is ready to eat! You can make your sun baked potato into mashed potatoes by adding milk and butter, or eat it with salt and pepper. Enjoy!

Apples with Cinnamon

Make a sweet snack with sliced apples. Use a glass baking pan, or dark metal pan to bake the apples in.

Core an apple, and then slice it into thin slices. Toss the slices with 1 teaspoon of cinnamon, and 1 teaspoon of sugar. Add a little water if necessary, so the apples are moist. Put the apple mixture in a baking pan, and place it in a pre-heated solar oven. Stir the apple mixture every 30 minutes. Make sure to adjust the position of the oven when necessary, so it is in full sun. Bake for several hours, until apples are softened, and are warm all the way through. If you like, serve over ice cream. Or enjoy the dish by itself!

Tags:

  • Digg
  • Del.icio.us
  • StumbleUpon
  • Reddit
  • Twitter
  • RSS
read comments

Sand Candles

IMG_1439Candle Wax
Wick
Sand (you can use sand in a bucket, or even make it right on the beach)
Saucepan (or large tin can, heat near the campfire!)
Stick
shells- optional

Wet the sand and mix it for an even consistency. Scoop a hole in the sand for the size candle you want. Flatten out the bottom to give the candle a base. If you want a specific shape, use a cup, a beach toy, or other object to push into the sand and make your shape. Push the wick into the middle of the hole and tie the other end to a stick that will rest across the top of the hole to keep it taut. Roll the stick if necessary to take up the slack. Push seashells into the side of the sand if desired.

011

Melt wax in a sauce pan on beach grill. You can use old candles, or new wax. Add color and scent now if you like. Gently pour wax into the sand hole. Let harden. If you are making directly on the beach, stack a bunch of sticks and/or make a sign to warn people about the hot wax. The candles candle_sandactually set quite quickly, but you will want to make sure that you leave them overnight to insure that they are completely hardened and cooled. Lift out of sand. Brush off loose sand. You will need to cut the wick to a reasonable length and place your candle on a surface safe for burning and collecting the wax if it runs. (I recommend a plate with a lip, add some sea shells, more rocks, and sand around it for decoration if desired.


Tags:

  • Digg
  • Del.icio.us
  • StumbleUpon
  • Reddit
  • Twitter
  • RSS
read comments

Garden Angels

I snagged these from a blog post sometime back in 2010.  The post said she had downloaded them from somewhere and had no idea where.  So no idea where these originated.


Tags:

  • Digg
  • Del.icio.us
  • StumbleUpon
  • Reddit
  • Twitter
  • RSS
read comments
 Page 2 of 103 « 1  2  3  4  5 » ...  Last »