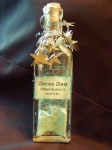
Magical Fairy Dust Decorative Bottles


Mix 1/4 cup of regular table salt in a baggie and added a couple of teaspoons of coarse glitter (the kind used for crafts) and a couple of drops of essential oil


Pour into a pretty bottle.  Decorate with paper, rub-ons, ribbons, charms, etc. 


If desired, create a label and “directions”

*Sprinkle anywhere fairy magic is needed. (Fairy Dust)

*Promotes twinkle toes. (Dancing Fairy Dust)

*May cause uncontrollable laughter and smiling. (Giggle Dust)

*Promotes toothless smiles. (Tooth Fairy Dust)

*Allows dreams to come true. (Dream Dust)

*Sprinkle any time to add a little light to your life. (Sun Dust)

*Adds glamour to every Diva’s charm. (Diva Dust)

*Promotes happiness and laughter. (Twinkle Dust)

*Promotes happily ever after. (Once Upon a Time Dust)

giggle

Tags:

  • Digg
  • Del.icio.us
  • StumbleUpon
  • Reddit
  • Twitter
  • RSS
read comments

Child Friendly Kitchen

Babies quickly become antsy when sitting in a high chair.  If you find the child is grabbing the spoon from your hand when you try to feed him, consider giving him his own spoon.  He’ll love the independence of holding his own utensil.  More than likely he will bang it on the food tray, try to scoop out his food, make attempts of getting the spoon in his mouth, and even try to feed you.  Hold off on washing his face or wiping down the area between bites.  This may be messy, but its important to give him the time and space to experiment with self-feeding.  In fact, he may sit and eat for longer periods when given his own utensil.


Another way to hold baby’s interest at meal time is to hang an unbreakable mirror on a wall by his high chair so he can watch himself eat.


Set aside a cabinet or drawer in the kitchen just for your baby.   This can help occupy her while you are tending daily kitchen tasks and curb her interest in off limits areas of the kitchen.  Stock her special space with a changing array of plastic cups and containers for nesting and stacking, wooden spoons for banging, and plastic funnels and measuring cups for filling and pouring.


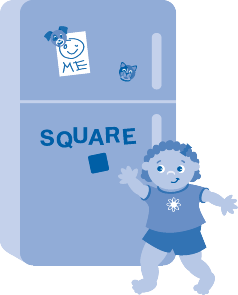
FRIDGEReplace tiny kitchen magnets which could pose a choking hazard with extra-large plastic magnetic alphabet letters.  Consider creating a morning ritual that involves checking the fridge each morning for the word of the day or a special message you’ve written out.  Buy self adhesive magnet sheets to make your own child safe magnets featuring pictures of her pets, family, baby faces from magazines, or cars that your toddler can vroom across the refrigerator.


Shop sales and thrift stores to find a plastic child size table and chair set for your kitchen.  Buy new paper tablecloths at a dollar store or discount party center.  Take out a new tablecloth each week and let baby decorate it with crayons or stickers to entertain imaginary tea party guests.  Help her come up with different decorating themes for a week, such as bugs, flowers, animals, fish, or silly faces.  This is a wonderful Monday Morning tradition, and she can add to her masterpiece each day.


Create a “sandbox” in the kitchen by filling a shallow plastic bin with dry macaroni or puffed rice cereal.  Keep measuring cups, colanders, bowls and sand pails and shovels on hand for digging and scooping the “sand”.  You could bury a hidden treasure in the sandbox each morning, such as a favorite stuffed animal, action figure, truck, or a packaged fruit snack.


If you have sturdy kitchen chairs, consider hanging toys from plastic chain links attached to the back rails.  This is a great way to situate toys at eye level and encourage crawlers to stand up with the aid of a chair and practice the fine art of balancing.


Create an obstacle course in the kitchen for cruisers.  Position four or more kitchen chairs about a foot away from one another.  Place a toy atop each chair seat and watch your cruiser cautiously move from one to next to investigate each exciting plaything.  Once he has mastered this course, position chairs further apart to give your cruiser the opportunity to take a few baby steps between them.


Rinse out yogurt containers to use as playthings in the kitchen.  Stack several in a pyramid formation on the kitchen floor, so you can playing a bowling game with baby, using a rubber ball.  You can place dry rice in a securely lidded yogurt container for fun to shake rattles or use the containers as handy on the go holders for crayons or snacks.


For hours of make believe fun, let toddlers set up shop in your kitchen.  Recycle empty cereal boxes, oatmeal containers, soda bottles, coffee canisters and egg cartons for thier pretend grocery store.  They can use a cardboard box as a front counter, food shaped magnets or plastic toy foods, paper bags for bagging the items, a wagon as a cart and paper money made from green construction paper.


Tags:

  • Digg
  • Del.icio.us
  • StumbleUpon
  • Reddit
  • Twitter
  • RSS
read comments

Cinnamon Soap Cakes

Easy-to-make soap cakes are an ideal way to turn leftover soap scraps, too small to use but too good to throw away, into luxurious, spicy, scented treats.


2 Lb. 2oz./1 kg. leftover soap

1 Tbsp./15 ml spring water

1 tsp./5 ml glycerin

½ tsp/2.5 ml cinnamon essential oil

1 Tbsp./15 ml sweet orange essential oil

10 drops clove bud essential oil


Coarsely grate the leftover scraps of soap into a large mixing bowl. Add the spring water, glycerin, and essential oils and mix well. Cover the bowl with a clean cloth and leave to stand for about 15 minutes, until soap is slightly soft and pliable. If the soap you use for grating is fairly new, you may find that you do not need to leave it to soften. Scoop up a handful of the mixture and press it firmly together. Push it firmly into your mold. If you do not have a suitable soap mold, you could simply roll your soap into a ball. The more you compress the mixture into the molds, the better your soap cakes will be. Push out of the mold and stand your soap cakes somewhere to dry and harden. They should be ready to use in a day or two.

Tags:

  • Digg
  • Del.icio.us
  • StumbleUpon
  • Reddit
  • Twitter
  • RSS
read comments

Reading Milestones – Toddler

toddler_milestone_readingAt this stage, your toddler learns about reading through everyday experiences with books. Simply through reading with adults, your toddler learns that books contain lots of interesting pictures and words and that stories show her worlds to explore.


Toddlers who have been read to will invite others to read to them. When adults stop and talk about the pictures, label objects on the page, and describe what they see, they are also promoting the child’s language development. As his language develops, your toddler will do these same things when he looks at books.


Toddlers learn that books are special. Your toddler’s experiences interacting with books teach her how to handle books. She learns that there is a front and a back to the book. She also learns how to hold a book and how to turn its pages.


Toddlers may use “storybook language” in their everyday conversations. For example, over a bowl of hot macaroni, you may hear your toddler say, “I’m gonna huff and I’m gonna puff.” Some toddlers may also incorporate reading into their fantasy play. For example, your child may read stories to his stuffed animals as he puts them down for a nap.


Toddlers learn about the structure of stories from books. Through reading different books, toddlers learn that most stories contain the same parts: a setting, characters, a series of events that lead to a problem, and a solution to the problem. When your toddler understands the way most stories are built, it helps her to understand new stories that are read aloud to her. Years later, this will help her to understand stories she reads independently.


Toddlers often show clear preferences and will ask to have a book read over and over again. Although parents may not want to read the same book, rereading is useful for toddlers. Reading a favorite book like Goodnight Moon for the one hundredth time will actually help your child relate what he hears to the words and letters on the page.


Read a variety of books to your toddler. Toddlers enjoy books about animals, the alphabet, and children their age. Rhyming books are also popular with children this age. Just keep in mind that not every book a child becomes interested in will be a favorite of his parent or caregiver. Even if the book doesn’t seem very interesting to you, your toddler may enjoy hearing the story over and over again.


 Talk to your toddler as you read a book. While you and your toddler read together, try labeling objects on a page, talking about the pictures, or taking turns telling the story. As you read, remember to stop every now and then and give your toddler time to focus on pages that are interesting to her. These interactions will also provide you with a window into your child’s interests, fears, and wishes.


 As you read, take your cues from your toddler. It is OK if your toddler only wants to talk about the pictures or skip pages of the book. To make stories more interesting, you may want to change words or substitute the name of your child for one of the characters. What is most important is that you and your toddler have fun as you explore the world of books together.

 Build reading into everyday routines. Whether it’s at naptime or after dinner as a family, incorporating reading into daily events firmly establishes reading as a part of your toddler’s life. An important part of reading together is the physical closeness between adult and child. Toddlers love to be read to on a loving adult’s lap or tucked into their bed with their parent right beside them.


 Enjoy alphabet books together to introduce letters. Keep in mind that the emphasis in reading alphabet books is not to “teach” the alphabet. Start by choosing books about things your toddler is interested in and books with engaging pictures. Reading these books together will provide you and your child with an opportunity to talk about the letters, their shapes, and familiar things associated with the letter, such as “B is for Bear.” In talking about the letters, their shapes and sounds, your child will begin to learn about how letters and sounds go together.


 Draw your toddler’s attention to the printed words and letters he sees while doing everyday things. Simply through exposure to print, older toddlers may begin to recognize very familiar signs, labels, and names. As you bring your car to a halt at a stop sign, point and say, “Look, it’s a stop sign. I have to stop. The sign says STOP!” Pretty soon, your child will recognize the sign and tell you to stop. Pointing out signs and other ways writing is used in the environment will help your child begin to develop an understanding of the uses of print and build a foundation for reading.

Tags:

  • Digg
  • Del.icio.us
  • StumbleUpon
  • Reddit
  • Twitter
  • RSS
read comments

Paper Sculpture

For Stars and Stripes Sculpture you need:

Red, White and Blue Paper

Glue Stick

Scissors

Stars


For Shape Sculpture you need:

Red, Yellow and Blue Paper

Glue Stick

Scissors

Shapes


Instructions for Stars and Stripes Sculpture:


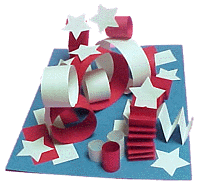
Print stars on white paper and cut them out. Cut different size strips of red and white paper. Fold some strips into circles. Accordion fold other. Arrange stars and strips on a piece of blue paper and glue into place.


sculptrwb


Instructions for Shapes Sculpture:


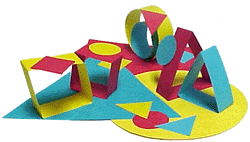
Print shapes on red, yellow and blue paper and cut them out. Cut different size strips of red, yellow and blue paper. Fold some strips into circles, some into squares others into triangles. Cut out large shapes for a base. Arrange shapes and strips on your base and glue into place.


sculptshapes

Tags:

  • Digg
  • Del.icio.us
  • StumbleUpon
  • Reddit
  • Twitter
  • RSS
read comments

Jing-a-Ling Garland

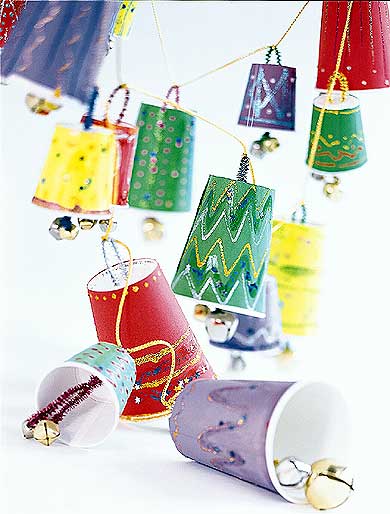
Add holiday cheer with this playful bell garland made from a paper-cup pattern.


Talk to your kids about different bells and where you would hear them.


Scissors

Paper cups

Construction paper

Pencil

Assorted jingle bells (2 for each bell)

Metallic chenille stems

Decorative glue, such as confetti glue and glitter glue

Thick white crafts glue

Colored cord


p_jingaling 


Make a pattern by cutting a slit down one side of a paper cup and removing the base. For each bell, lay cup pattern flat on paper and trace around it, adding a 1/4-inch margin. Decorate the paper with decorative glues as desired. Let it dry. Cut out the paper shapes and glue them over the same size paper cups. Let the glue dry. Poke the base of each cup twice with a pencil point. Fold chenille stems in half and thread the ends into the holes in each base, leaving a small loop sticking out. Twist a jingle bell onto each end of the stem inside the bells. String the cord through the loops, knotting it at the top of each bell and spacing the bells several inches apart.

Tags:

  • Digg
  • Del.icio.us
  • StumbleUpon
  • Reddit
  • Twitter
  • RSS
read comments

Create a “scrap” or “bits” Box

Contributed by a site visitor who keeps a “bit box” full of scrap paper, colored foil, sequins, pieces of wallpaper collected from their local DIY store, tissue paper, wrapping paper, and other scrap craft supplies for her little ones. She even cuts out her children’s favorite shapes to add to the box.


I thought this was such a wonderful theme idea that I wanted to add it to the site. Most of us who craft with out kids keep our own scrap boxes. I, for one, hate to throw anything way when it comes to craft supplies. There are a lot of things you can do with a box of scraps, and kids love looking through it to find little treasures.


Totem Pole – Give children a kitchen roll middle and a pot of glue and bits of paper to stick onto kitchen roll – one colourful totem pole – very popular with the children because it can stand up afterwards and they can “display” it. ~ Submitted by Jeanette


Mock Mosaic Flower – Draw a simple flower outline on a piece of construction paper for the child. Glue pieces of colored paper, yarn, feathers, buttons, or whatever you have on hand inside the outline of the flower to make it three dimensional.


Flower Garden – Draw an outline of a few flowers, trees, etc. on a piece of construction paper and let the children complete a simple flower garden using supplies from your scrap box. When done, the pictures almost look like mosaics. Older children can simply draw the stems of their flowers and fill in the rest. Younger children will need a bit more guidance to get started.


Scrap Hats – Create any kind of hat or headband you want and then let the kids go with the scrap box. They will have a ball decorating their hats.


Simple Butterfly – Cut out simple butterfly silhouette out of heavier weight paper and allow child to decorate it using supplies from the scrap box and some glue.

Tags:

  • Digg
  • Del.icio.us
  • StumbleUpon
  • Reddit
  • Twitter
  • RSS
read comments

Whipped Snow

2 cups warm water

1 cup pure laundry soap or flakes

Electric mixer


Put water and soap in large bowl and beat with mixer until very fluffy. Add food coloring if desired. This can be molded into shapes and left to dry.

Tags:

  • Digg
  • Del.icio.us
  • StumbleUpon
  • Reddit
  • Twitter
  • RSS
read comments
 Page 27 of 103  « First  ... « 25  26  27  28  29 » ...  Last »