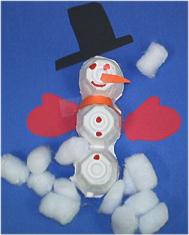
Egg Carton Snowman

eggsnowman


Cut three bumps in a row from a cardboard egg carton, leaving them attached. This will be the snowman. Paint the entire outside of the three bumps white. Glue the snowman to blue paper.  Cut facial features, buttons, boots, stick arms and a hat for the snowman from colored construction paper. Glue them all in place as shown. Cut two strips of fabric to make a scarf for the snowman. Glue the two strips across the snowman’s neck. Add snowflakes to the picture around the snowman by drawing them with a white crayon or white chalk. If you have snowflake shaped sequins you might want to glue those on instead.

Tags:

  • Digg
  • Del.icio.us
  • StumbleUpon
  • Reddit
  • Twitter
  • RSS
read comments

Snowman Sun Catcher

Construction paper (white, black, red, orange, green and brown)

Contact paper

Ribbon

Glue stick

Winter-theme sequins and/or glitter, various blue / silver bits of paper, feathers, etc


Trace three circles onto white construction paper; small, medium and large. On largest circle, cut a round opening in the middle the size of the medium circle. Glue circles together to form a snowman.  Using the green construction paper, cut out two holly leaves and a scarf. With the black construction paper, cut out a hat and eyes. With the red construction paper, cut out five small circles to form the mouth and three small circles for the holly. With the brown construction paper, cut out branch-shaped arms.  With the orange construction paper, cut out a carrot nose.  Use the glue and attach arms, scarf, face, hat and holly (on the hat) to snowman. Cut two circles from contact paper the size of the large circles. On the back of the snowman, attach one piece of contact paper so that the sticky side is on the front of the snowman. Flip snowman over and decorate ‘window’ with winter-theme sequins or other collage materials. Then cover window with second sheet of contact paper. Punch hole in top of hat and attach ribbon to hang.

Tags:

  • Digg
  • Del.icio.us
  • StumbleUpon
  • Reddit
  • Twitter
  • RSS
read comments

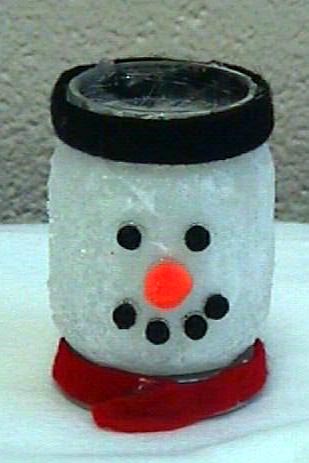
Snowman Candle Holder


snowcandleBaby food jar (I made larger ones with mayo & olive jars:  very cute!)

White tissue paper (or you can use white acrylic paint)

Small orange pompom or small tube made from paper

Small black pompom or circles punched from fun foam

Thin ribbon for scarf

Black acrylic paint for lid 

Glue


Glue pieces of white tissue paper onto the baby food jar. (I stuffed the inside of the jar with leftover poly fill stuffing and then screwed the lid on, worked great since I wasn’t going to use them as candle holders.) Paint a layer of glue over the whole jar and sprinkle with clear glitter or you can buy the glitter paint in the craft dept. and paint that over the dry jar.  Glue the eyes, nose and mouth onto the jar. Glue a strip of black felt around the open part of the jar (this will be his hat). Then glue a strip of red felt around the jar lid and then glue the jar lid to the jars bottom (that will be his scarf).  This could also be a candy holder.

Tags:

  • Digg
  • Del.icio.us
  • StumbleUpon
  • Reddit
  • Twitter
  • RSS
read comments

Make Frosty Pictures

Blue construction paper

White crayons

Epsom salts

Hot water

Give each child a piece of paper and a crayon. Invite children to create snow scenes on their blue paper. Set drawings aside. Dissolve 16 ounces of Epsom salts in 4 ounces of hot water.  Paint the mixture over each picture.  When the mixture is dry, white crystals will appear on the paper.

Tags:

  • Digg
  • Del.icio.us
  • StumbleUpon
  • Reddit
  • Twitter
  • RSS
read comments

Photo Cards

069[6]


Show your gratitude this holiday season with photos! Photo Thank You Cards are fun and easy to make. Before you know it, you will have a personal and creative thank you card ready for that special occasion. You’ll need a few things to get this simple project completed.


Magnetic Alphabet Letters

Digital Camera

Photo Printer (or have photos printed via your 1 hour photo shop)

Cardstock in color of your choice

Glue stick (acid free) or photo corners


Arrange the magnetic letters to spell the words “Thank You” (or any other message). Photograph the words in good light near a window. Try not to use your flash.Print out the image on 4×6 photo paper, set aside. Cut  cardstock to 6 1/2 by 9. Fold cardstock in half to make a 6 1/2 x 4 1/2 folded card.  Adhere “Thank You” photo to front of card using photo corners or adhesive.  If cardstock is dark in color, think about lining the inside with a piece of white cardstock sized 4 x 6.

Tags:

  • Digg
  • Del.icio.us
  • StumbleUpon
  • Reddit
  • Twitter
  • RSS
read comments

Sizeable Snowman

Children love to build a snowman out of snow, but they are also fun to build out of paper, especially if you live in a warm climate, or it is way too cold to go outside. This is a great way to teach children different shapes, sizes and color contrast.            


Dark construction paper

White construction paper

Scissors

Glue


Counting Concepts, Critical Thinking, Fine Motor Coordination, Following Directions, Opposites, Size and Shape Discrimination


Give children a piece of dark construction paper and 3 white circles of different sizes. Ask your child to show you which circle is the smallest? the biggest? What shape is the snowball? Count to see how many snowballs there are. Have them build their snowman by gluing the white circles on to the dark construction paper from the biggest (on the bottom) to the smallest (on the top).  Then have your child point to the one on the top, middle and bottom. Add other shapes such as squares, ovals and triangles for face features. Now it is time to glue the facial shapes onto the snowman. At this time have your snowman maker identify the various shapes, sizes and colors.          

Tags:

  • Digg
  • Del.icio.us
  • StumbleUpon
  • Reddit
  • Twitter
  • RSS
read comments

Squeeze Bottle Glitter


1 part flour

1 part salt

1 part water

Food Coloring


Mix equal parts of flour, salt and water. Pour into plastic squeeze bottles, such as those used for ketchup and mustard. Add liquid coloring for variety. Squeeze onto heavy construction paper or cardboard. The salt gives the designs a glistening quality when dry.

Tags:

  • Digg
  • Del.icio.us
  • StumbleUpon
  • Reddit
  • Twitter
  • RSS
read comments

Rainbow Stew


rainbow_stew_ready_for_color_mixing1/3 c. sugar

1 c. cornstarch

4 c. cold water

Food Coloring


Cook until thick. put in bowls, add food coloring. Put in ziplock baggies. Let the kids play with it while it is in the bags for a neat sensory experience or use it to mix colors.

Tags:

  • Digg
  • Del.icio.us
  • StumbleUpon
  • Reddit
  • Twitter
  • RSS
read comments
 Page 26 of 103  « First  ... « 24  25  26  27  28 » ...  Last »