Cosmic Crafts: Trash Tram

trash-tram-space-station-craft-photo-420-FF0402RECYLA16

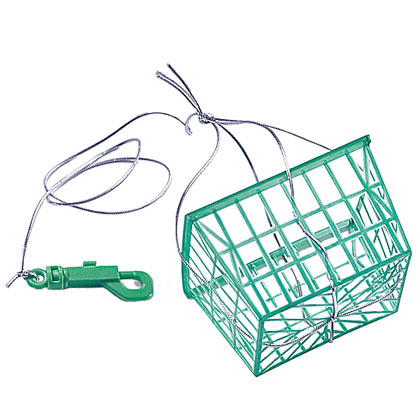
Kids can haul loads up and down in this berry basket elevator.

1 plastic berry basket
2 strands of silver cord (one 2 feet
long, one 4 feet long)
1 plastic key chain clip
3 plastic clothes hanger clips
Cross the cords over the bottom of the basket, weave each strand up one side, and knot, as shown. One end should extend about two feet past the knot. Tie the key chain clip to the end, as shown.

Thread the long strand through two pulleys made from clips attached to the top shelf (a thin piece of cardboard under each clip will protect the bookcase surface). Use the green key chain clip to anchor the tram to a clip on the side.

Waste Shooter: Got a truck-bound pile of trash on the roof? Whiz it down the Waste Shooter — a cardboard wrapping paper tube covered with aluminum foil and affixed to a clothes hanger clip with a pipe cleaner or twist ties.

Tags:

  • Digg
  • Del.icio.us
  • StumbleUpon
  • Reddit
  • Twitter
  • RSS
read comments

Cosmic Crafts: Satellite Recycler

Drive the sturdy, smooth-riding Satellite Recycler around the neighborhood on regular collection days, or park beneath the Waste Shooter for a quick fill.

Wheels: 4 plastic lids, cardboard liners removed (we used peanut butter jar lids)
Axles: 2 bamboo skewers or wooden dowels, 1/8 inch thick and a few inches longer than your truck body is wide
Hubcaps: 4 small plastic caps (we used soda caps)
Axle guards: 1 toilet paper tube, cut in half lengthwise
Body: 1 lidded plastic box (we used a wet-wipes box)
Dish: 1 small disposable pie tin (ours is 3-1/2 inches in diameter), duct tape, 2 silver pipe cleaners, 1 large round plastic lid with a flip top (we used a wet-wipes top), aluminum foil, 1 small plastic cap
Tools: craft knife, pushpin, pointy scissors, wire snips, tape

satellite-recycler-trash-space-station-craft-photo-420-FF0402RECYLA14Wheels and hubcaps: Use a craft knife to make a trash-collecting hole in the lid of the box (a parent’s job). Next, make a hole in the center of each wheel and hubcap. The skewer axles should fit through snugly. Using the same method, create two evenly spaced larger holes near the bottom of each long side of the box.

Push a lid and a cap onto the pointed end of a skewer. Thread the skewer through the holes and attach a second lid/cap pair on the other side. Trim the excess skewer with wire snips. Repeat for the second set of wheels. Rest the trimmed toilet tube halves over the axles so the truck’s contents won’t interrupt wheel movement. Tape them down.

Satellite dish: Reinforce the back of the pie tin with a small piece of duct tape. Use a silver pipe cleaner to attach the pie tin to the flip top of the plastic lid. For optimal reception, mold an aluminum foil ball onto the protruding end of the pipe cleaner.

Pierce a hole in the truck where you’d like to attach the dish and another in the center of the small cap. Attach the dish to the truck with the second pipe cleaner. On top, thread the pipe cleaner through the flip top and the small cap, then twist. Easy as pie!

Tags:

  • Digg
  • Del.icio.us
  • StumbleUpon
  • Reddit
  • Twitter
  • RSS
read comments

Cosmic Crafts: The Trash Masters

trash-masters-space-station-craft-photo-420-FF0402RECYLA10Your kids will love creating and playing with these miniature action figures. To create the green illuminater, slide the cut-off bottle bottom from the Two-liter Transporter over a battery-operated touch lamp (available at drug and discount stores).

To make a space-case backpack, tape a pair of twist-tie straps to the back of a dental floss container.

Face: trimmed from a photograph or magazine
Head: 1 small, clear gumball-machine bubble
Neck: 1 paper fastener
Body: 1 small plastic container, such as a rectangular mint box, a film canister, a food coloring bottle, or an empty pill bottle
Limbs: 2 pipe cleaners
Tools: pencil, scissors, pushpin, colored electrical tape

Head: To get the right face size, trace your bubble head cap. Cut out the face and place it inside the head. Perforate the cap of the bubble and the cap of the body and use a paper fastener to attach them.

Limbs: Perforate the body and thread pipe cleaners through four holes. If the plastic is impenetrable, tape the pipe cleaners to the sides of the body.

The Trash Masters wear recycling ID badges (stickers with symbols drawn in marker). Their chairs? Trimmed shaving cream can caps attached to soda or water bottle caps with pipe cleaners.

Tags:

  • Digg
  • Del.icio.us
  • StumbleUpon
  • Reddit
  • Twitter
  • RSS
read comments

Cosmic Crafts: Junkmobile

Drive the sturdy, smooth-riding Junkmobile around the neighborhood on regular collection days, or park beneath the Waste Shooter for a quick fill.

4 plastic lids, cardboard liners removed (we used peanut butter jar lids)
Axles: 2 bamboo skewers or wooden dowels, 1/8 inch thick and a few inches longer than your truck body is wide
Hubcaps: 4 small plastic caps (we used soda caps)
Axle guards: 1 toilet paper tube, cut in half lengthwise
Body: 1 lidded plastic box (we used a wet-wipes box)
Driver’s cab: 2 paper fasteners and 1 plastic container (we used a Nestle’s Quick container)
Tools: craft knife, pushpin, pointy scissors, wire snips, tape

junk-mobile-trash-space-station-craft-photo-420-FF0402RECYLA12

Wheels and hubcaps: Make a hole in the center of each wheel and hubcap. The skewer axles should fit through snugly. Using the same method, create two evenly spaced larger holes near the bottom of each long side of the box.

Push a lid and a cap onto the pointed end of a skewer. Thread the skewer through the holes and attach a second lid/cap pair on the other side, as shown. Trim the excess skewer with wire snips. Repeat for the second set of wheels. Rest the trimmed toilet tube halves over the axles so the truck’s contents won’t interrupt wheel movement. Tape them down.

Driver’s cab: Trim the smaller plastic container so that it fits beneath the edge of the truck body. Pierce holes and use paper fasteners to attach the cab to the body.

Tags:

  • Digg
  • Del.icio.us
  • StumbleUpon
  • Reddit
  • Twitter
  • RSS
read comments

Cosmic Crafts: Two-Liter Transporter

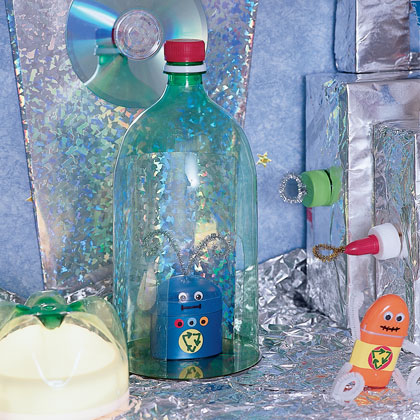
It’s the fastest way to travel this side of the universe. Just give the Two-liter Transporter a quick turn, and the Trash Master or robot inside “disappears” behind a trick piece of silvery paper.

two-litter-transporter-trash-space-station-craft-photo-420-FF0402RECYLA10


2-liter plastic bottle

Craft knife

Clear tape

Shiny paper

Use a craft knife to slice off the bottom 2-1/2 inches of a green 2-liter plastic bottle (a parent’s job). Cut a doorway. Now use clear tape to affix a rectangle of shiny paper to the inside wall of the transporter, opposite the doorway. Tape a larger piece of the same paper to the bookcase wall behind the transporter.  For extra dazzle, stick junk mail CDs near the top of the wallpaper and to the floor beneath the transporter.

Tags:

  • Digg
  • Del.icio.us
  • StumbleUpon
  • Reddit
  • Twitter
  • RSS
read comments

Fun with Foil

Foil Sculpting

Here’s a fun activity that keeps children busy and encourages them to use their imaginations. It’s a great activity to do in the car on a long road trip, or just something fun and different to do on a rainy day. All you need is a roll of cheap aluminum foil and some creativity.   One roll of aluminum foil can provide an instant cure for the doldrums.  Just give each child a sheet of aluminum foil and have them mold it into anything they want! Encourage them to use their imaginations. You might need give them a few ideas to get them going if they aren’t sure how to begin.

Start by making different little zoo animals. See how many kinds of animals you can make.

Girls might enjoy making jewelry and playing dress up. Make crowns, headbands, rings, necklaces, bracelets and earrings. Make chains out of foil to hang little charms. Poke holes into the foil for added decoration. Think about whether you want to use the shiny side out or in for your jewels. 

Masks are another fun idea. Kids can really come up with some interesting ones — anything from superheros to carnival masks.  My son enjoyed making a shark helmet with a big fin on top of his head and matching wrist bands. 

You can also make hats, sun visors, body armor, “Wonder Woman” deflector wristbands, or even goofy eyeglasses. Maybe you’d like to make a fun little bowl for dry cereal or other snacks. Make tiny cups and saucers for a tea party.

Aluminum foil also makes good temporary Frisbees and balls. Or make a set of tiny bowling pins to knock down with a miniature bowling ball. Make a chess set. Make Star Trek communicators or Vulcan ears!

Toddlers can also participate in this activity, but they may need a little help. Be sure to watch them carefully so that they don’t put any pieces in their mouths.

Aluminum foil modeling is easy and doesn’t take any preparation. Clean up is easy too. Be prepared to use a whole roll of foil if they are really having fun!


Foil Etching

Cardboard
Tin foil
Tape
Tempera or acrylic paint (dark colors)
Liquid Dishwashing soap
Paint brush
Popsicle stick

Tape a piece of tin foil to a piece of cardboard. Add a couple of drops of liquid dishwashing soap to a small amount of tempera (or acrylic) paint. Brush paint over the entire piece of foil and let dry. Using the popsicle stick, carefully scrape a design into the paint. Glue the finished piece to a sheet of construction paper or scrap mat board for display.
Foil Painting

Foil
Construction paper
Paint
Q-Tips

Roll out a piece of foil about the size of a piece of construction paper. Squirt two or three colors of paint onto the foil. Give your child a Q-tip and let him or her draw designs or a picture in the paint. This is a wonderfully artistic activity! After the paint dries, glue a piece of paper onto the back of the foil to mount the picture.
Mosaic masterpiece

Foil can be crumpled into a loose ball, then smoothed out. The resulting lines (or wrinkles) form a variety of shapes that can be filled in with permanent markers, creating a colorful mosaic. Mounting the foil on construction paper or card stock gives it a “framed” look and adds the finishing touch.

Tags:

  • Digg
  • Del.icio.us
  • StumbleUpon
  • Reddit
  • Twitter
  • RSS
read comments

Web of Life

Web of Life – C:\Users\Public\Documents\Max & Baby\Science\3_WebOfLife.pdf

Pre-K to first

Students construct a food web to learn how all living things in an ecosystem are interconnected and energy for life comes from the sun.

Objectives:

1. Show how plants and animals get energy, by telling other students which plants and animals are eaten by other animals.

2. Explain that energy for life comes from the sun.

3. Explain how all living things depend directly or indirectly on green plants for food.

4. Use pictures and arrows to create a food web that includes the sun, green plants, and animals from the prairie.

Materials:

1. Ball of yarn

2. Pictures of prairie plants, animals, and humans

3. Tape to attach pictures to clothing

4. Space for the class to form a large circle


Tags:

  • Digg
  • Del.icio.us
  • StumbleUpon
  • Reddit
  • Twitter
  • RSS
read comments

Make a PVC Sand Table for Children


If you look in any preschool, water and sand tables for sensory manipulation seem to be all the rage. Sensory tables emphasizes learning through the five senses.


Water Tables Emphasizes:

Learn Measurements through comparison and trial

Develop Hand/Eye Coordination by pouring

Discover the properties of water

Experiment with mixing different colors (provide eyedroppers with colored water)

Sharing an area with others


finished-table-large


We have had 2 of these sand tables now for over 4 years and they work great. I doubt you will be able to find one commercially to match their price and durability. We have been wanting to have a third for a while now so here is a write up for how we made it.


The credit for the original design of this sand table goes to an article in the July 2005 issue of Family Fun magazine. The original version had legs (no “base”) which I found to be a weak point in the design. Shortly after completion, a leg broke off at the joint so I modified it to have a “base” instead which is considerably stronger. As noted above this is the forth year they have been used without any issues.


All materials can be purchased at Home Depot or Lowe’s. The tub (made by Plasgad) can be found in the masonry aisle near the bags of cement.


Material List

mallet or hammer with wood block

hacksaw

miter box (would be nice but not necessary)

2 10′ 1½” pvc pipe* ………..$3.23 ea.

8 1½” 90° street elbows …..$.82 ea.

8 1½” tee fittings …………..$.90 ea.

1 large Plasgad tub … .. $10.29 ea.

pvc primer ……………..$3.49 ea.

pvc cement …………….$4.29 ea.

2 straps …………… …….$1.98 ea

spray paint (optional) ….$4.34 ea

vinyl gloves

safety glasses

sanding block or sand paper


*NOTE: If you have to cut the pipe to be able to fit in your car do not cut exactly in half as you may no longer get all the cuts needed out of the pipe. Instead cut one @ 61″ and the other @ 50″. See the black arrows on figure 1 below to better see what I am talking about.


1) Cut Pipe: Use breakdown below to cut pipe to size. If you don’t have a miter box try to cut pipe as squarely as possible. Take and mark your measurement all around the pipe to guide your cut.


pcv-pipe-cut-for-sensory-tableFigure 1. Breakdown of Pipe Cuts (note: if you need to cut the pipe to fit in
your car, do not cut in half. Cut at black arrows. See note above for details.)


2) Sand the end of each pipe: Sand off the burrs on the ends of the pipes to make inserting them into the fittings easier.


pipe-sanding-for-sensory-table-in-avon-ctSand off burrs on end of pipe.


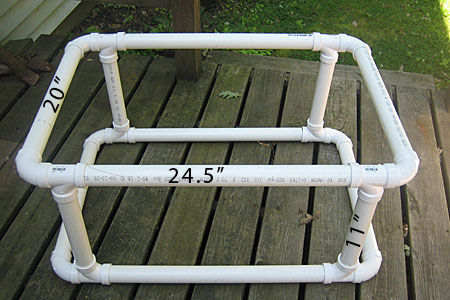
3) Assemble the frame: Assemble the frame without glue to trial fit the pieces. Tap in the pieces with a mallet so they are snug. If you are using a hammer, use a piece of wood to soften the hammer blows. If you hit the pvc directly with the hammer it may break.


trial-fit-frame-with-measurements 


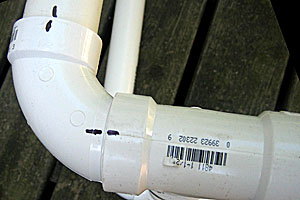
4) Mark the joints: Once together, Mark the joints where the pieces fit together. The most critical joint is where the elbow and the “T” fitting meet. If these are not glued together in the same alignment as your trial fit-up the frame will not be square.


joints-with-alignment-marks-for-table-in-canton-ctDraw alignment marks at connections.

5) Prime the joints: (read instructions on can) You must use primer or the glue will not stick. Put on your vinyl gloves and safety glasses. Do not use this primer in your house. Besides being dangerous the fumes smell extremely bad. Do it outside on a breezy day. The same goes for the glue. Open the can and you will see a little brush attached to the cap (Once you get a whiff of the primer I am sure now you will put on your gloves and glasses if you haven’t already). “Paint” the mating surfaces of the first joint. This is the inside of the wider pipe and the outside of the narrower pipe.


joints-with-primer-for-pvc

Prime Fittings


5) Glue the joints: (read instructions on can) Glue the mating surfaces that you have just primed. Do not glob the glue all over as it will be a weaker joint.


6) Insert glued end into joint: Insert the narrow piece into the fitting until it hits the bottom, give a 1/4 turn or so back and forth to spread the glue and then hold for 30 seconds (note: it will probably be hard to turn). Move on to the next joint.


sand-table-glued-up-for-children-avon-ctTable all glued up.


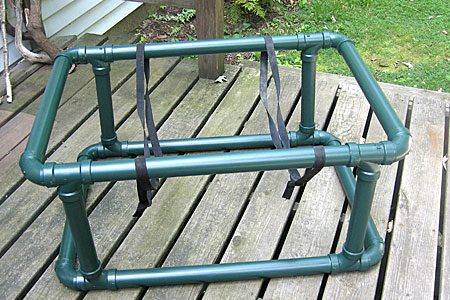
7) Paint if desired: Once completed you can paint it if you want. Standard spray paints will not stick well to the pvc as it is too slick. You could scuff all the pipe with a fine grit sand paper and then paint or use a paint made for plastics such as Krylon’s Fusion. I have used the Fusion paint on previous sand tables with just average results. They still have to be touched up occasionally. For this table we sanded and used the Fusion paint so hopefully the durability will be better.


8) Add security straps: To finish up add the straps for extra security. Lengthen the straps just enough so that they are just under the tub when it is set in the frame.


straps-added-to-sand-tableStraps added to the the frame.


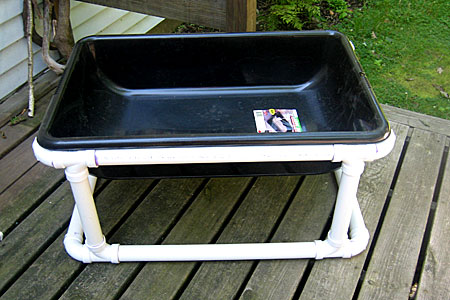
9) Just add the tub and fill with sand and you are ready for action!


Tags:

  • Digg
  • Del.icio.us
  • StumbleUpon
  • Reddit
  • Twitter
  • RSS
read comments
 Page 23 of 103  « First  ... « 21  22  23  24  25 » ...  Last »