Nature Window

Celebrate nature and decorate your space!


Show some examples of the things you’d like the children to look for on their walk: small flowers, leaves, etc. Discourage them from choosing sticks or thick items (pinecones, etc) – explain that flat things will work better for your project. Take your group on a nature walk. Encourage them to gather interesting items, such as single petals, a dropped spray of pine needles, etc. Place in front of each child one sheet of clear, self-adhesive paper, sticky side up. Allow the children to place flowers and other items and arrange them as they’d like. “Sandwich” the cover with another piece, side down. It’s best if an adult does this. Trim any excess if needed. Use as a place mat or as a hanging nature window! You can use the sandwiching technique with many other items! “Capture” and display pieces of colored paper, glitter, sand, etc.


1401


Tags:

  • Digg
  • Del.icio.us
  • StumbleUpon
  • Reddit
  • Twitter
  • RSS
read comments

Sock Garden Walk

Many times we walk through gardens without realizing the potential in the soil. This activity invites the preschool child to discover the many possibilities that wait at her feet!


Before You Start: Find a plant or a tree that is growing in an unusual place. Ask the children how that plant began growing in that spot.


 Ask each child to pull a large sock over his or her shoes. Then take a walk through a garden and/or wooded area. After the walk is completed, ask the children to sit down and carefully take off their sock. Have them carefully examine their sock with a magnifying glass. Ask them to talk about what they see. Talk about the different ways seeds can travel and what other things they might stick to. Invite the children to fill a clear plastic container with potting soil. Plant the sock and cover it with potting soil. Water lightly with a watering can. Cover the top of the containers with plastic. Encourage the children to make a prediction about what type of plant will grow from their sock. Observe the sock garden grow over the next few weeks. As the plants begin to sprout, remove the plastic covering and water lightly.


Have the preschool children create a sock garden diary. They can draw what is happening in their sock garden on a weekly basis. If you can’t find a garden or area with enough fallen seeds, scatter some grass and other seeds on the ground where you plan to walk.

Tags:

  • Digg
  • Del.icio.us
  • StumbleUpon
  • Reddit
  • Twitter
  • RSS
read comments

Sing, sing, sing


Babies love music.  Gentle harmonies can soothe a screamer. More upbeat tunes can lift the sagging spirits.  Here’s a new song that’s sure to get a giggle from your baby — even if you can’t carry a tune.


Raise your finger in the air so your baby can see it. Then circle it slowly in the air (like the flight of a bee). At the same time, sing or chant,


Bumble bee, bumble bee,
Come from the barn,
Come to get (baby’s name)
Right under the arm.


At the end, “fly” your finger under the baby’s arm. You’ll be sure to get a giggle if you end with a gentle tickle.

Tags:

  • Digg
  • Del.icio.us
  • StumbleUpon
  • Reddit
  • Twitter
  • RSS
read comments

Exercycle


Babies love to have their arms and legs moved for them, especially before they gain control of their own movements.  A good workout helps your baby develop muscles and learn how to use them joyfully.  And exercise helps everyone sleep better!  Hold the baby’s feet and gently guide them in a cycling motion.   One appropriate song to sing during this exercise is Row your boat.  Variation:  To help a baby practice kicking, hold a toy or cradle gym within range of the feet so contact can be made.

Tags:

  • Digg
  • Del.icio.us
  • StumbleUpon
  • Reddit
  • Twitter
  • RSS
read comments

Baby Pull-ups


When your baby is two or three months old and can raise and hold up her head, you two can begin a wider range of games.


Infant Sit-ups


Lay your baby on the floor (or bed) in front of you or in your lap facing you.  Gently pull the baby to a sitting position while holding hands.  Say something like “U-u-up you go,” or “Baby sits up now”.  Even at two months your baby’s head may lag a bit when pulled to a sitting position.  Slowly lower your baby back down, “Dow-w-wn you go”.  Repeat until one of you tires.


Infant Stand-Ups


At three or four months, lay your baby against a pillow facing you or sitting in your lap.  Firmly grasp her hand and begin counting.  Let your baby know what’s coming so he can anticipate the excitement to come.


“Are you ready to stand up now?  Let’s do it!” Slowly count to three, and on three slowly pull the baby to a standing position.  Keep a steady patter of conversation going to lend enthusiasm to the exercise.  By four months, most babies enjoy being upright and you’ll feel your baby pushing down on you while in a standing position.

Tags:

  • Digg
  • Del.icio.us
  • StumbleUpon
  • Reddit
  • Twitter
  • RSS
read comments

Rain or Sun it’s Always Fun to…


Make a Wagon

Poke holes near the top rim of a medium size Cardboard box.  String a piece of cord about 2 feet long through the hole, knotting on both ends.  You can paint wheels on the box and cover it with contact paper for a more permanent toy.


Make a Mobile

An older preschooler can learn about balance by helping choose objects to put on the mobile.  The weight of the objects must vary.  Good materials to use include clothes hangers, plastic straws, twigs, light cord, or fishing line.  Objects for mobile can be everyday household objects or can be shapes cut from cardboard or construction paper.


Guess the Food

Materials needed: Tray with small dishes of different foods, i.e. banana slice, apple, celery, peanut, cracker, lemon slice, etc.

Blindfold your child or have him/her cover his/her eyes. Let the child taste the different foods and see if he/she can guess what the foods are.


Homemade Sand Pails

With an ice pick or other sharp object, poke holes on opposite sides near the top of a plastic food container such as those ice cream or cottage cheese are often packed in. String a cord through the holes, knotting at both ends. This makes a fine, non-rustable bucket from recycled materials.

Tags:

  • Digg
  • Del.icio.us
  • StumbleUpon
  • Reddit
  • Twitter
  • RSS
read comments

Duck Pond

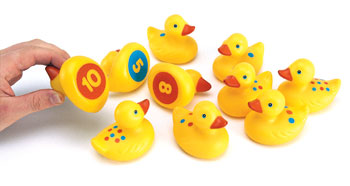
This is a fun way to help children identify letters or numbers.

793


To help children with letter/number recognition, along with taking turns.


Before You Start:

• Cut simple duck shapes from yellow contact paper (or laminated construction paper).

• Attach each duck to the side of a juice box.

• Cut out a square piece of contact paper and attach to the opposite side of the box.

• Using a permanent marker, print a letter or number on each square piece of paper.

• Place the boxes in a large container or kiddie pool that is half full of water (ducks faced up).


Have the children take turns picking a duck from the water. Ask the children to identify the letter/number on the bottom side of the box. If the child correctly identifies it, he/she points to a friend.  That child must quack like a duck.

Tags:

  • Digg
  • Del.icio.us
  • StumbleUpon
  • Reddit
  • Twitter
  • RSS
read comments

Earth Bottles

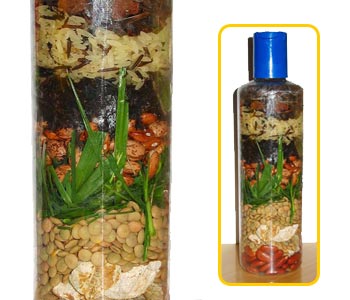
Bring pieces of the Earth from your own backyard into your students’ homes with these stylish and esthetic Earth Bottles.

Inspire admiration for earth’s beauty and variety. Improve sensory integration, creativity, fine motor skills, patterning and recycling skills.  The beans and rice, as well as the other natural materials offer a variety of colors that can be used to make beautiful art. Create positive and memorable environmental experiences for the students.


1330


You’ll need to recycle clear empty bottles (water bottles work well), one bottle for each student. You’ll need a colorful assortment of natural/neutral colored beans and rice. You should also have funnels available for easy filling and to add a bit of skill building. You might want to have this be a search-and-find activity first, where the children go in search of dirt, rocks, grass, etc.

You may choose to bring this project inside to work on, or leave it an open ended outdoor activity, where the students collect their “ingredients” for the bottles as they fill them, with the beans and rice outside ready to use. I prefer to do this project outdoors to keep it more of a sensory, individual environmental experience for the students. Either way, you’ll need trays, bowls or cups for displaying the rice and beans.


 Take the bottles and layer the bottom with one of the colored rice or beans. Have the children find pieces from their environment to make the next layer – grass, rocks, soil, wood chips, sand, etc. Continue to layer the bottle back and forth – beans/rice, then the earth materials, beans/rice, earth materials, etc. Fill the top compactly so that there isn’t too much room to shake and dismantle the goods. Close the bottle and you’ve got a beautiful piece of earth art!


You can use a funnel to make it fun and easy to fill the bottles, but also pinching the material into the top of the bottles will be a great fine motor skill builder. We try to keep anything man-made out of the bottles. If you can think of any other dried natural goods to use, that’s great, especially in a variety of colors!

Tags:

  • Digg
  • Del.icio.us
  • StumbleUpon
  • Reddit
  • Twitter
  • RSS
read comments
 Page 58 of 103  « First  ... « 56  57  58  59  60 » ...  Last »