Enjoying Messy Play – Dough Crafts


The more children play with modeling materials, the more likely they are to want to help prepare, store, and even clean up — and soon your messy activities won’t seem so messy after all!


Playing with clay and other modeling materials is a tactile experience that benefits children in many ways, but it can be messy. Here’s how to make it a pleasurable and manageable activity for preschoolers — and for you.


Nurture freedom of expression. Remember that clay, plasticene, and play dough are open-ended materials — there is no right or wrong way of playing with them. Avoid making models for children to copy or suggesting that a final product is expected.


Personalize the experience. A small child-sized table with four chairs set up around it is a comfortable work space that encourages children to share materials and conversation. By controlling the group size, the frustration level — as well as the mess — isn’t as apt to get out of hand.


Support children’s play. Encourage children who want to experiment. A smile, wink, or a hand to steady a clay mound are forms of positive reinforcement. Offer sincere, meaningful comments such as “Your yellow shape is so BIG!” rather than asking “What is that?” Be careful not to compare children’s work.


Encourage hesitant children. Some children may not want to participate in messy play. Never force the issue! Be patient and give children lots of time and plenty of opportunities to observe the fun others are having. They might enjoy helping you carry the wrapped dough to the refrigerator or feel comfortable sitting near you as you pat the dough and describe how it feels.


Guide children who may be disruptive. Sometimes a child might be tempted to take play dough away from others or smash their clay sculptures. To encourage appropriate behavior, make sure children understand a few specific rules for the clay table, and be sure to provide ample manipulative materials for each child, so they’re less likely to feel a need to take another’s supplies.


Provide technical assistance. It’s time to step in when a child is having difficulty with something he or she wants to accomplish. Just be sure your suggestion helps the child accomplish his own goal for his clay.


Supply accessories for added fun. When children have had lots of time to explore the properties of the material, they may enjoy the challenge of using tools that make impressions, such as large buttons, spools, and forks, or tools that cut, such as plastic knives and plastic caps. Cookie cutters, however, may stifle creativity.

Tags:

  • Digg
  • Del.icio.us
  • StumbleUpon
  • Reddit
  • Twitter
  • RSS
read comments

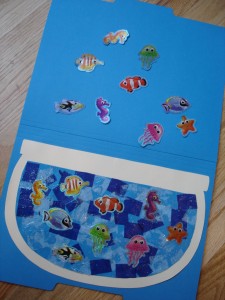
Fishbowl File Folder Matching Game/Craft


2 blue file folders

1 manila file folder

Mod Podge (we used the Sparkle kind)

blue tissue paper (we used two shades of blue)

fish stickers (2 matching sets)

glue

scissors


album_6_20_08_028


First, I cut the manila file folder in half and then cut out the bowl shape. (I traced around an oval Pyrex dish to get the general shape of the fish bowl.) Then, cut one of the blue folders in half and cut out the water, being sure to make it slightly smaller than the manila fish bowl. Now, here is the fun part. Cut the tissue paper into small pieces and glue it to the blue water. Once dry, coat it with the sparkle Mod Podge. Once dry, glue it onto the manila fish bowl and add on the fish stickers. (I found our stickers at the Dollar Store. The kids love them because they are shimmery!) Finally, adhere the complete fish bowl to the other blue file folder. Use your second set of matching fish to play a matching game with the fish in your fishbowl. Laminate of more durability.


This would be great to use with a fish or water theme. I love it because it doubles as a craft and teaching tool!

Tags:

  • Digg
  • Del.icio.us
  • StumbleUpon
  • Reddit
  • Twitter
  • RSS
read comments

Pine Cone Creatures

pine cones
acorn caps
other natural materials (acorns, leaves, moss, twigs, bark)
pom poms
glue
shoe box
construction paper
art supplies

• supports fine-motor development
• encourages creative play

With your child, collect pinecones (or you can purchase them at a nursery), along with leaves, twigs, and other “natural” materials.  To make a pine cone creature, your child can glue a pom pom to one end of the pine cone, make wings out of leaves or arms out of twigs, eyes out of acorn caps or construction paper, a nose out of a leaf or construction paper, and so on.  Glue acorn caps to the bottom of the creature to make feet (and to keep the creature more stable). Decorate the inside of a shoebox with paint or construction paper and leaves, twigs, and other natural items to create a habitat for the creatures. Ask your child to name his pine cone creatures. The two of you can make up stories and adventures for this new species!

Learning benefits:

Tags:

  • Digg
  • Del.icio.us
  • StumbleUpon
  • Reddit
  • Twitter
  • RSS
read comments

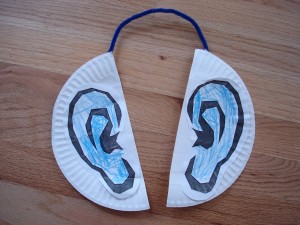
Listening Ears Craft


All you need is a pipe cleaner, paper plate, glue, and some ears to color and cut out. These were some enlarged clip art ears. Color and cut out your ears. Cut the plate in half. Attach an ear to each half of the plate and attach the plates with the pipe cleaners using glue. Once dry, put it on.


album_6_8_08_022


Tags:

  • Digg
  • Del.icio.us
  • StumbleUpon
  • Reddit
  • Twitter
  • RSS
read comments

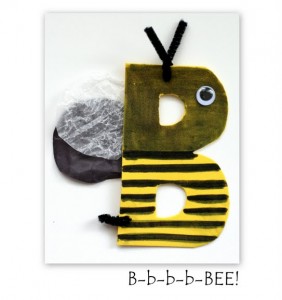
‘Bb’ is for Bee {Craft}

Alphabet_Examples1


Yellow foam sheet or construction paper (if you use a foam sheet and a marker, the smudge factor will be involved. Fingertips will be black and marker color will spread like wildfire.)

Black sharpie or marker

Wax paper

Googly eye

Black pipe cleaner

Glue


Cut an uppercase ‘B’ out of the foam sheet or construction paper. I used a foam sheet that was about 4″ x 5″ in size.  Cut out two circles from the wax paper to use as wings for your bee. {I used one black, one wax paper so the wings would show up for the pictures}. Cut the pipecleaner into two pieces ~ one should be 1/3 of the length of the pipecleaner, the other 2/3 of the length. Poke the small pipecleaner through the bottom base of the ‘B’ to use as a ‘stinger’. Poke the longer pipecleaner through the upper part of the ‘B’ to use as the bee’s antennae. Have your child draw stripes on the B using the marker. Glue on the googly eye and wings.

Tags:

  • Digg
  • Del.icio.us
  • StumbleUpon
  • Reddit
  • Twitter
  • RSS
read comments

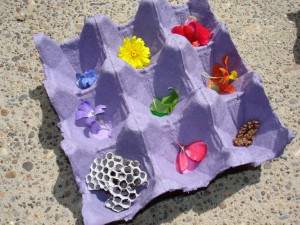
Nature Hunt by Color

album_6_5_08_053


My kids LOVE going for walks around the neighborhood. But, when I saw this awesome idea, I just knew I had to make it for my kiddos so that our neighborhood walks would become nature walks…you know, make it educational! {smile} So, since I didn’t have a nifty little tray, I decided to use an egg carton. We get the big Costco size pack of eggs, so I cut down the egg tray so that there would be nine spots. It is a bit hard to tell, but I used some paint and just dropped a few drops of each color into the bottom of each spot. We let it dry overnight and then the next day we took our trays with us on our walk. The idea is that you have to find things (in nature) that match the colors painted in the tray. (Each of the big three kids had their very own tray to fill.) The kids LOVED finding all kinds of things…from a honeycomb (for gray) to pinecones (for brown)…and of course we found lots of flowers, rocks, and leaves for the other colors! We have used the same trays for at least 4 times now and the kids still love doing it! 

Tags:

  • Digg
  • Del.icio.us
  • StumbleUpon
  • Reddit
  • Twitter
  • RSS
read comments

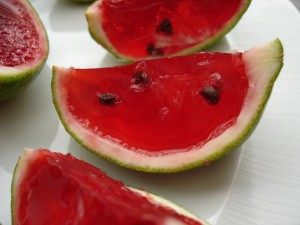
Mini Jell-O Watermelons


2 limes (I used 5 limes)

1 small box of red Jello

mini chocolate chips


album_6_8_08_026


Cut limes in half lengthwise. Scoop out all the fruit with a spoon. (I found it to be easier if I used a knife to get it started and then did the scooping with a grapefruit spoon.) Place the limes in a muffin tin to keep them from tipping over. Make the box of Jello according to the Jiggler directions. Carefully spoon Jello into the limes halves. Chill until almost firm. Using a skewer push the mini chocolate chips into the Jello for “watermelon seeds.” (I used a toothpick and discovered that if you kind of poke the flat/bottom side of the chocolate chips with the toothpick and plunge the chip in pointy side first, it was a bit easier.) Chill until firm, then cut into slices and enjoy.

Tags:

  • Digg
  • Del.icio.us
  • StumbleUpon
  • Reddit
  • Twitter
  • RSS
read comments

Oral Motor Development Milestones

What is oral motor development?


Oral motor development refers to the use and function of the lips, tongue, jaw, teeth, and the hard and soft palates. The movement and coordination of these structures is very important in speech production, safe swallowing, and consuming various food textures. Normal oral motor development begins prior to birth and continues beyond age three. By age four, most children safely consume solids and liquids without choking.


The milestones below are typically observable through these particular ages.


Consult your doctor or pediatrician before introducing new foods to your baby. He/She will guide you in selecting appropriate foods and feeding utensils. Use the following list of developmental milestones to monitor your child’s progress toward oral motor and swallowing development.


Before birth, the baby:


• Begins to develop the sucking and suckling reflexes around 36 weeks.


At birth to three months, the baby:


• Demonstrates many reflexes to protect his/her airway.

• Responds to stimulation in and around the mouth.

• Turns his/her head toward the nipple when the caregiver strokes the cheeks.

This signals that the baby is ready to eat.

• Consumes breast milk or formula using a nipple.

• Coordinates his/her breath with two to three sucks of liquid before swallowing and breathing.


At three to six months, the baby:


• Brings both hands up to clasp the bottle but needs assistance holding it.

• Consumes rice cereal or pureed fruit and pureed vegetable baby foods.

• Eats from a small infant/toddler spoon during feeding.


At six to nine months, the baby:


• Holds the bottle independently.

• Cleans the spoon with his/her upper lip.

• Eats pureed meats and a variety of pureed baby foods.

122r Duper® Handy Handouts

At nine to twelve months, the baby:


• Demonstrates lip closure while swallowing liquids and soft solids.

• Begins to self-feed by using his/her fingers to grab small foods. The baby may attempt to eat small, soft dissolvable solids (i.e., soft crackers and small cereals like Cheerios™).

• Begins to experiment drinking liquids from a sippy cup.

• Begins to consume mashed table foods.

• Drinks out of a sippy cup and attempts to hold the handle independently.

• Begins to drink through a straw.


At twelve to eighteen months, the toddler:


• Coordinates sucking, swallowing, and breathing patterns for longer

sequences.

• Begins to eat finely chopped table foods.

• Bites through crunchy foods such as cookies and crackers.

• Moves the food in his/her mouth from side to side as he/she chews.


At eighteen to twenty-four months, the toddler:


• Feeds him/herself using a spoon but may still need assistance.


At twenty-four to thirty-six months, the toddler:


• Consumes a variety of liquids and solids through straws and open mouth cups.

• Uses a spoon to scoop soft foods while feeding him/herself.

• Independently moves toward fine tuning all feeding skills.


At thirty-six months to five years, the child:


• Progresses toward chewing and swallowing advanced textures (meats, fried foods, whole fruits, etc.) with close supervision by a caregiver.

• Begins (with close supervision) to use a fork to stab food.

• Drinks from an open mouth cup with no assistance.


It is very important to consult your doctor or pediatrician if you feel that your child is not meeting these milestones at an age-appropriate level. Your doctor or pediatrician may refer you to a Speech-Language Pathologist or an occupational Therapist who will evaluate and develop a plan to strengthen your child’s oral motor skills.

Tags:

  • Digg
  • Del.icio.us
  • StumbleUpon
  • Reddit
  • Twitter
  • RSS
read comments
 Page 50 of 103  « First  ... « 48  49  50  51  52 » ...  Last »