Paper Plate Spiders


DSC04934

I have made these spiders for several 3rd grade class parties, but I am sure they would work for a variety of ages. The kids enjoy the activity and they turn out pretty cute. Once they are made, treats can be put inside the pocket and sent home with the kids.

Items Needed:
black spray paint
paper plates (1/child)
pipe cleaners (about 4″/leg)
puffy paint (mouth)
scrap paper (eyes and teeth)

Spray paint the bottom side of the paper plates(not where you would put food). When the plates are dry, cut them in half. Put 2 halves together (paint side facing out) and staple. Make sure that you staple the pipe cleaners in too! Yes, I know that spiders have 8 legs, so you might want to change yours a little from mine! 🙂 Have items ready to decorate the spider and let the kids be creative.

Tags:

  • Digg
  • Del.icio.us
  • StumbleUpon
  • Reddit
  • Twitter
  • RSS
read comments

stART: Skeletons and Bones

skeletonsgems

What is Halloween without some skeletons?

Using about 4 pipe cleaners (chenille stems) and a little piece of craft foam, you can make a little skeleton. (these go with along with our other kid crafts from pipe cleaners -seen below)

Here are our favorite skeleton stories that are perfect for young children:

Shake dem Halloween Bones by W. Nikola-Lisa

super cute book with a catchy little rhyme-easy read

Dem Bones by Bob Barner

Based on the folk song Dem Bones this book teaches the bones by using the song-great learning book!

Skeleton Hiccups by Margery Cuyler

Margery Cuyler is one of my favorite authors for kids. This book is really short, easy to read, and has darling illustrations! Love it!

Tags:

  • Digg
  • Del.icio.us
  • StumbleUpon
  • Reddit
  • Twitter
  • RSS
read comments

Halloween Memory Game with Recycled Lids

quilt,_dallin,_crafts,_007

There are many uses for little lids from bottles and jars. We wash and save the lids from Powerade and Gatorade, and keep them with the kid craft stuff. Since these were mostly orange and black, these were perfect for a little Halloween game. We just put a Halloween sticker (2 of each) and it became a matching game. You could also put one specific sticker on one, and play “find the spider” or whatever the sticker happened to be, and instead of matching, make the object to find that specific one. Of course when Halloween is over, this will go in the Halloween bin with all the other stuff, and it will be like a new game next year when we pull it out.

Tags:

  • Digg
  • Del.icio.us
  • StumbleUpon
  • Reddit
  • Twitter
  • RSS
read comments

Halloween Games

Max’s kindergarten harvest party:


1. Fall / Halloween Bookmarks

2. Ghost or pumpkin bagels (cream cheese and raisins)

3. Owl goodie bag (filled with pre-done treats)

4. “pin” the nose on the pumpkin


PUMPKIN WEIGHT – Purchase a 6-7 pound pumpkin, weigh it on your bathroom scale, and record the weight. Ask the children to pick up the pumpkin, guess the weight, and write down their estimates. The child who comes the closest to guessing the actual weight can take home the pumpkin or a mini pumpkin as a prize. (You may want to have a few favors on hand in case more than one child makes a close guess.)


PUMPKIN CIRCUMFERENCE – Modify the above guessing game by having the children guess the circumference of the pumpkin using pieces of string. (You’ll need a ball of string and scissors to do this.) One at a time, ask each child to cut a length of string that they believe is the distance around the pumpkin. After everyone has cut a piece of string from the ball, wrap a length of string around the pumpkin and cut it to get the exact circumference. Ask each child to measure his or her string against the string representing the actual circumference, and determine the winner(s).


HALLOWEEN GUESSING JAR – Fill small jar(s) (mayo jar, baby food jar, etc.) with candy corn, plastic spider rings, or other Halloween items. Ask the children to write down the number of pieces they believe to be in the jar. As a group, count the pieces of candy corn in the jar. The child who’s guess is closest to the actual number gets to take home the jar of candy.


WITCH’S BREW – Cut about ten pieces of paper in Halloween related shapes, such as ghosts, bats, pumpkins, or spiders. The shapes need to be about the size of a Ritzâ„¢ cracker. Place the shapes in a pile beside a small bowl or witch’s cauldron. Have straws available for each player, along with a stopwatch, or a watch with a second hand. Using the straw as a vacuum, have each child try to pick up the shapes and drop them into the cauldron. The player with the fastest time wins. (Ages 6-12)


PIN THE WART ON THE WITCH – Instead of Pin the Tail on the Donkey, try Pin the Wart on the Witch (or Pin the nose on the Jack-o-lantern). Draw a witch’s face on a piece of poster board. Use little balls of green Play-Doh â„¢ or paper cutouts as the warts. Blindfold each child as his/her turn arrives, spin, point in the right direction, and watch your wicked witch become even more wartful! (All ages)


EYEBALL RELAY – Before the party, buy about 12 Ping-Pong balls. Using permanent markers, draw irises, pupils, and bloodshot veins on the balls. Divide your group into two teams and give one spoon to each team. The kids are to try to carry the “eyeball” from one side of the room to the other without dropping it. If they drop the “eyeball”, they should return to the starting point and try again. (Ages 7 & up)


HALLOWEEN BINGO – You might be able to find Halloween Bingo games at stores during this time of the year. (Try Wal-Mart but I think I got mine at A Teacher’s Closet). If you don’t want to buy the game, you can make it or download/make a blank template and have the kids write in their own Halloween words. Use Smarties candy or other candy pieces as the markers


Easy Toilet Paper Pumpkin:

Using a 15″ x 15″ square of festive fabric, you cover a roll of toilet paper.  This website has the directions to the craft, but in lieu of the brown paper roll, we used actual thick branches from a tree (about an inch thick). We also skipped using the batting.  We had the felt leaves and pipe cleaners prepared ahead of time, and the Kindergarteners could complete the craft in about 15 minutes. Have masking tape on hand to label the pumpkins with their name.
Pumpkin Painting:
Stop at a pumpkin stand and ask the owner for a deal on the number of pumpkins you need for your classroom.  Allow each child to tempra paint a small, softball sized pumpkin.  Use a permanent marker to write their names on the pumpkin prior to painting it. Send them home in a plastic shopping bag (in case paint is not dried or begins to peel.)  Also don’t forget to encourage the use of paint shirts.

Paper Bag Pumpkin:
(photo from Crayola.com)

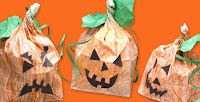
This is an easy project.  Using a brown paper lunch bag and a green piece of string, you can create a paper bag pumpkin. If you use orange paint to color the bag…stuff the bags ahead of time.  Or use crayons to color the bag and have the kids stuff them as part of the process. Directions can be found here.  

Games: 
Hoola Hoop Toss:

Place 3 to 5 pumpkins, in a variety of sizes, in an open area (the classroom carpet works great for this activity).  Have the kids toss 3 to 5 hoola hoops over the pumpkins.

Bozo’s Grand Prize Game “Pumpkin Style”:

Either purchase 5 to 10 fall-themed buckets or cover some ice cream buckets with fall colored construction paper.  Have the children line up and toss a bean bag into each bucket.  For younger children, five buckets are the way to go.


Tags:

  • Digg
  • Del.icio.us
  • StumbleUpon
  • Reddit
  • Twitter
  • RSS
read comments

Back to School Issues

Tips on BTS safety, health, making the adjustment, and more!

Back to School Tips

  • Back to School Tips from the American Academy of Pediatrics.  Covers many topics:  the first day; backpack safety; traveling to and from school; eating during the school day; bullying; child care before and after school; and homework and study habits.

Back to School Safety

  • School bus safety rules—from the National Safety Council—how to get on and off the bus, and how to cross the street safely.
  • Get to school safely!—the US Department of Education—many tips for kids who take the bus, subway, walk, ride, or drive, along with safety activities for parents to do with their children.
  • School Safety—getting there, on the bus, and in the classroom—from McGruff the Crime Dog.
  • Help children avoid injuries as they head back to school—news from the Consumer Products Safety Commission (CPSC) on playground, bicycle and sports safety, and more.

 BTS Safety on YourChild:

Back to School Nutrition and Health

 Making the Adjustment

More BTS Information

Tags:

  • Digg
  • Del.icio.us
  • StumbleUpon
  • Reddit
  • Twitter
  • RSS
read comments

Creative Bookmarks


hold-your-place-in-style-craft-photo-420-FF0206EFDA01Scissors

Card stock

Glue

Markers


To make one, first cut a 1 3/4- by 8-inch strip of colorful card stock. Holding the strip horizontal, fold each half of the strip down at a right angle at the strip’s center, as shown. Next, use shapes cut from colored paper or card stock to create a design for your bookmark that’s about 3 1/2 inches across. Glue the pieces together, adding details with markers, if you like, then glue your design across both folded halves of the card stock strip, securing them together.  Be sure to let your bookmark dry completely before using it in your latest read.  Try animal faces, flowers, cars, etc.

Tags:

  • Digg
  • Del.icio.us
  • StumbleUpon
  • Reddit
  • Twitter
  • RSS
read comments

Digital Camera Alphabet Scavenger Hunt

lets-find-letter-treasure-games-photo-420-FF1009ALPHAA21


PICTURE THIS: a family outing that’s great for all ages, affordable, and (shh!) educational too. Sound too good to be true? Not if you’ve got a digital camera and a sharp eye for letter shapes, as my family recently discovered they have. My 10-year-old, Ava, and 5-year-old, Harry, loved going on an I Spy adventure; their dad and I loved how creative and easy this excursion turned out to be. Read on for our eight tips on staging your own successful letter quest as well as for craft ideas to help you showcase your alphabet finds.

1. CAPTURE COLOR
We kept our eyes peeled for splashes of color and were not disappointed. Here’s Ava in front of a banana-yellow garage door, her camera at the ready. When we stepped back and tilted our heads, we spotted a perfect upside-down “L” in the angle of the door frame.

2. MAKE A CHECKLIST
A must-have! We made a list of the letters we needed before getting started. Without it, we surely would have forgotten a few p’s and q’s. Plus, when we spotted different versions of a letter, we could record them on our list.

3. PURSUE DIFFERENT AVENUES
To test if this fun hunt could take place anywhere, we visited a mix of spots around town. For example, after pounding the pavement on Main Street, we drifted over to a leafy park to see what else we might find. We spied several letter shapes in the playground equipment, then used the slides and monkey bars as intended — to give our littlest letter sleuth a break.

4. LOOK UP
After shooting at eye level for a while, we decided to tilt backward and shoot up. We were amazed to discover so many letters suspended above our heads: in telephone lines, electrical wires, architectural details, and among the foliage. For example, lying on his back in the park, Harry got a shot of a “Y” in the crook of a tree branch.

5. LOOK DOWN
Here’s a tip that lends credence to the phrase, “The world is at your feet!” We were surprised to find so many clearly formed letters in the pavement’s cracks and gaps. Looking at the ground, Harry found a little “R” festooned with tiny leaves, while Ava spied the elusive “Q” in an iron chain link.

6. CHECK THE ALLEYS
They have it all! We could have spent hours examining the angular fire escapes and pocked brick walls, never mind the wire tubing and climbing vines. Here’s Ava shooting an unexpected alley find. Do you see the “O” in the truck’s chrome fixture? We saw lots of letters in bike racks, sidewalk cracks, and emblems too.

7. BE FLEXIBLE
While our 10-year-old was interested in finding all the letters she could, our 5-year-old mostly tried to find himself — or his initials anyway — on the hunt. Harry was thrilled to see so many sideways H’s in the brick wall above and the one in the window pane shown below.

8. GET SOME PERSPECTIVE
Sometimes it’s all about the approach. Here we were peering at a staircase, searching for a letter but having no luck. When we took a few steps back and scanned the entire shape, however, this lower-case “j” — with a globe lantern for its dot — leaped out at us!

When you get home, turn your photos into mementos with an eye-catching Photo Alphabet Book.

Or create Frame Names: Spell your name or your initials using colorful letter photos, then trim and mat the shots to fit a store-bought frame.

Tags:

  • Digg
  • Del.icio.us
  • StumbleUpon
  • Reddit
  • Twitter
  • RSS
read comments

Pierced Sun Catchers

pierced-sun-catcher-window-decoration-summer-craft-photo-420-FF0705SUNA09


These colorful, perforated window decorations can really brighten up a room when sunlight shows through all the pinholes.


Card stock

Corrugated cardboard

Pushpin

Thin string or thread


To create one, simply cut a sun shape out of the paper or card stock and place it atop the cardboard.  Have your child pierce the paper with the pushpin, creating a pattern of straight lines or swirls. Loop a piece of string or thread through one of the holes near the top edge of the sun catcher, and it’s ready to hang.

Tags:

  • Digg
  • Del.icio.us
  • StumbleUpon
  • Reddit
  • Twitter
  • RSS
read comments
 Page 96 of 103  « First  ... « 94  95  96  97  98 » ...  Last »