Thank Goodness for Manners


The development of decorum varies from child to child. But between the ages of 2 and 5, your child is most receptive to learning the rules of polite conduct. “When children are very young,” says Linda Altman, a Georgia-based counselor and educator, “they want to do anything you ask. Grab the opportunity to teach appropriate behavior.”


You can begin introducing manners into your child’s daily routine practically from infancy. If your youngster likes to hand you his favorite stuffed bear, give him a smile and an enthusiastic “Thank you” when you accept it. When your family is gathered at the dinner table, be sure to say, “Please” or “May I?” when requesting the salt. Learning manners is easier for your child when it is the common practice in your household.


Nip Bad Behavior in the Bud


Be a role model. Your child may pick up bad habits from a rude cartoon character or a playmate who whines to get her way. Try to supply good examples for your little one to counteract the negative influences. Try reading storybooks that showcase good manners.

However, your child watches you more than he watches anyone else, especially in the impressionable younger years. Remember that you are his number-one role model! The best way to make sure he is polite is to be so yourself.


Start small and expand on rules. Learning is gradual. Don’t expect it all to come together in a snap. Altman advises, “Prioritize what you think is important for your child to do. A constant refrain of ‘sit up straight,’ and ‘don’t do that,’ will have less of an effect.” Little ones can be forgetful, especially if too much is thrown at them at once — and that will only cause frustration on both ends. Refer to the chart above for a step-by-step approach.


Give reminders and reinforcement. If your child backslides, offer a gentle reminder. For example, if you begin to work on table manners at home (“See how Daddy uses his fork and knife? That’s how grown-ups do it — let’s see if you can too!”) and it becomes a habit, try using the utensils at the next dinner at Grandma’s. If your child reverts back to using her hands, point out quietly how good she is at using her fork at home (“You were so good at it last night. I bet Grandma would love to see how grown-up you can be!”). Don’t scold her, especially if it’s her first outing. Children need positive reinforcement, so let yours know when you think she’s done a great job!


Ignore poor behavior; reward good performances instead. “Parents should always emphasize what is good and what they want from a child much more than honing in on punishment,” says Steven Nowicki, Ph.D, the Charles Howard Professor of Psychology at Emory University in Atlanta. “At age 2, children are gaining cognitive skills and may act out, because it’s something they couldn’t do developmentally at a younger age,” says Altman. Allow your child to pick out a treat at the grocery store once he’s demonstrated good behavior such as sitting quietly in the cart, helping you pick out fruit, or carrying a bag. Soon he’ll understand that his good behavior is appreciated and rewarded.


Be clear and consistent; explain why. Make sure any punishment fits the offense. If your child understands why she’s not allowed to go swimming today (last time you went to the pool, she splashed too much and the lifeguard blew the whistle at her twice), then she will be less like to act out again. By the same token, if you let her slide, she will pick up on the inconsistency and try to get away with more next time around. “Children can do a great deal more than we thought a few years ago. They are capable of understanding that they are part of an interaction and that other people have intentions and minds,” says Dr. Nowicki. Make your intentions clear and your child will react accordingly.


Always bear in mind that it’s okay for your little one to make mistakes. Keeping good manners is a lifelong process. But do take the time to help him learn the skills that will allow him to become a more social, confident individual later on. Someday he’ll thank you for a job well done!

Tags:

  • Digg
  • Del.icio.us
  • StumbleUpon
  • Reddit
  • Twitter
  • RSS
read comments

A jack-o-lantern mosaic

What do to with paint swatches?  Today we used them to make a jack-o-lantern mosaic. First, I drew an outline of a jack-o-lantern on a big piece of paper. I set out paint swatches in shades of orange, green and black. I cut and glued on a few, so the children would get the idea of what colors went where.


IMG_6204


In the beginning, it was a little tricky for some of the children to visualize what in the world we were trying to make, but as the jack-o-lantern filled in, they all caught on. It was kind of like working on a big puzzle, each child stopped by the mosaic throughout the day, pausing to cut and glue on a piece or two (or twenty), and then went along with his or her daily business.


IMG_6233

Tags:

  • Digg
  • Del.icio.us
  • StumbleUpon
  • Reddit
  • Twitter
  • RSS
read comments

Let’s Go Outside

Through physical play outdoors, your child develops confidence in herself as she sees her physical skills grow. This self-confidence can translate into social confidence: Children who feel good about their physical abilities tend to view themselves more positively in general.


Your baby probably invites you to play by making sounds, looking intently at you and smiling, or by crawling over to you, dragging a toy along in his hand. When you cue into his signals, you help him begin to build confidence that he can make things happen! This opens the door for further development of social skills.


Toddlers tend to play beside each other — sometimes with the same toys — but not necessarily with each other. They are playing “alone together.” Make sure there are multiple items of the same kind of toy — two shovels, two little cars — so your child can play and not fight over an item. Your child will begin to see others as part of the play potential and not as competitors. Children can relax and enjoy play and not have to be on guard to protect their playthings from others.


Great Outdoor Games for Babies and Toddlers


Talk to the animals. Make a point of going somewhere outside where your baby will see animals (the park, a zoo, and so on). Hold your infant so she feels secure, but make sure she has visual contact with the animal (after you’re assured the animal is “baby friendly”!). Ask: “What does the doggie say?” If your little one does not yet make the sound, make it for her. Most likely, the animal will soon respond. This dialogue will reinforce your baby’s idea of social “conversation.”


Ribbon dance. Tie wrapping ribbon (use a variety of colors) around plastic bangle bracelets or “six-pack” holders. Put on music and dance with your child while you both move your arms to wave the ribbons. This game will help your child understand social expression.


Tags:

  • Digg
  • Del.icio.us
  • StumbleUpon
  • Reddit
  • Twitter
  • RSS
read comments

Halloween Lanterns

Here are some simple paper lanterns we made in Halloween/fall colors just because.


Stapler

Glue

Hole puncher

Scissors

Ruler

Craft knife

String

Construction Paper (black, yellow, orange).


We made two kinds of lanterns. The first kind were just simple tubes – either cylindrical or square in cross-section, and layered with a contrasting color of paper on the outside. The kids cut fancy edges with my fancy-edge scissors and went crazy with the hole punchers.


The second kind was made with slits cut into an outer layer which was then stuck onto an inner tube (black) that was shorter so the slit part popped out. We used the regular 9″ x 12″ sheets of construction paper. We cut the black into three equal strips 3″ x 12″. We cut the orange into two equal strips 4.5″ x 12″. On the orange strips, we marked out a 0.75″ band on either edge, and cut vertical strips about 0.75″ apart in the region between those outer bands. Then we put glue on those outer bands lined them up with the long edges of a black strip and stuck them on so the middle region of cut slits popped out.


696479012_u2a2L-XL

Tags:

  • Digg
  • Del.icio.us
  • StumbleUpon
  • Reddit
  • Twitter
  • RSS
read comments

Why Play Outdoors?

Through physical play outdoors, your child develops confidence in herself as she sees her skills grow: “Watch me climb the monkey bars, look how high I can swing. Watch me, watch me!” A child who is initially reluctant to go down the tall slide feels a great deal of personal pride when he finally musters up the courage to do so.

This self-confidence can translate into social confidence: Children who feel good about their physical abilities tend to view themselves more positively in general. This generalized feeling of competence finds expression easily as children approach other children to play, offer suggestions for solving problems or conflicts that arise during play, and negotiate their way through play episodes that change tone, content, and direction.

Keep in mind that opportunities for social growth can occur even when there are conflicts. Some disagreements are inevitable as children interact, play out various themes, and compete for the same play equipment. However, providing these outdoor opportunities for learning social skills (such as sharing, using language, including others in play, turn taking, developing play “manners”), we can help our children become more socially confident as they approach new play situations.

Cooperative Play

As your child gets into her preschool years, she will take turns and, with her play partners, have some shared sense about where their play is headed (though don’t be surprised if she and her friends don’t arrive at the planned outcome). “Let’s play fire station,” your child and her pals might decide. An old cardboard box, the swing set, or a park bench might become the fire station; a trike or wagon, a fire truck; the garden fence or sandbox, a house on fire. Add a hose, and they’ll spray water (all over). All of these events may be happening at the same time, but they will not necessarily be “coordinated.” In other words, your preschooler may be pretending to put out the fire while her pals are still driving the fire truck to the scene.

Outdoor play is critically important to the social development of children this age, and to girls in particular when it comes to building self-confidence. Girls are more assertive in their action-oriented play outdoors than they are in their dramatic play indoors. In addition, children learn to be more empathic and less through social play, and they develop more skills for coping with conflict. As children engage in active play with their peers, siblings, and newfound playmates in public parks, they have opportunities to develop cooperation and leadership skills as play episodes ebb and flow.

Great Outdoor Games

Safari. Take a collection of plastic animals to your local park or even your backyard. When your child and his friends aren’t looking, hide them. Now go on a safari to find the animals. Children can capture the animals with butterfly nets. If you have multiple animals of the same types, children can hunt in teams to find one of each kind of animal.

Leafhoppers. This is one for autumn. Suggest to your preschooler and his friends that they gather the fallen, leftover crunchy leaves from your yard or park. If there are enough, encourage the kids to make piles varying distances apart. The leaves can be in straight lines opposite each other or in a “trail” leading from one object (bench, boulder, path, and so on) or area to another. Children can then play leafhopper as they jump from pile to pile. A variation is to step only on leaves or objects, but not the grass or the ground.

Play Props to Take Outside

You can spark social interaction outdoors by creating opportunities for theme-based play. While organized sports offer occasions for social interaction, they tend to be more controlled and goal-focused. “Free play” is more child-directed.

To inspire a pizza delivery game: Provide pizza boxes, receipt books, plastic utensils, aprons, and plastic mixing bowls.

For outdoor blocks: Visit a home under construction and ask the framing crew foreman if you can have scrap pieces of wood. Gather short pieces — one foot and under in length. (Stay away from pressure-treated wood because it contains toxins.) You and your kids can smooth them off with sandpaper and voila! … outdoor blocks. Combine the blocks with small-scale construction toys, straws, shovels, rubber bands, and string, and children can create wonderfully complex construction sites.

For “houses” or “tents”: Acquire longer lengths of lumber and let children stack and build with them. Combine the longer lengths with plastic crates (available at most discount stores), cardboard boxes, and old shower curtains. Your kindergartner and his friends can create structures that encourage them to use social skills as they cooperate to build them play in them.

Tags:

  • Digg
  • Del.icio.us
  • StumbleUpon
  • Reddit
  • Twitter
  • RSS
read comments

Pumpkin Patch Print

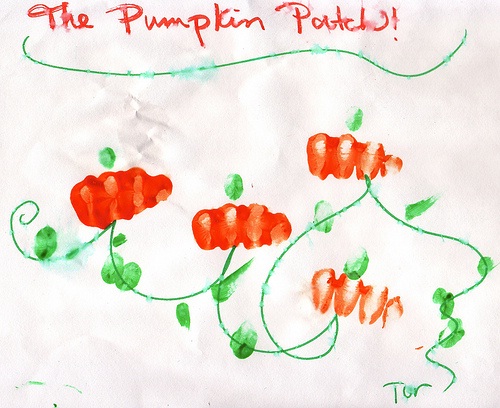
Ok… so this one got a bit wet on the way home, but I had to share since it was so brilliant (I’m hoping you’ll agree!). My youngest made this in Pre-K today and it sounded super easy to do (if a bit messy, so have wipes handy). Just draw happy, squiggly green lines on plain paper then have your child make a fist. Dip the knuckle part of their fist into orange paint (like they are punching in, only gentler so you don’t get splashed) to make the pumpkin “stamps” and then use just a finger or thumb dipped in green paint to make the leaves and stems. Genius, no?


pumpkin patch

I’m thinking you could even use fabric paints and make the prints on trick-or-treat bags — it’d also work on grocery bags. Oh, I do like this one, I hope you do, too!

Tags:

  • Digg
  • Del.icio.us
  • StumbleUpon
  • Reddit
  • Twitter
  • RSS
read comments

Activities for Toddlers and Their Parents

Balloon Tennis (paper plate; wooden paint stir stick; craft glue; balloon) Glue the wooden stir stick to the paper plate. This is your tennis racquet. Blow up the balloon, tie the end, and let the games begin!


Touch and Feel Book (construction paper; glue; materials of different textures, e.g., small piece of sandpaper, cotton balls, velvet, bubble wrap, felt, wax paper, etc., stapler) Glue one textured material per page of construction paper. Staple the pages together. Have your toddler close her eyes and tell you what each feels like (rough, soft, etc.). Young children will enjoy discovering the many textures of the world around them.


Bread Art (white bread; food colorings; small drinking cups; milk; new paintbrush; toaster) You will need a drinking cup for each color you wish to use. Pour a small amount of milk into each cup. Add a few drops of food coloring to the cups (a different color for each). Using a paintbrush, paint designs or pictures onto the bread. Don’t soak the bread. Use just enough “paint” for the picture to show up. Now toast the bread for edible art!


Animal Walk Parade (radio; silliness) First, choose your favorite animal. Form a straight line, Turn on the radio and walk the way your animal would walk. If you’re an elephant, use your arm as a trunk. Giraffes, stretch your neck out and hold your head up high. Birds, flap your Wings to the music.


“People Who Love Me” List (paper; pen or pencil) Sit down with your toddler and make a list of all the people who love her. (Parents should limit the time spent on this project because, after all, doesn’t everyone love our children? This list could take hours!) When you’re finished, frame the list or have it laminated, then hang it in her bedroom. Have her refer to the list whenever she feels blue.


No-Bake Banana Crunch Cookies (bananas; graham crackers; Ziploc baggie; butter knife; rolling pin) Place 3 or 4 graham crackers into the baggie, and gently crush the pieces with a rolling pin. Peel a banana, and then slice it into small circles. Drop the banana circles into the bag and shake, coating each slice with crumbs. This simple treat is sure to become a favorite!


Yummy Finger Painting (package of instant vanilla pudding; food coloring; muffin pan; spoon; paper plates) Prepare the pudding as directed on the package. Once it’s ready, spoon the pudding into a clean muffin pan. Add drops of different food coloring to each (mix 2 different colors to make wilder colors). Stir each until the color is consistent. Now, “paint” yourself silly on the paper plates. Yummy!


Sun Spots (blueprint paper, available at office supply stores; small objects such as leaves, flowers, buttons, rubber bands, keys, etc.; clipboard; lots of sunshine) First, attach a piece of blueprint paper to the clipboard. Place a collection of small objects onto the paper. Leave space between objects when arranging. Set the clipboard and its contents outside in direct sunlight for several minutes. Bring your project inside and remove all of the objects. Beautiful artwork compliments of the sun!


Sheet Murals (white bed sheet or pillow case; tempera paint; squirt bottles such as a clean ketchup or mustard container, or clean spray bottle; water) Hang your canvas (sheet or pillow case) on a clothesline. Fill the squirt bottles with water and just enough paint to color the water and not clog the spray. Shake well to mix. Now stand a few feet away from the sheet and spray your art! *Note: If you’re doing this project indoors, be sure to put down a sheet of plastic to protect the floors.


Colored Ice (plastic ice tray; water; different colors of food coloring; freezer) Fill the ice tray with water. Add a few drops of food coloring to each square, and then freeze. This may help children who don’t drink enough water. Add a few cubes of colored ice to their bath water for even more fun!


Make an Album. Get a small photo album (the 4″ x 6″ plastic booklets from the photo store are perfect), and gather individual snapshots of all the people you want to include. Put the photo on the right, and on the left insert a 4″ x 6″ index card with a word or two identifying that person (Grandma, Uncle George, and so on). Kids love to look at pictures, and it will also help your child remember who’s who.


Mail Love Notes. Create postcards from 4″ x 6″ index cards. Have your child draw or paint a picture on one side, then turn it over and ask her to dictate a message for you to write. Add the address and a stamp, and you’re sure to brighten someone’s day.


Plant a Paper Garden. It’s not quite spring yet, but it’s never too early for flowers. Using pinking shears or other decorative scissors, cut tulip-shaped blossoms out of brightly colored construction paper, then tape onto a drinking straw. Set bouquets in vases around the house.


Plan a Color Day. Once a week, dedicate the day to a color. On blue day, dress your little one in a blue shirt. At breakfast, add a drop of blue food coloring to pancakes or scrambled eggs and your child’s morning cup of milk. Go for a walk, and point out all the blue things you see while outside-a blue mailbox, a blue house, a blue bird. It’s a great way for kids to learn their colors, and it gives organization to the day.


Build a House. Call your hardware store, and ask if you can have a large appliance box. After you cut out a door and some windows, make curtains out of fabric scraps, draw or paint pictures to hang on the walls, and put a throw rug inside for a carpet. You can also attach boxes of different sizes to create a mansion.


Make Wind Chimes. String beads, bells, and other noise-making objects onto thin strands of yarn or fishing line. Tie these onto an embroidery hoop or a wire hanger twisted into a circle, with the strings spaced closely enough so the objects strike each other and make music when the breeze blows. Hang the chimes on your porch or in a tree, and listen for the soothing sounds.


Feed the Birds. Get a couple of bird feeders and a birdbath (a pie tin is just fine) that can be seen from your window. With your child, set out water and birdseed, then plop down on some cushions by the window to see which feathered friends drop in for dinner and a spa treatment. For more tips on bird-watching, log on to www.birdsource.org.


Write a Book. Make an “I can” book with your toddler. Have her cut out pictures of things she can do (get dressed, ride a trike, brush her teeth) from magazines and glue them onto sheets of construction paper. Make holes with a three-hole punch, and bind pages with ribbon or yarn. Variation: Have her dictate a story and draw pictures to go with it, then bind as above.


Rock On. Make your own instruments, and have a concert. Let your imagination run wild: For a great sound, put crunchy cereal between two aluminum pie plates stapled together, shake rice in an old film canister, make a drum out of an empty cardboard oatmeal container (use a wooden spoon for a drum-stick), or fashion a kazoo by wrapping a comb in waxed paper.


Host a Teddy-Bear Picnic. Have your child draw invitations and send them to the guests. Prepare cocoa, tiny sandwiches, and a dessert of pound cake cut into shapes. Cover a small table with a cloth, and assemble the lucky partygoers.

Tags:

  • Digg
  • Del.icio.us
  • StumbleUpon
  • Reddit
  • Twitter
  • RSS
read comments

Natural Halloween Craft: Black Bean and Lentil Wreath


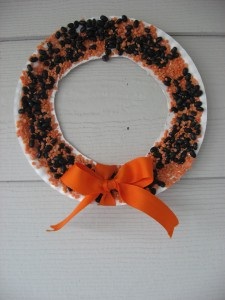
halloween wreath

I love wreaths, they are the perfect way to decorate and although I made a Halloween Wreath last week I wanted to share how my son  got in on the fun too. We actually made this one weeks ago. This Halloween craft was fun for both of us I love the organic look to it. If you don’t have a paper plate to use any cardboard cut into a circle will do!

Gather your materials. You will need dried black beans, dried orange lentils, a paper plate, orange ribbon, white glue, bowls to mix , a spoon and scissors.

Start by having your child mix the black beans and orange lentils. It was at this point that I got the idea for this sensory tub. My son loved this step.  While they play with the beans and lentils add glue, lots and lots of glue.  Add the beans and lentils. It was hard getting photos of this because I was helping him drizzle them on.   Keep going until all the glue is covered. Let dry – I popped it outside in the sun to dry faster! When it’s all dry cut out the middle.  Shake off any loose lentils and beans.  Add an orange ribbon.  Hang up !


Tags:

  • Digg
  • Del.icio.us
  • StumbleUpon
  • Reddit
  • Twitter
  • RSS
read comments
 Page 71 of 103  « First  ... « 69  70  71  72  73 » ...  Last »