Vacation Memories: Collection Connection

Kids love to collect stuff, especially when they’re on vacation. Here are some great ways to organize and display their treasures.


Map It Out


Remember vacation destinations by retracing your steps.


p_BHG123909 

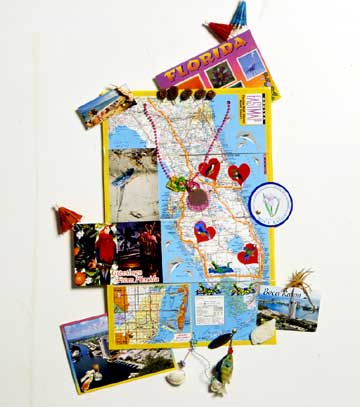
Purchase a laminated map of your travel destination. Draw your route on the map with puff paint. Attach souvenirs. Tape or glue postcards to the map; attach heavier items with brass fasteners, or punch holes in the map and hang items with paper clips or string.


Fun in a Frame


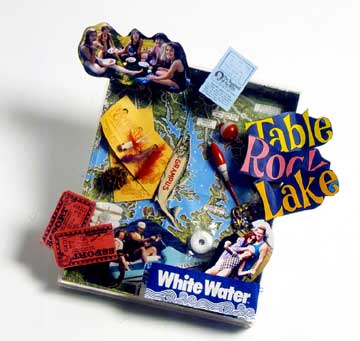
Remake your travel location by collecting memories in a frame


p_BHG123908 

Purchase a clear plastic box frame. Remove the lid. For a background, glue a map of your travel location to the inside of the frame. Add souvenirs such as ticket stubs, postcards, and photographs, then replace the lid and attach more items to the outside. Hang your collection on a wall or place it on a desk.


Kit and Caboodle


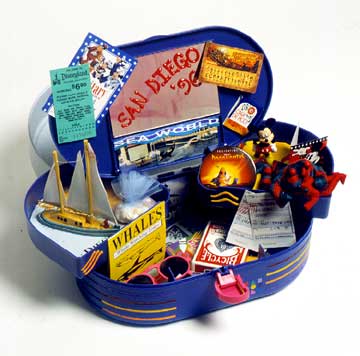
Bring vacations wherever you go with this crafty carrying case. 


 p_BHG123910

Before your trip, purchase a plastic carrying case. As you travel, place all your great collectible items in it. When you get home, open it and arrange your souvenirs on the shelves and in the bins of the case. Make it your own by decorating with puff paint

Tags:

  • Digg
  • Del.icio.us
  • StumbleUpon
  • Reddit
  • Twitter
  • RSS
read comments

Glowing Flowers


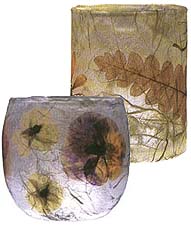
When you press flowers and leaves, they become thinner and light can shine through them. In this project, you simply decoupage pressed flowers and leaves to a votive cup and cover with tissue paper.


Pressed Leaves or Flowers

Votive Cup

Tissue Paper

Decoupage Solution

Foam Brushes


votive_nature2


Tear off the straight edges from a sheet of tissue paper, then tear the paper into small pieces. Brush the outside of the votive cup with decoupage solution. Arrange pressed flowers and leaves all around the glass. Brush on more glue and lay the pieces of paper on the glass, overlapping the edges. Keep adding paper and glue until the entire glass is covered.


Tags:

  • Digg
  • Del.icio.us
  • StumbleUpon
  • Reddit
  • Twitter
  • RSS
read comments

Sandpaper Pointillism

Paper

Sand Paper

Crayons

Iron


Kids are always eager to draw pictures. They know firsthand the pleasure of putting crayon to paper (and to an occasional wall or two) to express what’s in their imagination. Enhance your children’s natural creativity and love of art by offering them new experiences using basic art supplies and unexpected items to challenge and surprise – in this case, crayons in bright colors and sandpaper out of the toolbox.


The texture of the sandpaper will create a beautiful picture made up of tiny dots that resemble pointillism, a painting technique used by postimpressionist painter Georges Seurat. He used thousands of dots of color that you can see up close but that blend into an image when you step back, away from the painting.


Try these steps to create a wonderful piece of pointillist-like art in seconds. What’s the magic ingredient? A dot, your kids might say? Uh-uh. An iron! Here’s how:


Pick out an array of bright crayons. Vibrant blues, greens, purples and reds are great.


Create a drawing on a sheet of medium-grain sandpaper, pressing very hard as you color. Designs that use blocks of color rather than thick lines work best here. Again, press hard as you fill in the shapes with your crayons.


When you’re done, turn the sandpaper over on top of a plain, white piece of drawing or construction paper. An adult should heat up an iron on low temperature and then iron the backside of the sandpaper.


Pass it over the back evenly and slowly for 15 to 20 seconds. Remove iron.


Count to 20 with your kids, and then slowly pick up the sandpaper to reveal the picture on the paper in dot form. There it is. Sandpaper pointillism! Never mind French postimpressionists for the moment. You’ll have your own very “impressive” artist in residence.


Encourage your child to look closely to see the dots, then step away and discover how they blend together. Note how crayon melted on the sandpaper, too, providing a “two for one” art project.


Sea Creature Activity: Cut out the sand paper creatures in the shape of various sea creatures. Let the kids color the sea creatures (The more times they go over an area or harder they press the better). Then put the sand paper face first on another piece of paper. Go over the paper with a warm Iron. This will create a neat picture on the paper.

Tags:

  • Digg
  • Del.icio.us
  • StumbleUpon
  • Reddit
  • Twitter
  • RSS
read comments

Writing Milestones (toddler)

toddler_milestone_writingYou can support your toddler’s writing development by having materials available. Keeping materials for writing and drawing handy will encourage your toddler to draw and “write.” Children take pride in their work and like to have their attempts acknowledged by parents or caregivers


Drawing is a complex task, but it helps toddlers become writers. Drawing involves grasping a crayon or marker, holding the paper so it doesn’t move, and applying just the right amount of pressure with the marker–all at the same time. As toddlers develop and practice these skills, they become better writers and drawers.


Toddlers develop the control in their hands needed in order to use writing tools. By 18 months, many children are able to hold a marker and scribble on paper. Some toddlers are able to make a few letters such as “X” or “O” by the time they are 3 years old. At first, they may make these letters purely by accident, though.


Older toddlers like to use “writing” in their play. Using chalk, crayons, markers, and pencils, toddlers mimic how they have seen adults use writing in their lives. For example, your toddler might pretend to be a police officer “writing” traffic tickets or a mommy stuffiing her purse with notes on the way to the grocery store.


Older toddlers become aware that written symbols, such as letters or pictures, represent real objects. This awareness lays the foundation for them to become not only writers, but readers as well. In order to read and write, your toddler must first understand that letters stand for sounds and that groups of letters together stand for words.

Keep crayons and other drawing tools in easy reach. This will encourage your child to use these tools to scribble on paper. These pictures, squiggles, and lines are the beginnings of your child’s writing. At the same time, your child will learn that she can communicate ideas through pictures or symbols.

Provide opportunities for your toddler to develop the physical skills needed for writing. In order for children to be able to control tools like pencils and markers, they must develop motor coordination in their hands. Encouraging your child to stack blocks, pick up toys, finger paint, and roll playdough shapes will help develop these necessary fine-motor skills.


Introduce your toddler to her written first name. As toddlers realize they are individuals, their names take on special meaning. Many toddlers develop an awareness of the letters in their name, especially the very special first letter. Call attention to the letters in your toddler’s name and take the opportunity to point out those letters as they appear on signs, in books, or on labels in the supermarket. As you load groceries into your cart at the market, you can say, “Look, it says ‘macaroni.’ Macaroni starts with ‘M,’ like your name–Matty.”


 Respond to the intended meaning of your toddler’s marks on paper. Younger toddlers may tell you a line is a dragon. Older toddlers may proudly tell you, “This says ‘I love you’” as they point to squiggles on the page. Whatever your child draws, or no matter how readable it is, make sure to respond to the meaning of the writing. Display you toddler’s work to instill a sense of pride.

Tags:

  • Digg
  • Del.icio.us
  • StumbleUpon
  • Reddit
  • Twitter
  • RSS
read comments

Ready to Read

These engaging activities help build the foundation for reading.


• Storybooks
• Books with rhymes


1. Take a picture walk. Before they can read words, young children use picture cues to retell stories. Invite your toddler to describe what is happening in the illustrations of a favorite book. Ask lots of questions to hone his observation skills.


2. Make time to rhyme. Distinguishing sounds is an important component of literacy development. Reread a rhyming book a few times so that he can listen to the sound patterns and rhythm of the story. Encourage him to chime in as he learns the story, and to clap when the words rhyme.

3. Extend or create a story. This activity encourages creativity, language skills, and such important literary skills as developing a beginning, middle, and end of a story. Read a book and invite him to make up his own story about the main character, create a sequel to the story, or make up his own ending. You can also encourage him to make his own book by drawing a few illustrations. 

• builds vocabulary
• strengthens pre-reading skills
• encourages oral language development

Tags:

  • Digg
  • Del.icio.us
  • StumbleUpon
  • Reddit
  • Twitter
  • RSS
read comments

Stained-Glass Hearts


  • Crayons (light and bright colors work best)
  • Handheld pencil sharpener
  • Waxed paper
  • Large paper grocery bags
  • Ironing board and iron
  • Scissors
  • Permanent marker

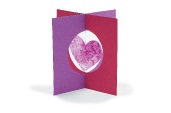
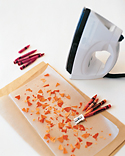
Peel the paper off the crayons. Use a pencil sharpener to shave them over a large sheet of waxed paper, spreading the shavings thinly and leaving a wide blank border around the edges of the paper. Place a flattened paper bag on your ironing board, then set the crayon-covered waxed paper on top of it. Cover the shavings with a second piece of waxed paper and then another flattened bag. Heat the iron on the medium or wool setting, then slowly and evenly press the surface of the top bag (a parent’s job). Continue ironing until the crayon shavings are evenly melted (peek under the bag to check). Once the waxed paper is cool, your child can cut out a bunch of hearts. If he opts for larger hearts, he can use a permanent marker to print greetings directly on them. Smaller confetti-style hearts are great for filling store-bought cards. For an extra-special surprise, hang a stained-glass heart in a simple stand-up frame. standcardTo make one, cut two 4-inch squares out of colored card stock. Cut matching 2 ¼-inch-wide circles from the centers of the squares and discard them. Now cut ½-inch notches in each square . Fit the squares together so that the notches interlock, as shown, and use thread and tape to hang a heart in the opening.
Tags:

  • Digg
  • Del.icio.us
  • StumbleUpon
  • Reddit
  • Twitter
  • RSS
read comments

Robobuddy


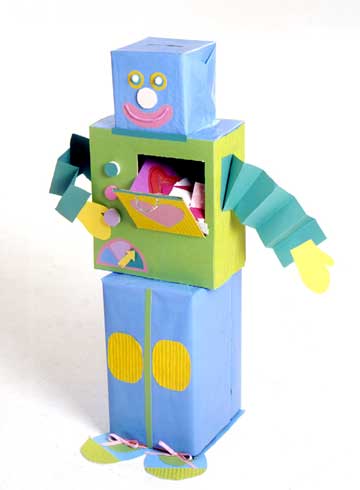
Robobuddy can be both a new friend and a place to keep valentines cards.


p_BHG137389


3 cardboard boxes

Wrapping paper

1 sheet of foam core

Packing tape

Hot-glue gun

Colored paper

1 brad fastener for gauge arrow

Ribbon pieces for laces

2 chenille stems

2 pom-poms

3 plastic lids


Find a small box for your robot’s head, a medium-sized box for the body, and a long, tall box for the legs. Adult: Make an opening on top of the medium box the size of the small box. With the two remaining flaps open, turn the box over and place it on top of the medium box. To make the body door, ask an adult to cut three sides of a square in the medium-sized box. Poke holes in door and attach chenille stems for handle. Also have an adult cut a card slot in top of the head. Cover the head and leg boxes with wrapping paper. Cover the body box with colored paper. Hot-glue the body box to the leg box. From the foam core, cut out the shoes, as shown in photo. Hot-glue the leg box to the shoes. Cut two long strips of colored paper. Accordion-fold them to create arms. Hot-glue the arms to either side of the medium box. Cut out hands and glue to arms. Decorate robot with lids, pom-pom eyes, colored paper gauges, and other details.

Tags:

  • Digg
  • Del.icio.us
  • StumbleUpon
  • Reddit
  • Twitter
  • RSS
read comments

Crayon Hearts

gt076_crayheart01_l


If the sun seems to peer right into your window, give it something pretty to look at—and through. These translucent hanging hearts are easy to make from waxed paper and crayons. In return, sunbeams will color your room with cheer. Begin with a 12-by-16-inch sheet of waxed paper. Fold it in half along its length; unfold. Deposit wax-crayon shavings (made with a handheld pencil sharpener) evenly but not thickly across one half of the paper. Fold the clean half of the paper over the shavings. Crimp the three open edges with a 1/2-inch fold to hold the shavings. Protect your ironing surface with kraft paper. Place the waxed paper on the kraft paper, and cover it with another sheet of kraft paper. Iron lightly on medium heat, checking after every few passes. Stop when all the shavings have melted; let cool.

gt076_crayheart02_m


Next, trace and cut out hearts of various sizes. String each heart with a silk thread for hanging.


gt076_crayheart03_m

Tags:

  • Digg
  • Del.icio.us
  • StumbleUpon
  • Reddit
  • Twitter
  • RSS
read comments
 Page 68 of 103  « First  ... « 66  67  68  69  70 » ...  Last »