Sparkle Paintings


Can you see the painting glisten?


flour
salt
water
food coloring (optional)
small bowls
brushes
cardboard or heavy construction paper

Start by pointing out to your toddler things that sparkle. Mix equal parts of flour, salt, and water. If desired, add food coloring.  Use brushes to paint the substance on cardboard or construction paper. Let the painting dry. Can you see it sparkle? The salt gives the picture a glistening quality.

Learning benefits:
• enhances creativity
• supports observation skills

Tags:

  • Digg
  • Del.icio.us
  • StumbleUpon
  • Reddit
  • Twitter
  • RSS
read comments

Choosing Books for Your Children

Ultimately, we parents are the ones who decide what is best for our child to read/listen to when it comes to books. We consider the story, it’s themes, message, and content. We want to be sure our child is not only listening to/reading a well written (or illustrated in some cases) book, but one that matches our child’s reading ability and comprehension skills. That’s why I love Scholastic (Yet another company that I love, that is not a sponsor). They have thought through every aspect of the literary experience for your child. Scholastic has put together a few pointers on helping you choose the right book for your child at their appropriate age level. Below, you will find some helpful tips for 2-5 year olds (check the Scholastic website for tips with older children):


From Scholastic.com


At age 2 and 3, children may:


  • be preoccupied with “good” and “bad” behavior and expect happy story outcomes
  • seek comfort and reassurance through stories
  • prefer stories with simple plots and no digressions


At age 4, children may:


  • be attracted to separation/reunion stories
  • prefer stories about forgiveness for transgressions
  • recognize the basic emotions in story characters: mad, sad, and glad
  • have a growing appreciation of incongruity due to a better grasp of real and pretend
  • invent stories that are action-packed chains of events with little unifying theme


At age 5, children may:


  • begin, with guidance, to consider underlying reasons for a character’s behavior
  • be better able to recognize more subtle emotions in characters (for example, disappointment, confusion, frustration, embarrassment, and panic), even though they may not have the vocabulary for them
  • gradually realize that a character’s actions and intentions could be contradictory
  • respond to stories that show triumph over adversity

Tags:

  • Digg
  • Del.icio.us
  • StumbleUpon
  • Reddit
  • Twitter
  • RSS
read comments

Ten Ways to Encourage an “Attitude of Grattitude”


1. Using a piece of poster board, create a “Things We are Thankful For” chart. Each night, over dinner or before bed (or whatever time works for you), recap your day/week and discuss things you are thankful for.


2. Take your child to serve at a homeless shelter/mission. Before, during, and after, talk with your little ones about why it’s important to help others. Seeing what others are going through reminds us how blessed we are to have even a little. This both promotes compassion and gratitude.


3. Lead by example. Tell your children why you are thankful for them. Tell them all the time. Your children will never get tired of hearing how thankful you are for them.


4. Refresher Course in Manners. This may seem obvious, but remind your child to say their “Please and Thank You’s” Teaching them at a very early age provides a foundation that can later be built upon when the “Why” stage hits.


5. Make a Thanks and Giving Tree. (As seen at Chocolate On My Cranium). This is another great “Things I Am Thankful For” tool.


6. Help your child to write thank you notes to their school teachers, friends, relatives and coaches and other important people in their lives. This not only encourages thankfulness, it also teaches them to share it with others. “Just Because” cards are wonderful too!


7. Make the most of teachable moments. When I worked at Gymboree Play and Music as a play teacher, we often talked about paying attention to those “teachable moments” or the moments with your children when there might be a lessoned to be learned. So, for instance, when you are with your little one and a stranger opens the door for you at a store, say “That was very kind of the man to open the door for us.” If there’s time, encourage them to say thank you.


8. Pray. (I understand that if you do not believe in God or even a “higher power” this may not apply to you. As for me, and my household, we serve the Lord and this suggestion is based on that premise).Take a minute to explain to your child that God is the ultimate Giver and we are grateful to Him for the gift of His Son and all the blessings we receive, and that it is because of Him that we are able to give to others.


9. Donate items to a charitable organization or a needy family (or person). Have your child choose the items him(her)self and be present when giving. This is another way to remind them to be grateful what they already own and instead of perhaps buying something, they can give out of what they have. This is also a good lesson in sacrifice.


10. Write it out, Keep a Journal. Keep a “Things I am Thankful For” or “Attitude of Gratitude” Journal. This way your child can look back and be reminded of past blessings as well as present. (Incidentally, this helped me a few years ago when I was battling depression.)

Tags:

  • Digg
  • Del.icio.us
  • StumbleUpon
  • Reddit
  • Twitter
  • RSS
read comments

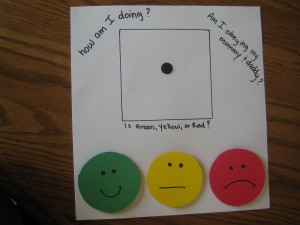
Behavior Chart

Here’s a simple discipline tool you can use with your little one. Create a simple chart using the supplies listed below.


Ask your child, in the morning, what kind of day they want to have: Green=Happy (obedient), Yellow=So-So (warning), Red=Sad (disobedient).


When they tell you “Happy”(assuming they will), place the green happy face in the square. During your day, as your child is either being obedient, or needs a warning, etc. you place the appropriate circle in the square.


2008-9-03_002


Now, I realize this may not work for all children. Some could care less about circles and happy faces. However, there are those children for whom this project works like a charm and would do “anything” not to get a red sad face in their square. You can also adapt this idea, by associating a reward or discipline with each happy or sad faces. Ideally, every child should start and end their day with a happy smiling face, both on and off the chart, but this is not always the case in real life. Just a tool I thought I would pass along to you to help you along life’s journey with children!


~Small white poster board,

~Construction paper/cardstock in red, yellow, green,

~Black sharpie

~Velcro dots (adhere to undersides of circles)

Tags:

  • Digg
  • Del.icio.us
  • StumbleUpon
  • Reddit
  • Twitter
  • RSS
read comments

Sand Painting


sand
glue
cardboard
empty salt or oatmeal container
tape

Prepare by poking holes in one end of an empty salt or oatmeal container. Fill with sand, and seal up the opposite end with tape. Use glue to make a design on the cardboard. This could involve geometric shapes, pictures (such as a house), or simple patterns. Help your toddler shake sand onto the cardboard. After the glue is covered, pick up the cardboard, and shake off the excess glue. After the glue dries, discuss the shapes with your child. What can she find? Straight lines? Circles?

Learning benefits:
• develops fine-motor skills
• enhances creativity
• supports language development

Tags:

  • Digg
  • Del.icio.us
  • StumbleUpon
  • Reddit
  • Twitter
  • RSS
read comments

Shape Stamps – Circles


Help your child round up circular items and create art with them.


picture book about circles
paper plates or construction paper
tempera paint
paint tray
round objects
newspapers
old shirt or smock

Share a picture book about circles with your child, such as Round and Round and Round by Tana Hoban. Use your fingers to trace the round objects in the photos. Go exploring! See what kinds of round things you can find in the house to make paint prints with — spray-can tops, container lids, corks, paper or plastic cups, bottle tops, straws, and so on. (Make sure all the objects you pick are too large for your child to swallow.) Take turns tracing your fingers around the edges of the objects. Put out the supplies you’ll need to make round prints: paper plates or construction paper cut in large circles, tempera paint poured into trays, the round print makers, and a smock or old shirt. Then cover the table with newspaper.  Invite your toddler to press the round print makers into the paint and then on the plates or paper. Talk about the round shapes that appear on the paper. When the paint is dry, trace your fingers around the circles your child created.

Learning benefits:
• teaches shape recognition (circles)
• builds eye-hand coordination

Tags:

  • Digg
  • Del.icio.us
  • StumbleUpon
  • Reddit
  • Twitter
  • RSS
read comments

The Rhyming Book Game

magazine or catalog with appealing pictures
children’s safety scissors
glue stick
stapler
drawing paper
marker
 
Tell your child that the two of you will play a game to create a rhyming-word book. Ask him to staple together several sheets of paper. He can make a cover for the book with crayons or markers. Give your child an appealing magazine or catalog. Ask him to cut out a picture for each page of the book and glue it on the paper. Help him write the object’s name under the picture. Turn to the first page of the book to begin the game. Roll the die to determine how many rhyming words must be written under each picture. The rhyming words can be real or silly words. For instance, if there is a picture of a book, you can write “look,” “hook,” “nook,” “plook,” and so on.  Continue taking turns and playing the game until all the pages have been filled. Remember: The rhyme book can be completed over a period of time. When you have filled all the pages, your child will enjoy going back and reading his rhymes.


What your child will learn:
• focusing on rhyming sounds in words
• engaging in playful word games
• strengthening writing skills
• recognizing words and word families

Tags:

  • Digg
  • Del.icio.us
  • StumbleUpon
  • Reddit
  • Twitter
  • RSS
read comments

Rub-a-dub Read


Create a special book for bath time.


airtight sandwich bags
scissors
needle and thread
family photographs
several sheets of construction paper cut to fit inside the sandwich bags
crayon or marker

Show your toddler some family photographs and help him name the people and objects in each shot. (You can also cut out interesting pictures from catalogs or magazines that depict things used at bath time.) Glue the pictures he likes best onto sheets of construction paper (precut to fit into an airtight sandwich bag). Demonstrate how to insert the pictures back-to-back (to create two-sided pages) into the bags and assist your child while he completes the task. He can make a cover for the book with a precut sheet of paper and crayons. Print his name on the book’s cover, naming each letter as you write, and then put this sheet into a bag. Your toddler will enjoy learning how to zip close each plastic bag. Explain that you will sew the bags together to make a book that he can look at in the bathtub. Using sturdy thread and a small needle, sew along the inner side of the zip lock. Now the book will be watertight and ready for your child to enjoy at bath time.  You can use colorful wrapping paper or fabric scraps, interesting pictures, or small objects to create more bath time books for your toddler. Consider creating theme books such as “things we wear,” “animals,” “transportation,” “food,” “toys,” or “bedtime.”

Learning benefits:
• labeling and identifying objects
• strengthening eye-hand coordination
• developing fine-motor skills

Tags:

  • Digg
  • Del.icio.us
  • StumbleUpon
  • Reddit
  • Twitter
  • RSS
read comments
 Page 47 of 103  « First  ... « 45  46  47  48  49 » ...  Last »